I’m back from the comic shop this week and I got six new comics.
Check them all out here:
I’m back from the comic shop this week and I got six new comics.
Check them all out here:
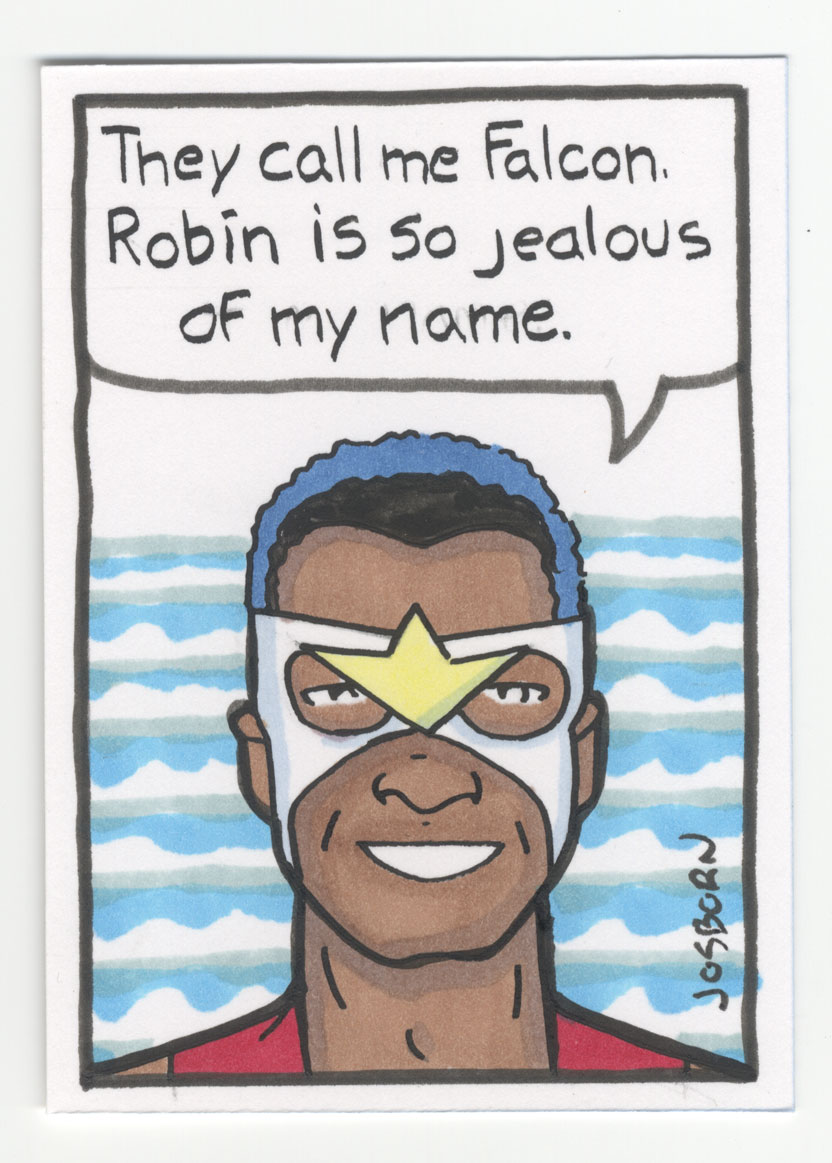
This week I’ve been making some more art cards. Baseball card sized drawings. Ones of my cartoon art card variety. Those are a drawing of a person with a word balloon above them and an amusing saying lettered in the balloon ( at least I aim for amusing). Except instead of my usual drawings of made up faces I decided to draw some super heroes. Mostly Marvel super heroes but a few DC ones too.
I’ve found it takes me a remarkably long time to draw a super hero head. With my own cartoon art cards there are very few rules. I grab a pencil and draw whatever comes to mind. Sometimes I even skip the pencil and go right to ink. Since I’m filmed myself drawing some of those cards I know they take me about 15 minutes to draw, ink, letter, and color one of those. But super hero illustrations take much longer.
When I make a drawing of Captain America the number one thing I have to get right is that it looks like Captain America. His face has to be the right shape, his mask has to be the right mask, and all the other details have to be correct. People who look at it have to immediately recognize the drawing as Captain America or I’ve failed. Not to mention that a lot artists have made good drawings of Cap so I don’t want to make a bad one. People know what bad ones look like so I want to stay out of that lane.
So the first thing I do is grab a pencil and start to draw the face. An oval for a head, then I gesture in the placement of the eyes, nose, and mouth. After that I sketch in the details of the costume and then slowly bring the drawing along until I have a finished face. With my own random faces this pencilling proves takes about two minutes. When trying to draw a specific super hero this process is more like ten minutes. Or even a few more if I don’t get it right the first time.
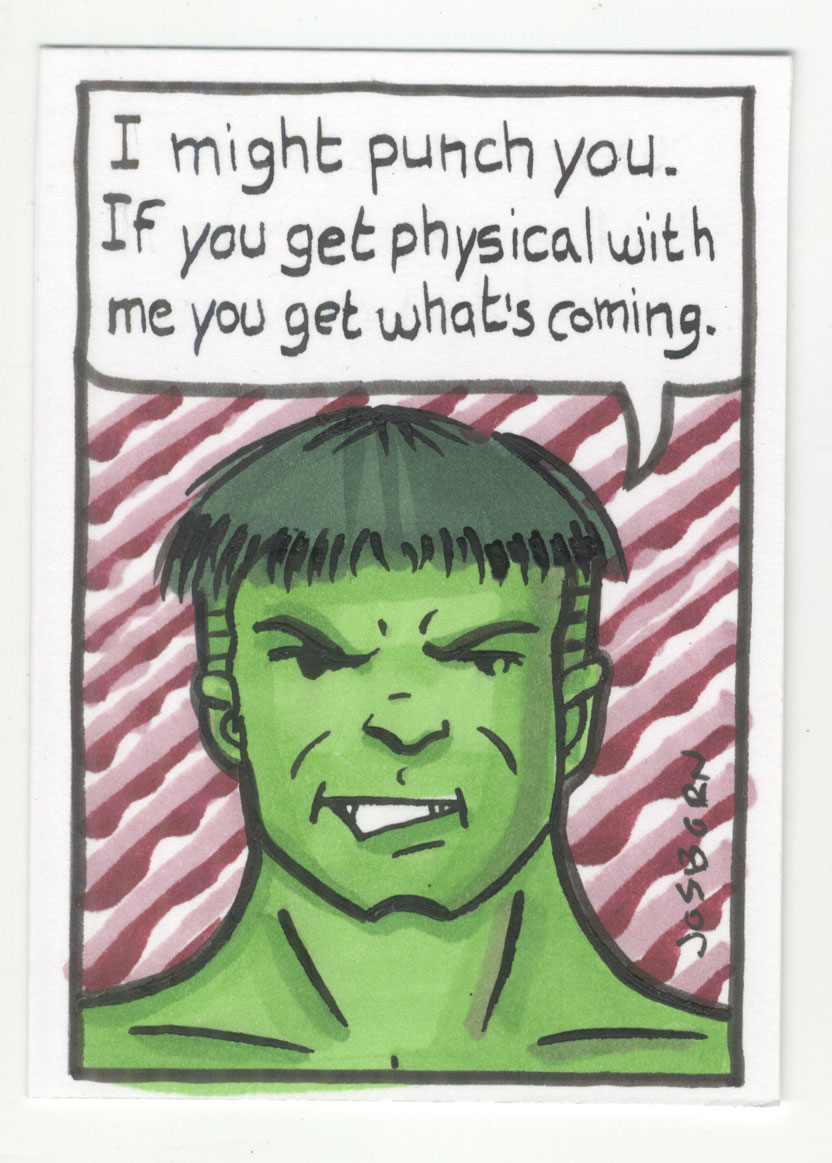
I also have to find reference for all these superhero faces. That takes time. Not a lot but another few minutes a drawing at least. I have to decide on a character and then, either online or in one of my digital reference books, look for a drawing of that character’s head. There is not always a good one available so I have to dig a bit. So now just pencilling a head take just as long as making a finished cartoon art card of my own design. It can be a little frustration.
One thing I did do with the pencils is I scanned them in. In order to try and save some time I can now print out the pencils and ink over them if I want to make another card of the same character. I even erased the mouths on the pencil drawings so I could draw a new expression on the character’s face to keep it fresh and have the character match what he or she is saying in the word balloon. It would be nuts to draw a card of Batman over and over since they would all generally be similar anyway so this will say me some time.
The next step is inking the drawings. I found this step tricky. The drawings are really small. For most of my own cartoon art card drawings I inked them with a sign pen (a cheap marker) refilled with India ink. I did the same with some of the superhero cards but I found I didn’t like the results. It was a little too thick lined for this style. I tried using a brush and various art markers but didn’t like any of them. The brush was also a little too thick lined and sometimes the black ink of the markers smeared when I added the color markers on top off them. That’s a problem with markers.
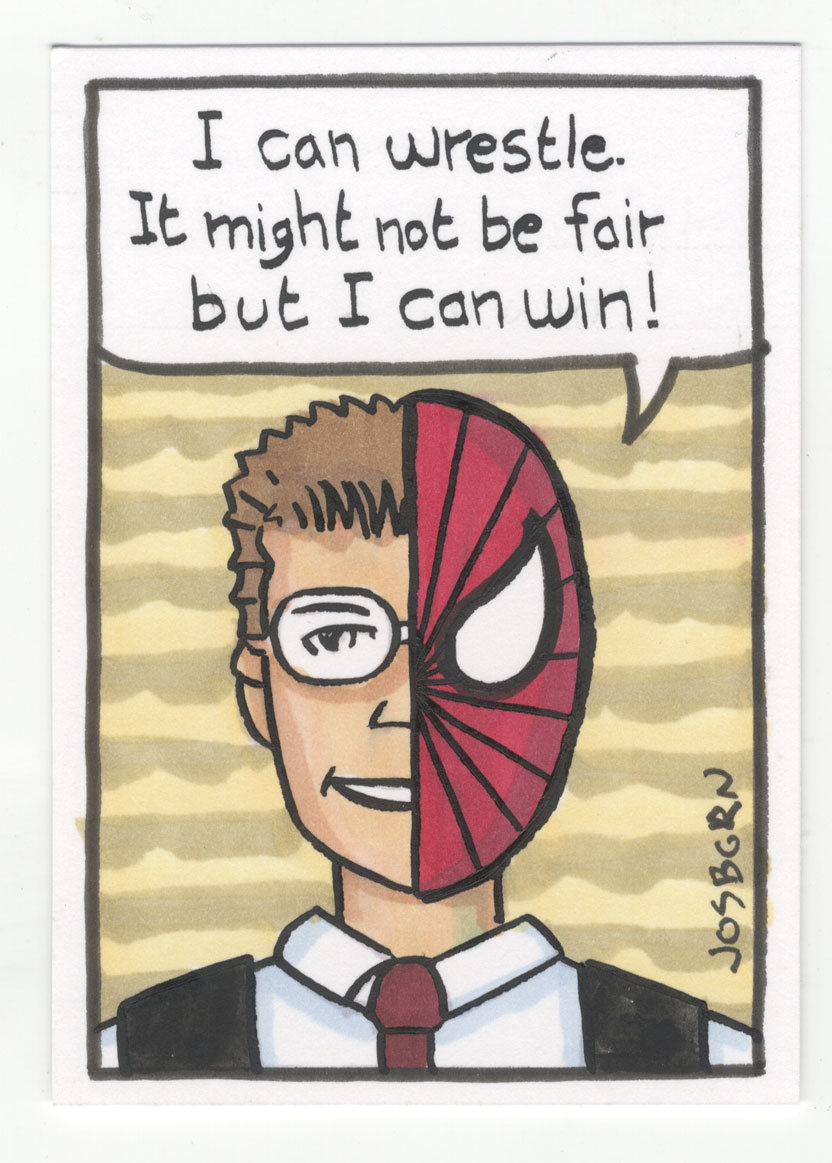
I ended up using a technique I’ve seem other inkers use but I never have before. I started with a dip pen and India ink. Most inkers use a Hunt 102 to ink with. It’s a solid pen with a bit of flexibility to it so they can vary the weight of the ink line. Instead I used a Hunt 107 which has almost no flexibility to it. It puts down a solid single weight line. I inked the whole face with a single weight line figuring I’d add in some line weight after the color.
The good thing about using India ink is that it won’t smear into the color markers. So after I had my single line weight down I added color to the drawings with the markers. Once again I had to pay attention to my reference to make sure I got the color right. This takes more time. The one good thing about these drawings taking more time is that as I was working in the various stages ideas for the writing would pop into my head. So there wasn’t really a writing step as with my own cartoon art cards. That step would happen as I was in the middle of other steps.
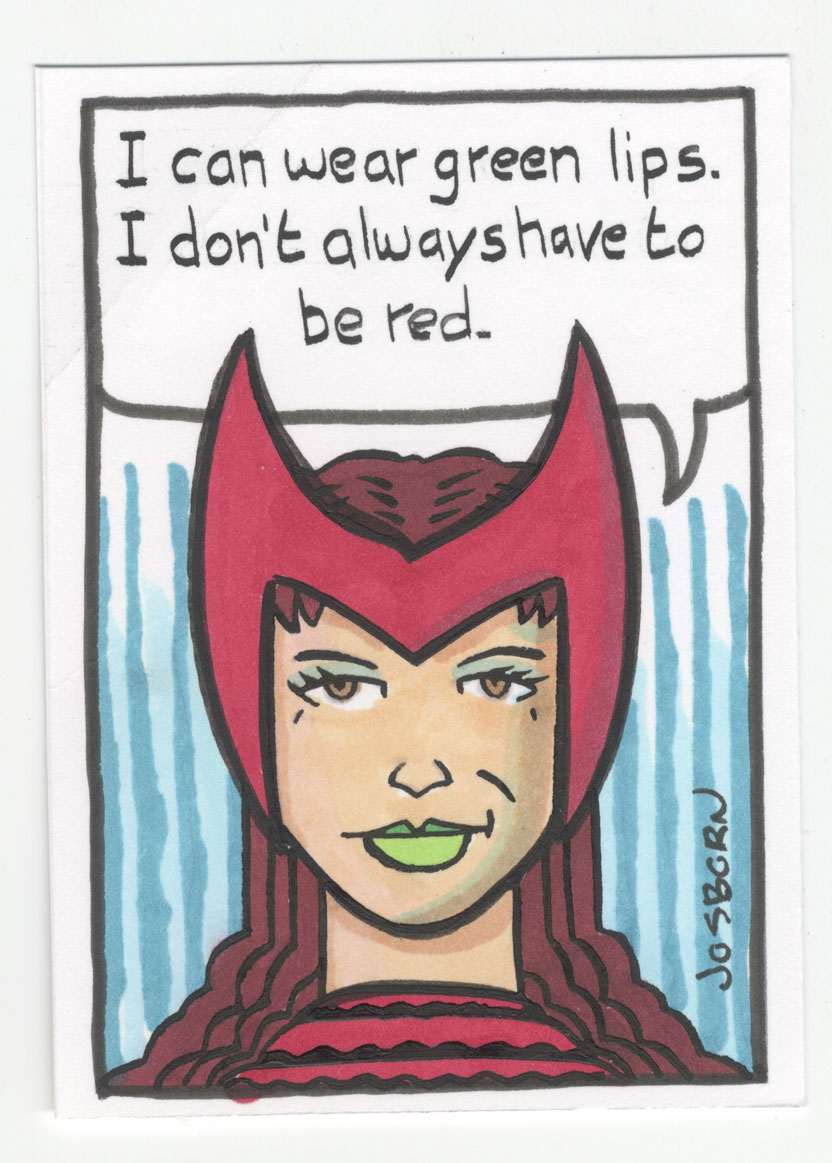
After the color was in I went back to add to the black line. I used a brush and India ink to thicken up some lines and generally get the drawing to look like I wanted it to. I tried to not overdo things and leave some of the thin lines in there. I’m used to working in all brush so this took some trial and error to get the look I wanted. I instinctively wanted to overwhelm the thin ink line so I had to restrain myself.
After I finished pencilling, inking, coloring, and writing the cards the last step was lettering. It was usually after the pencil stage that I would pencil lettering guide lines into the word balloons. That way if an idea popped into my head I could write it in pencil directly in the balloon. When the lettering stage came around I would letter the words in ink.

I’ve been using a .5mm black art marker for my lettering in recent years but I’ve never been happy with it. So for some of the art cards I decided to go old school and use a filed Hunt 107 for my lettering. A filed Hunt 107 is different than a normal one in that the letterer (in this case me) uses a piece of wet/dry fine grit sandpaper to file the point of the pen into a angled line. That way using the side of the point you can get thicks and thins into the lettering. It’s much trickier than using a marker but I like the results.
In the end I liked the way the cards came out and put some of them up on Ebay. For $12 you can have one of your own.
I’m back from the comic shop this week and I got four new comics.
Check them all out here:

It’s time for the post-party blues again. Every year I throw a backyard barbecue for a bunch of friends. Usually somewhere from around 30 to 40 people show up and we all have a good time. I don’t have much to say about the party except that it’s fun.
The party doesn’t cause me much stress either. For anyone who has ever thrown a party that’s a big deal. If you’ve never thrown a party then let me tell you that they can be stressful. You worry about things going right and you worry about people who can’t make it. But I’ve been throwing this BBQ every year since 1991 so I’ve learned to let things go. If we run out of stuff someone will go to the store to get it. If someone can’t show up that’s okay. Enjoy the people who are at the party and don’t sweat those who couldn’t make it. Also let people help you. They want to.
The post-party blues happen after the party is over. Of course they do. That’s what “Post” means. Not right after the party though. Since the BBQ is on a Saturday that means that there is still probably a bit of cleanup the next day on Sunday. There are things to do. Often a few people stay overnight too. So the next morning there is breakfast and hanging out. That takes most of the morning so it’s not until the afternoon that everyone is gone.
This year I had something to do on Sunday afternoon. Usually I do nothing since I’m too tired and can’t concentrate. I sometimes spend that Sunday afternoon watching TV, a movie, or some such which is an unusual event for me since I don’t normally watch a movie in the afternoon. Not even a Sunday afternoon. I don’t know why but it’s just not my habit.
This Sunday afternoon I had some old photos to scan. Two of my party guests were old friends from my Marvel Comics days. Actually more than two were my old Marvel friends but these two brought old Marvel photographs. We all worked in the Marvel Bullpen in the 1990s. The photos were mostly of a couple of Holiday parties and a couple of Halloweens. I took a bunch of photos back in those days too but I’m always happy to add to the collection so my friends left the photos with me to scan in.
I have both a photo scanner and a negative scanner. Negatives give you a better quality but photos are easier to scan. I mention that because these were all photos and I want to set the stage. Scanning negatives can be real work but scanning photos can just be a task. A task is something I really don’t have to think about. It’s mindless repetition. It might not be totally mindless when it comes to scanning photos but it’s mindless adjacent.
So there I was on Sunday afternoon. I put three 4×6 inch photos at a time on the scanner, made sure they’re straight, closed the lid, previewed the photos in the scanner software, selected each photo individually, and then hit the scan button and waited five minutes. Repeat this about 40 times and you have 120 photos scanned. So that’s what I did all Sunday afternoon and into the evening. Sometimes getting lost in a task is like meditation. My mind is at peace as I run through the steps. It mostly kept the post party blues away.
That evening I decided to watch a movie. Avengers: Endgame. It was three hours long. It was a good movie and took me to bedtime when my tired self fell asleep. All in all the post-party blues didn’t affect me much on Sunday. Then Monday came.
We all get the Monday blues. It’s the back-to-the-grind day. I don’t have to explain that to anyone. I’ve been putting together my “Four Talking Boxes” comic strips on Monday mornings just so I can start my week out with something expected. After that I tried to get some art work done but nothing was happening. I was too distracted by the post-party blues creeping in. It also didn’t help that I was waiting on a phone call about some work and the phone call never came. That was an extra distraction from getting anything done.
I hadn’t finished scanning in all the photos yet but wasn’t planning on doing anymore that Monday. I really wanted to do something creative to shake of the doldrums but nothing creative was coming out of me. I had about 60 photos left to scan and so decided to tackle them. That took me a few hours but never in those few hours did I reach the peaceful meditative state of the day before. Instead I had to grind it out.
Grinding out scans is a lot different state of mind. Instead of the repetition soothing me I become aware of it. I have to make the conscious decision to keep going with every task. Instead of my hands doing the work without my mind being very involved I have to think about every step. It’s really annoying and slows things down.
As I’ve written about before scanning in old photos has it’s own type of ennui that can come along with it. Plus these were photos of parties. The post-party blues are how I describe the feeling of sadness after a party. That feeling hits me as I realize that every day isn’t a party. I had a lot of fun at the party so how come there isn’t another party the next day? Of course we all know we can’t have a party everyday but that logical answer doesn’t help when you’ve got the post party blues. Scanning in photos of parties past doesn’t seem to help much either.
So there I was with the post-party blues, scanning in photos from parties past, and waiting on a phone call that never came. That’s a recipe for sadness if I’ve ever heard one. Do you know what shook me out of my doldrums? I had small family party to go to that Monday night. A little hair of the dog.
I’m back from the comic shop this week and I got four new comics.
Check them all out here:

Here is a bike riding update for you. I’m still out there riding my usual route to get some exercise and fresh air but my bike could use a little repair these days. My bike is ten years old this year and that’s ten years of Spring, Summer, Fall, and Winter riding. The nice sunny Summer days are easy on the bike but the cold and wet ones are tough on the bike. Winter road grime gets everywhere.
I repair my own bike and am good at keeping it in riding shape. Just recently I had some chain slippage and knew I had to check my gear cassette. Chain slippage happen when either the chain gets worn out and stretched or the gears get worn down to points instead of being flat on top. Chain slippage is really not fun. It happens when you’re pedaling, especially when pedaling hard, and the chain suddenly slips forward a few inches. The chain isn’t catching on the rear gear cassette properly.
I think this is the third gear cassette I’ve bought for this bike. The original one and then three others. It’s easy enough for me to put on. It takes a couple of special tools and some effort but it’s not hard to do. It’s the adjustments afterwards that get tricky. The rear derailleur is what needs to be adjusted. That’s the part of the bike that moves the chain from gear to gear when you shift the gearshift lever.
My rear derailleur has seen better days. Its gears are wearing down and so are its setting screws. Those are the two little screws on it that adjust how far up or down the derailleur can go. The road grime has gotten to them and they’re worn down and tough to turn. I wish I could just replace those little screws but I can’t find them. Oh, well.
After I adjusted my rear derailleur my bike was working fine except I was getting some chain rub on the front derailleur of all things. I didn’t even touch that one. Chain rub is when the chain is rubbing against the metal side piece of the derailleur. That shouldn’t happen and makes for a rougher ride. I set out to adjust it but couldn’t get it to stop. I went to look on the internet to see if it had any answers. It did.
It turns out that there is a tension knob on the derailleur cable that’s used to stop chain rub. Somehow in ten years I never knew this and never really paid attention to the knob. The way cables work on a bike is that they attach on one end to the gearshift lever/brakes on the handle bars, get run along the frame where they pass though mounted holes that keep them in place, and attach at the other end to a derailleur or brake as the case may be. One of these mounted holes on the frame has a small half inch plastic knob attached to it. This is the cable tension knob.
Ideally that knob moves the whole derailleur over fractions of an inch to get rid of chain rub. Turn the knob two turns to the left and the derailleur moves over an eighth of an inch and it doesn’t rub on the side of the derailleur guide piece. Unfortunately ten years of riding have frozen that knob in place.
The knob itself is plastic. It also has a spring in it so you have to pull up on the knob and then turn it. The bolt that’s in the threaded hole is metal. So I pulled on the plastic knob, tried to turn it, but it did nothing. The metal is rusted in place. I tried using WD40 to lubricate the metal but that didn’t help.
I could also feel the plastic knob start to crumble a bit under the pressure. I decided to get the pliers out and try to use them on the knob. I figured I might as well try that before the knob crumbled entirely. It didn’t work. The knob kept crumbling and nothing turned. So then I crumbled the knob off on purpose to try and turn the metal bolt part itself. Then the metal started to crumble too. I admitted defeat and walked away.
Now I have to track down a new cable tension knob and bolt. I found something similar on the internet but still haven’t ordered it yet. The bike is still working fine and is ridable with a little bit of chain rub so I fear I’ll mess it up more if I try to replace the bolt. That thing is rusted in and I’m not even sure if I could get it out. I may make things worse rather than make things better.
The rest of the bike is okay though. The chain slippage is gone and that’s the most important thing. A bike is unrideable if there is chain slippage. I also patched a bunch of tire tubes. I’m always getting flat tires so it’s no surprise that I have to patch tubes but I somehow let them build up. I got a flat one day and when I got home to patch the punctured tube I noticed I had two more punctured tubes that I never fixed.
One of the tubes had a new hole right next to a patch and the second tube already had four patches on it. I imagine that I was frustrated with the tubes when they went flat and didn’t want to bother to fix them since they had both been fixed before. But now, months later, I wasn’t frustrated with them any more so I figured I’d patch them. I was patching one anyway so why not three? It all went okay. I must have been worried about putting one patch so close to another on that one tube but it held up just fine. And that five patch one did too. Maybe that’s one too many patches but we’ll see. It’s all fine for now.
I’m back from the comic shop this week and I got eight new comics.
Check them all out here:
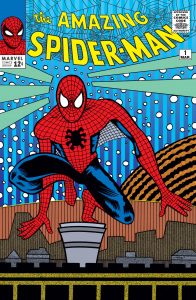
A failure rate of 50% is no fun. That’s my lesson for today. That was my failure rate for making my True Believers Amazing Spider-Man #1 alternate covers. I was making an edition of twenty of them and it took me thirty printouts to make those twenty copies. That’s not good.
Besides the time and talent it takes to make the art for my own alternate covers it takes a lot of time to make the physical end copies. I’m taking a comic book the already exists and am wrapping a new cover around it. It’s not a thing that many people do, and I do sometimes, but I thought I’d make an art project out of it.
When I was looking for some inkjet paper to print on I found this nice 165 pound double sided 11×17 paper on Amazon made by Koala. I decided to give it a try since it was a nice heavy paper and had 100 sheets in the box at a good price. I ended up liking it when it arrived and the fact that I could print on both sides meant that I could print the finished art on the outside cover and the pencil drawings on the inside cover. That was pretty cool.
First of all I have to set up the digital files for printing. That meant cover 1 on the right and cover 4 on the left. Of course the correct size was important. I was going to print the covers, cut them to size, and then fold them around the comic. It was important that the final digital file was the exact correct size. I measured the original comic precisely but it still took four tries at printing different size test pieces to get it exactly right.
I set up the second digital file of the inside covers (covers 3 and 4) slightly larger than the front cover file. Since I was printing on both sides of the paper I knew they weren’t going to line up exactly every time so I give myself some extra bleed on the inside front covers that I could trim off and never come up short on art. I also put a black line down the center of this file so I’d have a reference line for where to fold the paper. This came in very handy.
So I printed out the front covers on 11×17 inch paper, flipped the paper over, and printed out the inside covers on the back. When that was done I took the paper over to my drawing table to cut it down to size. I printed a back box around the front cover art so I’d be able to easily line up the edge with my metal ruler. I find this makes things easier. I run an X-Acto knife (number 11 blade) along the metal straight edge to cut off the excess paper. After I do that I fold the paper.
I recently got a bone folder (not made of bone but made of plastic) to help me fold stuff. It looks like a plastic knife that I run along a ruler to compress the paper to give me a place to make a fold. So I line up my metal ruler along the black center line I printed on the inside covers and then run the edge of the bone folder along the ruler while pressing down. I then grab my burnisher ( a flat piece of plastic) and while holding the ruler in place fold the paper along the line I just pressed in with the bone folder. It’s basically just folding a piece of paper in half but more precisely than it’s usually done. The bone folder makes things more precise than the edge of the paper clip I was using before. The bone folder was well worth the six dollars I spent on it.
I have to prepare the comic by removing its staples. I open the comic book to the center fold and use needle nose pliers to grab one end of the staple and straighten it out. Once both ends of the staple are no longer folded I flip the book over to the spine side and pull the staples out. That’s easy. Getting the staples back in is a little bit harder. But first I have to poke holes into the folded print that I made.
I separate the comic book cover from the rest of the comic and nestle it inside of my new alternate cover. That way I can take a pencil and mark where the staples should go. I put the tip of the pencil through the holes in the original cover and mark where the holes are on my new alternate cover. Then I remove the original cover and use a pushpin to make holes in my alternate cover right where the pencil marks are. First I make holes with just the tip of the pushpin but then I flip the book over and make the holes a little bigger by pushing the shaft of the pushpin through the hole from the outside in. This gives me a little more leeway to work with.
The next step is to wrap the original cover around the interior pages , wrap the new alternate cover around them, and put the staple back in place. Since everything doesn’t always want to line up again I found using a straight pin helps. I put straight pin through one of the staple holes rather than a staple. I find it’s easier to do this and then the second staple hole is lined up and ready for the staple to be replaced. So it’s straight pin, first side of a staple, remove the straight pin, put in the second side of the staple, then flip the book over and bend the staple back down. Do this twice and the book is back together.
So where did my failure rate come from? The printing process. The first day I made fifteen of the twenty book but didn’t notice that four of them were bad. They had light lines through the black areas. Scratches of some sort. Thew were perfectly straight and parallel I knew they were coming from the printing process. I’m not 100% positive but I think they were coming from when I flipped the paper over to print on the backside and there wasn’t a second sheet of paper in the printer the original print was being dragged over something in the paper holder that was scratching it. It was either that or the paper was flawed to begin with. Either way putting a second piece of paper in the printer made it not happen anymore.
So off my edition of twenty I got fifteen done the first day (they take about 20 minutes a piece to print and bind) only to have to redo four of them the next day. I got the final five plus the four redos all done the second day. Things would go wrong though. Sometimes I’d print something out, it would be fine, and then somehow I’d scratch it in the folding and binding process. I ended up with ten printouts that I couldn’t use. Plus test printouts from earlier on. But they were necessary and not part of the failure rate. It’s that 50% failure rate that bothers me. I’ve got to get that down or time will not be on my side.
I’m back from the comic shop this week and I got four new comics.
Check them all out here:

“The Walking Dead” comic book is over. It was a complete surprise to us readers but the day before issue 193 come out Robert Kirkman announced that number 193 would be the last issue. I did not see that coming. It has been on my pull list (the comics I subscribe to at my local comic shop) for 16 years so I’ve gotten used to it being there every month, year after year. It being gone has put it in my head to write down exactly what is on my pull list these days. Though I pick up and make a video of what comics I get every week I still wasn’t sure exactly what was on my list. So I went back over my “Comics I Bought This Week” posts to make a complete list.
What is on my Pull List?
The Savage Dragon – Another comic that’s been on my list for a long time. I was actually late to the Savage Dragon and the first issue I put on my pull list was around issue 71. According to the internet that one came out in the year 2000. Eric Larsen has been writing and drawing The Savage Dragon since 1993 (I went and bought the back issues eventually) so I’ve been around for 20 of its 27 years. That’s a long time. The Savage Dragon is a super hero and he does super heroic stuff. That’s my recap of the series.
Criminal – I buy whatever series Sean Phillips and Ed Brubaker are doing and this is the current one. Fatale, Sleeper, Incognito, The Fade Out, and Kill or Be Killed I bought them all. They are one of my favorite teams in comics so I’m on board. This comic is about criminals committing crimes.
The Wicked + The Divine – I’ve been buying this one since it started back in 2014 and it’s about to end with issue 45 (I think issue 42 was the last one to come out). It’s about a bunch of gods who live again every 90 years or so. The catch is that they only live for two years and then die again. Drama ensues. It’s been a fun book with a slick fashion and music influenced look.
Monstress – This one is a fantasy book filled with strange not quite human creatures. There are some human ones in there too but we mostly stick with the more magical types. A talking cat, a little fox girl, and an angry teenager with a monster stuck in her. There is lots of intrigue and politics too as some people work towards war and some try to prevent it. The art is very lush and filled with little fantasy decorative bits. Good stuff.
Outcast – The second book on this list that’s coming to an end soon. I think it’s ending at issue 44 and issue 41 was the last one out. It’s a horror story about demon-like creatures slowly invading a small town. The art is dark and moody.
The Beauty – This book is all over the place in terms of content. The concept is that there is an STD going that makes people beautiful so some people were even catching it on purpose. Now its’ about four years later and people are starting to die from it. It’s had many story arcs since it began (issue 27 just came out) and they’re all a bit different from each outer. We’ve had a conspiracy story, a slice of life story, a tale of criminals, police stories, and a cops and robbers team up story. I find the art only so-so but I enjoy the variety of approaches.
Cerebus in Hell – A collection of Dave Sim’s “Cerebus in Hell” web comic strips. Each month we get a new first issue concept and number of Cerebus. He’s literally in hell after he died and there are jokes about it. Sim can’t draw anymore due to pain in his wrist so he cuts and pastes Cerebus drawings and old prints from the 1800s. I find it amusing.
The Actual Roger – An all ages comic about a kid superhero sidekick from Alterna Comics. They’re the company that puts out $1.50 comics. I picked up the first issue on a whim and enjoyed it. It’s a five issue mini-series.
East of West – This one has been going since 2013 and they’re up to issue 41. It’s all about the end of the world happening. It takes place in the USA on a world with an alternate history so it’s not really the USA. Politics, violence, and monster abound. I’ve also read that they are making it into a TV show.
Little Bird – A five issue mini-series that has one more issue left. It’s the art that drew me to this one. It’s a semi-real fantasy story with art that has a lot of bulging shapes and texture to it. The story has a lot of dream-like elements and I’ve enjoyed that. The single issues have a higher page count than normal and that’s cool too.
Paper Girls – This too just got a TV show to be made about it. It’s about 1980s paper girls and time travel. I don’t think I could explain it more than that. It only has one issue left. It’s been a solid series.
The Life and Death of Toyo Harada – A mini-series from Valiant comics that continues (or maybe ends?) the story of the villain Toyo Harada that began in “Harbinger” and continued in “The Imperium.” I’ve enjoyed the story of the man who thinks he’s a hero and just might be but the world will have none of it. Writer Joshua Dysart has been the constant with this story.
Kaijumax – This one has been a series of mini-series about giant monsters who are in prison. They stomped on too many towns and got locked up for it. Each six issue series is called a “Season” and season four just wrapped up. I’m not sure when or if there is going to be a Season Five but if there is it’ll be on my pull list.
Snotgirl – This is the book I never thought I’d like. It’s the story of a fashion blogger. It’s full of romance and drama that’s all a bit weird. I think it’s the “Bit weird” part that appeals to me.
The Goon – Eric Powell is back to his signature creation and we get more stories about the Goon. He’s a big guy who rights wrongs in his strange 1930s-esque world. He usually rights them with his fists. It’s a world filled with magic, monsters, and gangsters.
Gogor – A new series from Ken Garing. He’s put out a couple of mini-series that I’ve liked so I gave this one a try. I was hooked after the first issue. It’s a fantasy story that takes place on a series of islands in the sky. Some bad guys are trying to take over and a kid at a school has to run away and wake the monster Gogor. He does and now he and Gogor are on a quest. I’m there with them.
Five Years – Terry Moore unites all of his various series from over the years in this one. The protagonists from “Rachel Rising,” “Strangers in Paradise,” “Echo,” and “Motorgirl” join forces to prevent the end of the world. They have five years to get it done hence the name of the book. I’m down with any Terry Moore comic.
Birthright – This fantasy comic has been going since 2014 and it’s on issue 37. A family from Earth has to fight magical people and creatures from another world. Lots of action and well drawn art.
Hashtag: Danger – A new series drawn by Chris Giarusso about a team of adventurers out to save the world. It’s a tongue-in-cheek comic with lots of adventure and jokes in it. Chris Giarusso has been doing all-ages comics for years but this one is more adult. It’s got curse words in it!
Stray Bullets – This one has been on my pull list since about 1998. It’s a black and white crime comic by David Lapham. There have been a few different volumes and subtitles but they’re all really good. I think the current series “Stray Bullets: Sunshine and Roses” is coming to an end soon but hopefully they’ll be another after that one.
Usagi Yojimbo – What can I say about Stan Sakai’s “Rabbit Bodyguard” that hasn’t been said before? It’s been on my pull list since 1986. It just relaunched with a new publisher and a new first issue. It’s also in color for the first time so jump on and enjoy a master cartoonist at his craft.
Ghost Tree – A four issue mini-series about a Japanese man who sees ghosts. I find it very poignant and moving. It has very nice art too. Only one issue left of it.
Uber: Invasion – This is the second “Uber” series and the first I’ve picked up. It takes place in a world where super heroes were invented at the end of World War Two. Thus the war is prolonged and it delves into how exactly super people would be used in a war situation. Politics, war, and super powers make for some good drama.
Reaver – I just bought issue one of this and then put it on my pull list. It’s a fantasy story that reads like a Dungeon and Dragons adventure. A party of fantasy types has to go on a quest.