I’m back from the comic shop this week and I got nine new comics.
Check them all out here:
I’m back from the comic shop this week and I got nine new comics.
Check them all out here:

What’s old is new again. Or in other words I bought a whole bunch of new tubes of gouache. I just checked and it was back in 2020 that I wrote about getting back into gouache again.(Gouache Blog). I took a day and re-wet all the tubes and cubbies I had that were filled with gouache. I thought I would get going again and paint some pieces but I only ended up starting one thing and then abandoning it.
Gouache is an opaque watercolor and if it dries out it can be re-wet and used again. But I had a problem with the gouache that I kept in little plastic containers (cubbies). Sometimes the gouache in the cubbies would dry into little chips on the side of the container. Some of those tiny chips would no longer dissolve in water. So my smooth gouache paint wasn’t smooth anymore. When I attempted to make a new gouache painting in 2020 this frustrated me and I gave up on it.
In the end I decided that I needed some new tubes of gouache. The problem was that paint is expensive and gouache never seemed to make it to the top of my art supply list. I always had to get other things first. This month (October 2022) I finally pulled the trigger on some new tubes of gouache.
I ended up getting twenty two new tubes of paint and that cost me about $150. Gouache goes for around $7 to $14 a tube but I think I got only one $14 tube. I also bought a base set of ten tubes that was a little cheaper than if I bought the tubes individually.
I got a tube each of Black, White, Flame Red, Primary Red, Spectrum Red, Orange Lake Deep, Orange Lake Light, Cadmium Free Orange (this was the $14 tube), Permanent Yellow Deep, Primary Yellow, Lemon Yellow, Yellow Ochre, Permanent Green Deep, Permanent Green Middle, Permanent Green Light, Primary Blue, Intense Blue, Prussian Blue, Ultramarine, Winsor Violet, Brilliant Purple, and Brilliant Violet.
Whenever buying a basic set of any kind of color paint or markers I try to start with three shades of each color. Red, yellow, blue, green, orange, and purple. I tend to buy extra blues to cover the blue-indigo-violet part of the spectrum. I have to add in browns eventually too. But I still have all my gouache paints in the cubbies and not all of them have paint chips in them so some are still good. I’ll find out which over time.
After I ordered the paint I searched for a couple of old pallets since I didn’t want to put the paint in cubbies. Most watercolor pallets are plastic and have half globe depressions in them to hold the paint. I bought a couple of such pallets back in the early 1990s except they were ceramic. I eventually found them in the back of a cabinet but they weren’t clean. They had old gouache still in the wells. I remembered that the last time I used them they were really hard to clean so, at that time, I just left them.
This time I was determined to clean them so, at first, I soaked them in water for a while. Since gouache dissolves in water I thought this would do it. It got some of it out but not all. So then I soaked them in soap and water. This did a better job but still they weren’t clean. Plus the ceramic was white and the paint had stained it quite a bit. I decided to soak the pallets in bleach to try and get the stains out. This whole process took two or three days of soaking but in the end the pallets were looking good. There was still a little staining but that was okay.
Another thing I did as I was ordering the tubes of gouache was to see what watercolor paper I had. My favorite paper is 300lb paper but that stuff has gotten expensive. I used to get it in the 1990s and early 2000s for about $15 a 22×30 inch sheet but now that same sheet of paper costs $30. I have a few sheets left over but I hesitate to use them until I’m back up to speed with my gouache painting.
Turns out I do have a bunch of other types of watercolor paper lying around. Mostly it’s 140lb paper but a lot of it is already stained with color from when I was making watercolor backgrounds that I scanned in for digital work. I can now draw and paint on that color stained paper. Since gouache is opaque it’ll cover the background color where I need it too. That paper will come in handy.
When the gouache I ordered finally arrived the first thing I did was make swatches of it. I took a piece of 8×10 inch 90lb watercolor paper, drew some boxes on it, and then filled each box with a color. That way I know exactly what the paint in each tube looks like.
At the same time as the Winsor Newton gouache tubes I also ordered a set of “Graphite Watercolors.” Those are six watercolors that are graphite grey with hints of color in them. I ordered these to use with the gouache tubes so I swatched them too.
Among the pieces of watercolor paper I found while looking around my studio were some pieces that I started and never finished. One was a drawing that I had already transferred to 140lb watercolor paper. It was about 8×10 inches so I decided to start with that one. First I grabbed my color ink to outline the drawing and then I used the graphite watercolor to paint in the background. After that I broke out the gouache.
It was only then that I noticed that I neglected to buy any kind of skin tones with my new gouache set so I turned to my set of pan gouaches and used a skin tone from there. Despite having bought these new tubes of gouache that old pan set is still a favorite. I used a set just like it when I was first learning gouache and it was good then and is still good now.
It took me a lot longer than I thought it should have to finish the painting but I took it slow. It’s been a decade since I used gouache and it felt like it. In the end I like how it come out but I’m still not a hundred percent sure what I’m doing with the gouache. I guess we’ll have to see. But unlike in 2020 at least I did something.
I’m back from the comic shop this week and I got six new comics.
Check them all out here:

Well, I did it. I dropped $600 on a new film scanner. It’s a Plustek 8300i. The last film scanner I bought was my Minolta Dimage Scan III and I bought that one back in 2008. If that one were still working properly I wouldn’t have bought a new one but nothing lasts forever.
I first noticed my Minolta film scanner not working correctly earlier in the year. The scanner has a motor in it that moves the film holder. First you place the film in the film holder, then you place the film holder in the scanner, and then the scanner moves the film in place to scan a negative. If there are four negatives on the strip then the scanner moves the film holder to scan each negative in succession.
The problem I started having was the scanner no longer moved the negative holder correctly. It would scan the first negative perfectly, scan the second one a little off center, scan the third one even more off center, and by the time it came to the fourth negative on the strip it would only scan about half of it. A scan of a negative without the whole image in it is useless.
I had no idea if this was a hardware or software problem so I decided to download an older version of the scanner software I use (Vuescan). I installed the older version and it still did the same thing. The I decided to see if there was dust or dirt inside the scanner that was messing things up so I took a lot of screws out and looked inside. Everything looked dust free and everything seemed to be in place. Nothing loose or broken that I could see. So I put it back together and it still did the same thing. The scans were off.
I don’t use that dedicated slide and film scanner a ton so I decided to just ignore the problem for months. I scanned a slide or three on it and it was a struggle. This Friday I finally decided to spend the money on a new one. $600 is no small amount of money to me so it took me a while to come to the decision.
The new scanner is a Plustek 8300i. It’s the latest in their line of dedicated film scanners. I was also thinking about getting an old Nikon film scanner. A lot of people say that they were the best film scanners ever made but Nikon got out of the film scanning business about a decade ago. I would have to buy a used one and they go for about $600. In the end I didn’t want to spend that much money on a scanner that was at least ten years old if not older. If it was a hundred dollars I’d give it a shot but not for $600.
I got the scanner yesterday and it was easy to hook up. There is just a USB cord and a power cord. It also comes with basic Plustek scanning software and advanced scanning software called SilverFast. I was aware of SilverFast since it’s been around for a long time but I haven’t used it a lot.
My scanner came with a card that had my Silverfast serial number on it. I installed the SilverFast software which prompted me to go on the web, set up a SilverFast account, and verify my account. I did that. Guess what. There was no place to enter the serial number. Instead I needed an activation code. In fact the card I had was for Silverfast Ai Studio 9 and the website said that Silverfast no longer comes with a serial number. Then what was the serial number they gave me? All I could do was run the software in demo mode and email them. So I did. They haven’t got back to me yet.
I really wanted to give SilverFast a try but I’m not going to waste my time making scans with “Demo Mode” written across them. I went back to my go-to scanner software for the last 20 years. VueScan. I recommend VueScan highly. It drives just about every scanner out there and it’s easy to use and updated frequently. I want SilverFast to work since I paid for it but I don’t see it being better than VueScan.
The new scanner has about over twice the DPI of the old scanner. I think the old one was around 3000 DPI and the new one is 7200 DPI. When comparing scans of the same negative side by side there isn’t a lot of difference in quality. There is something with scanners called “Dynamic Range.” That’s a number from one to four that reflects how much detail a scanner can get out of a negative. The dynamic range of both scanners seems to be about the same. I can just blow the negative up bigger with the new scanner.
The new scanner doesn’t have a motor in it. Instead of the scanner itself drawing the film holder into the body of the scanner the film holder goes across the body of the scanner. And with no motor I have to push the film holder to the next negative. So it’s preview, scan, push, preview, scan, and so on. I find it strange that it doesn’t do it automatically. Of course the upside it that it can never put the negative in the wrong place like my old Minolta now does.
The best thing about my new scanner is the infrared cleaning. The scanner uses the infrared spectrum to clean any dust and scratches off the scan. It works well too. Last week I wrote about cleaning up scans but they’ll be far less of that with the new scanner.
The scanner is also a lot faster than my old one. It says it’s 38% faster than the 8200 model but compared to my twelve year old scanner it’s 500% faster. A scan takes one minute instead of five. The old one has some infrared cleaning on it too but it was not as good and really slow. It took seven minutes a scan with the cleaning on.
Update: Moments after writing this I decided to look even closer at the SilverFast card they sent me (it’s written in 13 languages). It turns out that there is a link written on the card that I had to go to in order to activate the software. The link that came with the software I installed brought me to the wrong place. If you just go to their website you will never find the link that’s on this card. Talk about making it hard to find! But at least Silverfast is working now.
I’m back from the comic shop this week and I got ten new comics.
Check them all out here:
I spent my Saturday this week cleaning up a couple of photo scans in Photoshop. Really one was a photo scan and the other was a negative scan. It amounts to about the same thing except I used two different scanners to get them onto the computer.
My Minolta film scanner is old. Somewhere around the year 2002 old. I write this in 2022 so that puts it at around twenty years old. Thanks to the scanner software VueScan I can still use it but it doesn’t work quite right all the time. The scanner uses a holder that I can put a strip of four or five negatives or slides in. The scanner then moves the holder to the appropriate spot to scan. Or it’s supposed to.
These days when I scan a strip of film it gets the first two in the correct spot but over or undershoots the last two or three. I have no idea why. I don’t know if it’s a software or a hardware problem. I tried an older version of Vuescan and it made no difference. I think it’s a hardware problem. I opened up the case on the scanner and blew the dust out (there was hardly any in there) but that made no difference.
Eventually I got on with scanning. Since I only had one negative to scan it came out fine. The scanner doesn’t overshoot the first one. The negative was one I bought off of eBay. Occasionally I look there and see what old fine art nude negatives are there for sale. I paid around ten dollars for this one. It’s a nude woman in some sort of net with flashing colors around her. It caught my eye and I thought I could make something out of it.
The second photo I was working on came in the mail form an old coworker. We worked together at Marvel Comics back in the 1990s. He had a nice group photo of a bunch of us who worked there. The photo was from September 1990. I asked him to send it to me so I could scan it in and he did. The version of it that he posted was a photo taken of the 4×6 inch photo with his phone. I knew a scan of it would be nicer.
The photo I scanned on one of my flatbed scanners. The Canoscan 8800F. This one scans negatives too but not as well as the dedicated film scanner. It also has a very high optical resolution which is really good for scanning photos. At first I scanned it at 1200 DPI but then I thought the better of it and scanned it at 2400 DPI too. That’s really overkill since 2400 DPI means that I could print the photo at 24×36 inch poster size and I’m not going to do that. But I have to return the photo when I’m done with it so why not make sure I have more DPI than I need? I’ve got the hard drive space for it.
Since the 2400 DPI scan was overkill I decided to clean up the 1200 DPI scan. By clean up I mean digitally remove all the dust and dirt that had accumulated on the 4×6 inch photo over the years. You can’t even see the dust and dirt on the photo with the naked eye but the blown up scan on the monitor makes it obvious.
There is scanner software that comes with new scanners that cleans up a lot of the dust specs but I don’t have that software. I’m not even sure how well it works. I used such software in the past and it only worked fair to middling. So I had to use the Photoshop spot healing brush. Tap on a digital dust speck and the tool makes it disappear and blend in. That has to be done speck by speck. There are usually hundreds of specks. So that’s how I cleaned the photo up.
After cleaning I went about figuring out how to make the photo scan look nicer. This meant duplicating the photo as other layers and using color correction tools, exposure tools, and layer styles on all those other layers. Then I blended them together. I even did an internet search to see if there were any new ideas out there on how to do this. I found at least one good idea I didn’t know about.
After almost getting the photo to where I wanted it I had an epiphany. Why was I working on the 1200 DPI version when I has a 2400 DPI version to work on? Sure 2400 DPI was overkill but if I ever needed that overkill I’d have to clean it up all over again. It’s easy to downsample something to get rid or resolution and hard to upsample and gain resolution (pointless even). So I decided to start over with the 2400 DPI version. I blame the lack of foresight on a sinus headache I had that day.
It took another hour or two to clean up the higher res version but eventually I got that one done too and finished it off. It came out nice and I posted it on Facebook. It was well received.
After doing that one I decided to clean up the negative I got from eBay. That one took even longer to clean. Negatives usually have more dust and scratches on them that printed photos do. This one had a lot. It was underexposed with pinholes of light all over the scan. It took some patience and persistence to clean up.
It also got me looking online at some new film scanners. Twenty years ago when I bought my dedicated film scanner there were three or four of them on the market by the big photo companies. Minolta made mine plus Nikon had one and there was a least one more that I can’t remember now. I think they’ve gotten out of the film scanner business because I only saw one new scanner made by a company called Plustek. It cost $550.
At least that was the only good one I saw. There are cheap $100 and under film scanners but those are made for people who just want to cheaply digitize old family photos. They’re not quite the artist quality that I want.
The Plustek one is the way to go for me but I don’t think I’ll be buying it anytime soon. It’s not like I have a pile of negatives to scan at the moment so I can wait. My Epson flatbed scanner can scan in film in a pinch anyway. I just don’t want to lose my ability to make high quality scans of film. It’s a good resource to have.
I’m back from the comic shop this week and I got five new comics.
Check them all out here:
Some tasks I like to do because they’ve a bit mindless. They usually have a right way to do them too. Take washing the dishes for example. The whole point of the task is to get the dishes clean. If the dishes aren’t clean in the end then you’ve failed. Black and white. Right and wrong.
When doing creative thing there is often no right or wrong. What makes one painting correct while another one is incorrect? That’s a question everyone who is making a painting asks themselves. Am I doing this right? Are my choices the correct choices? Should I do it differently? I am constantly asking myself such questions as I do creative stuff. I like the challenge of it but sometimes I also like to shelve that challenge and wash some dishes.
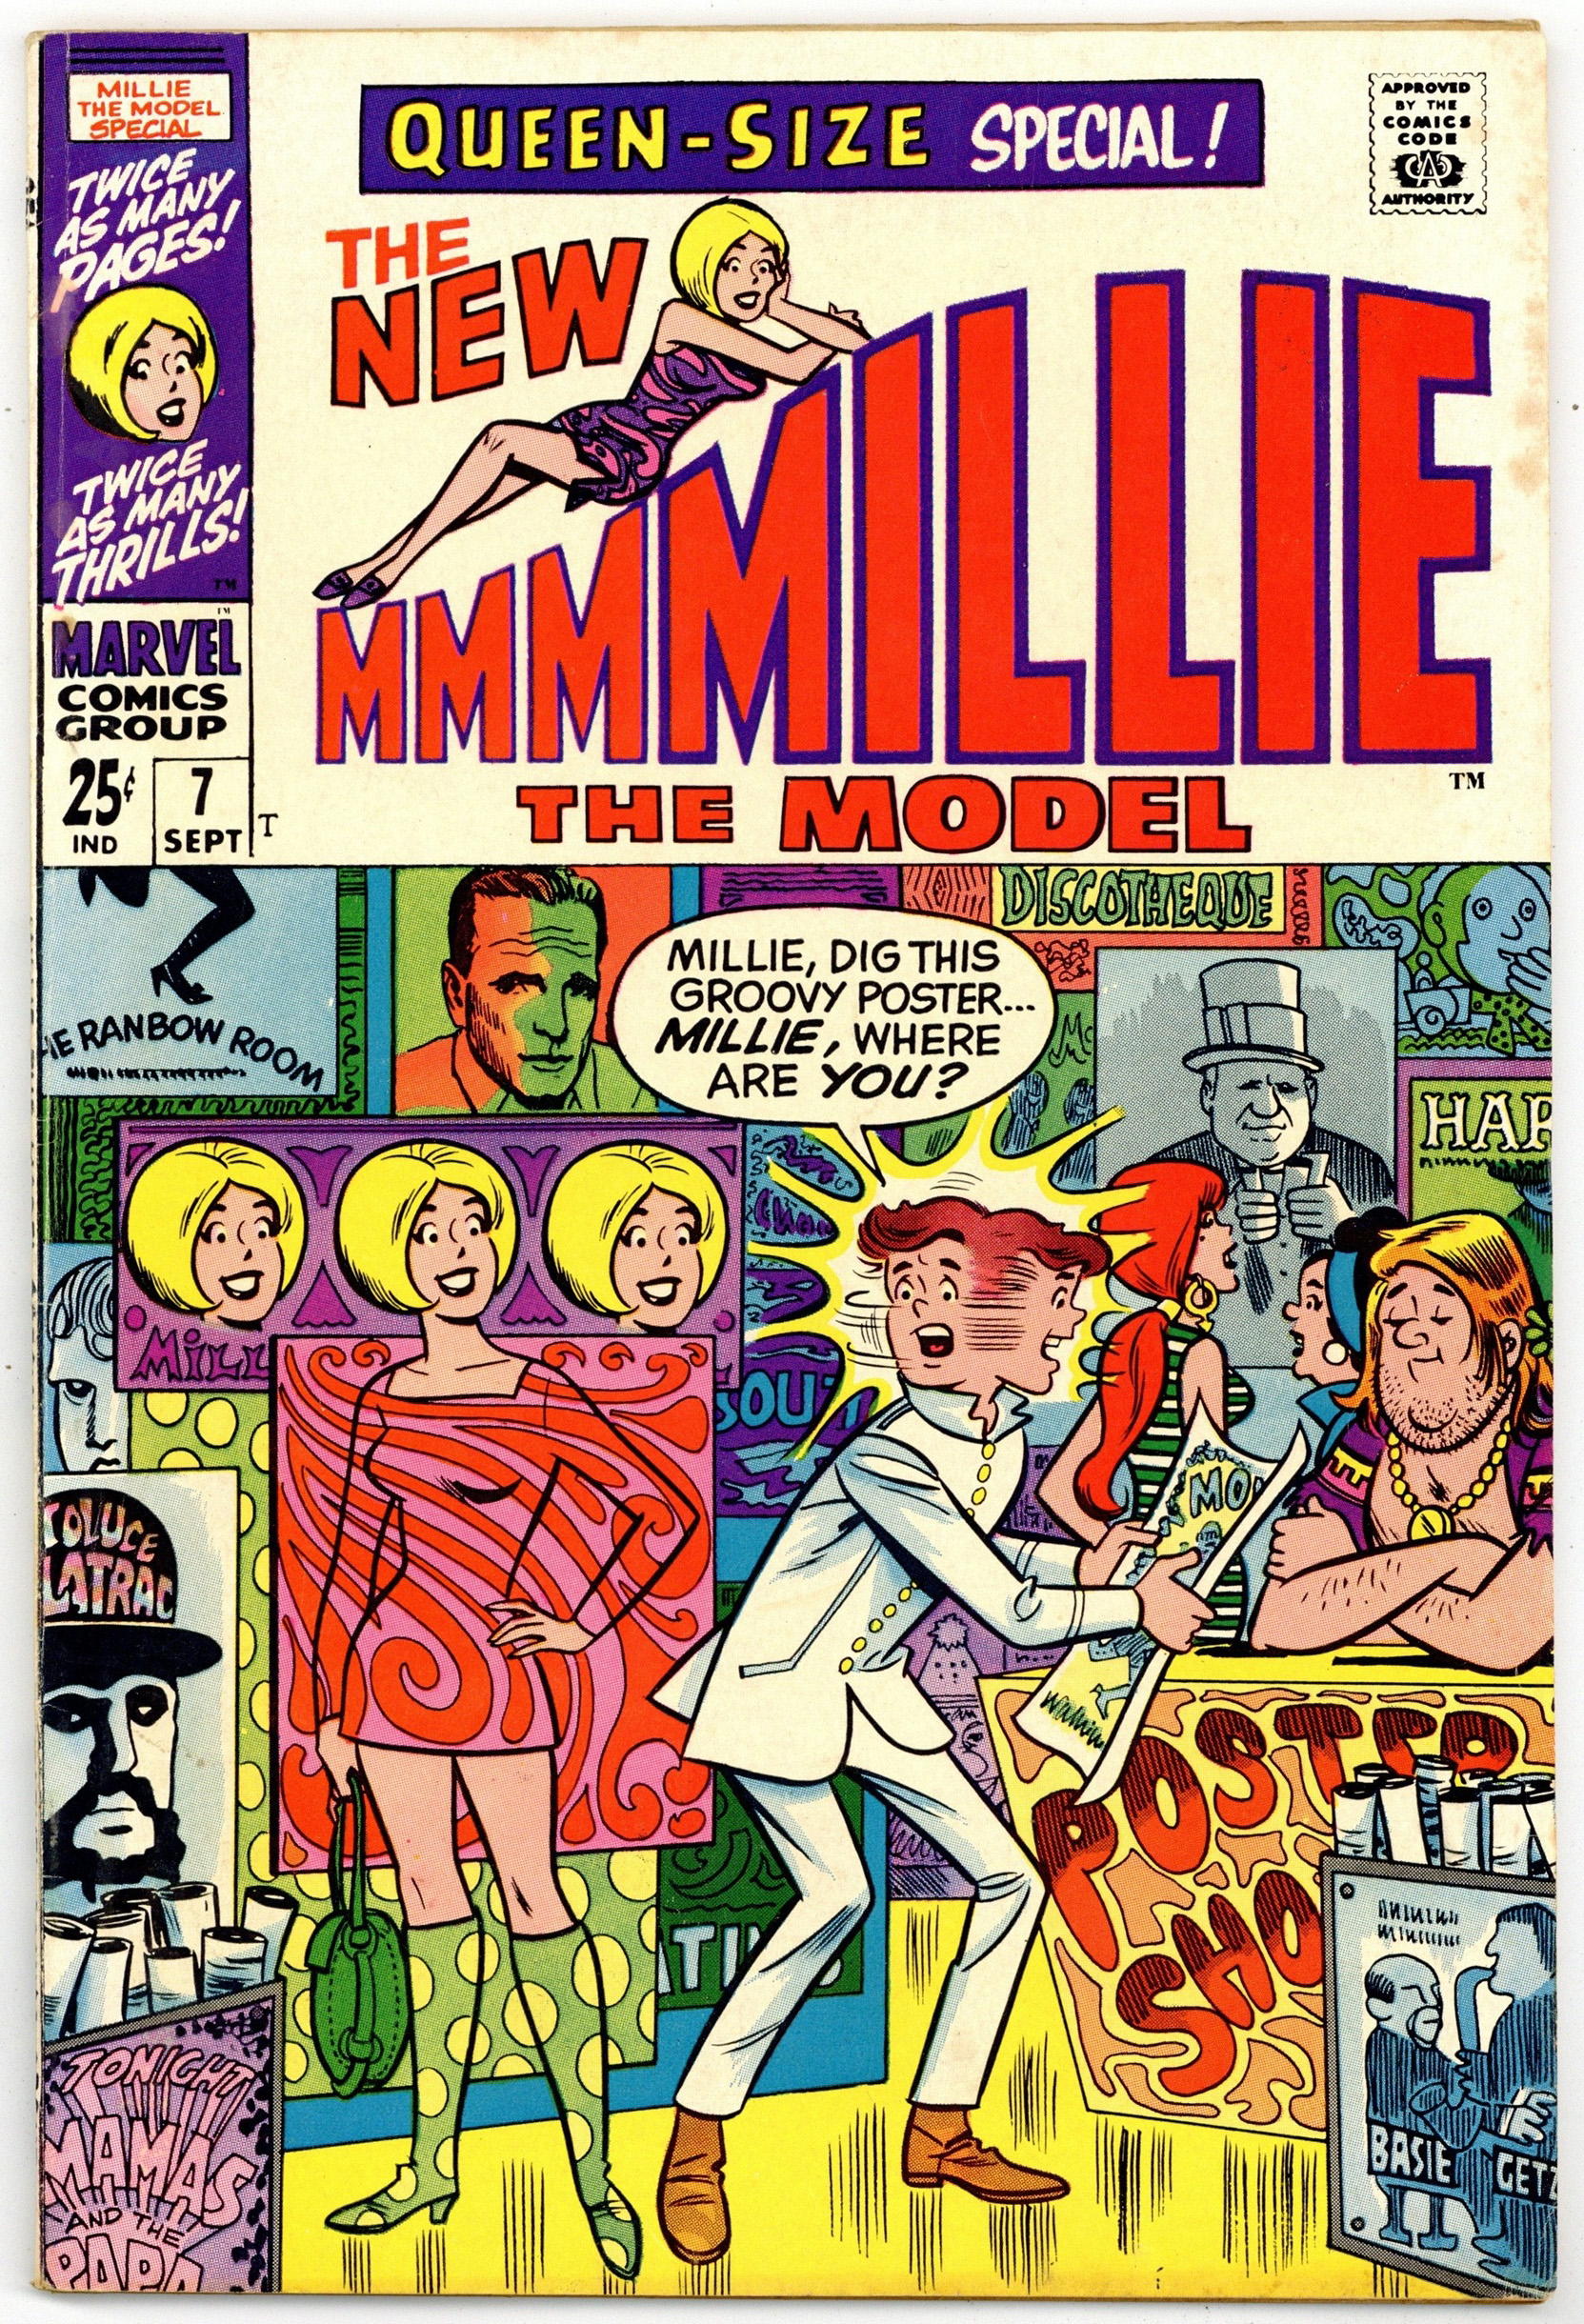
Last week I wrote about “1960s Nostalgia” and mentioned buying a “Millie the Model” comic book that I bought, scanned in, cleaned up, and made a print out of. I mention that again because cleaning up the scan is one of those tasks I occasionally like to do to relax my mind.
When cleaning up a scan the whole point is to restore the look of the comic to its original state. There can be creases in it, the printed lines can break up, and dirt in general build up on the cover of an old comic book. I clean it up in Photoshop using the clone tool, healing brush, and the content aware fill tool. It’s all about making selections as so much of Photoshop is. A selection is using one of Photoshop’s many selection tool to pick just one part of the picture that you want to change. To select it.
I use one of the tools to select the area, use another tool to restore that area, and then move on to the next selection. There is nothing creative about it. It’s all about picking the correct cleanup tool and if that doesn’t work then I pick another one. It just takes time but not a lot of thought. I find that relaxing at times.
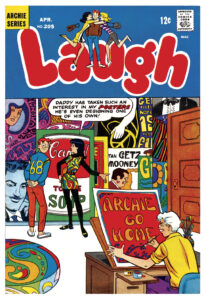
The “Millie the Model” comic was fairly easy to clean up. It only took a couple of hours since the comic was in pretty good shape. Another 1960s Pop Art comic that I bought the same week as Mille is an Archie comic called “Laugh.” It is issue number 205. This one isn’t in nearly as good shape as the Millie one so I had decided not to scan it in and clean it up. That was until I got bored on this Sunday night.
After the Giants’ game on Sunday afternoon I started trying to figure out why my film scanner wasn’t working correctly. That’s a tough thing to figure, I took a couple of hours to do it but wasn’t successful. It’s still acting up and I have no idea why. It will take about $500 to replace it and I really don’t want to do that. The film scanner is not really a burning necessity either but it still annoyed me. So I decided to scan in “Laugh” to try and not think about it.
I have two flatbed scanner besides my film scanner so I used the one that can scan at 1200 DPI and scanned in the comic book cover. I like to scan at that high a resolution for this task in case I want to print it out at a large size.
It’s an easy scan and an easy set up so I got to cleaning the cover right away. This one is tough. 1960s comic books are printed with fairly big screens. Those are the small dots of color that are used in printing to make all the colors on the page. The same dots that Roy Lichtenstein made famous in his Pop Art paintings. Not messing up the dot patterns are essential to cleaning up these covers.
The “Clone” tool is one of Photoshops best tools as it directly copies from one area to another but if the dot pattern isn’t cloned in a perfectly lined up way its very noticeable as a mistake.
The “Healing” brush looks at the pixels around where you want to fix and estimates what should go there. Sometimes it’s right and sometimes it’s wrong.
The “Content Aware” fill tool is often the best one to use as it looks at a wide area of art to try and figure out how to properly fix something. I found it works really well with the screens but if the screen is too close to an area of black then that can cause problems.
It takes a mix of these three tools to get the job done and sometimes I have to run through all three of them. But it’s still a right or wrong proposition. There is not a lot creative about it. I use the tool and it either works or doesn’t work. If it doesn’t work then I move on to another solution. I find the right answer and it’s always obvious if I did or didn’t. That can be relaxing.
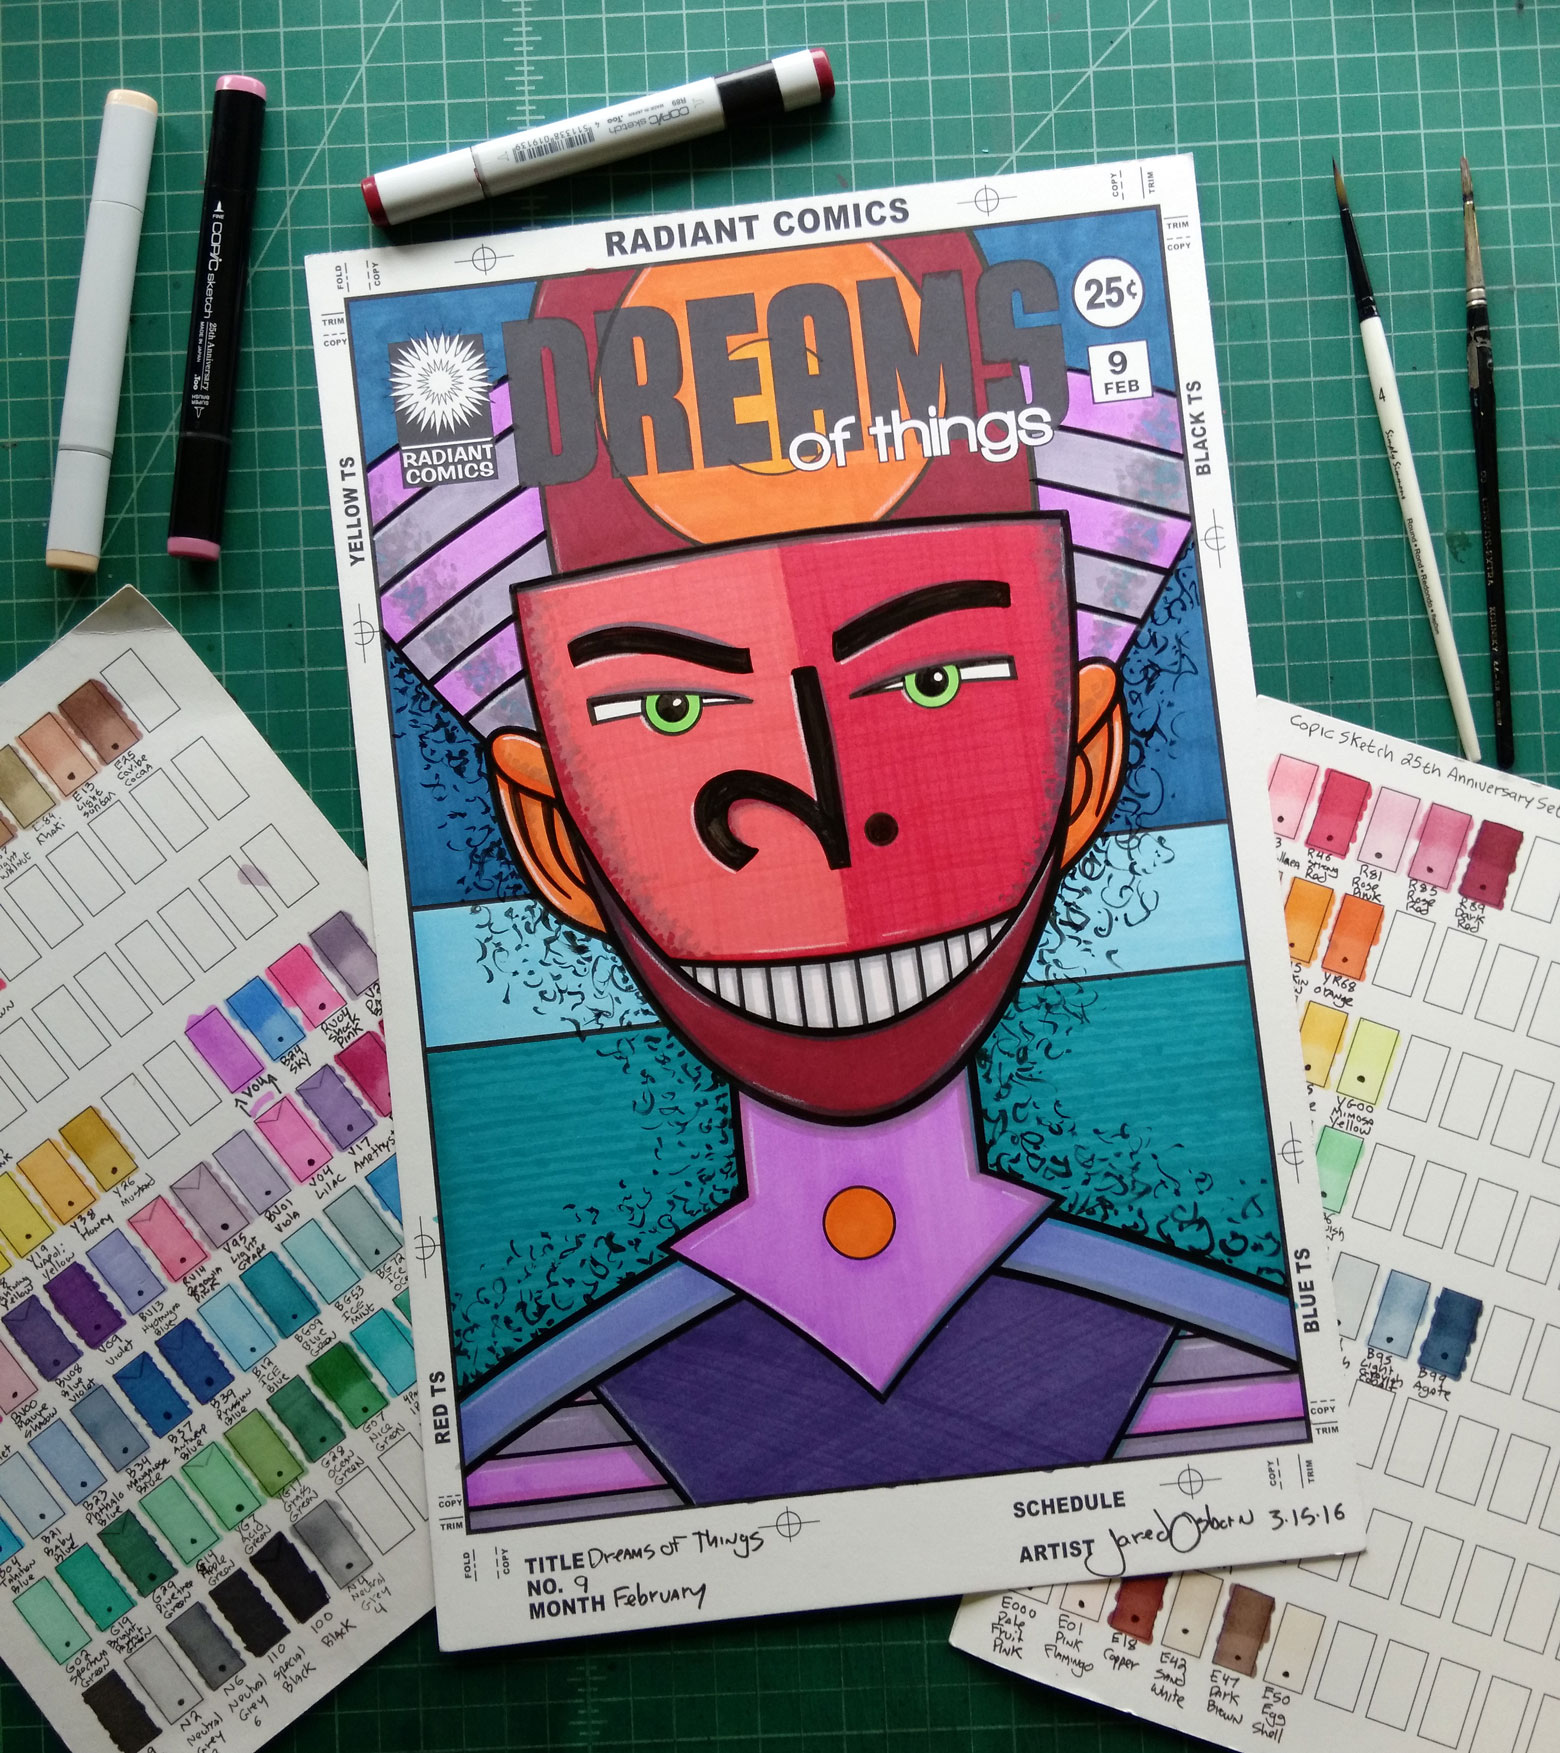
I worked for for about an hour on the “Laugh” cover before I couldn’t take any more. It’s actually pretty detail oriented and tedious work so I can’t do it for a long time. Especially since I spent a lot of this Sunday working on other creative stuff. I inked a “Dreams of Things” cover, drew two inkbook pages, and made a three pen drawing. That’s quite a bit of stuff before I got around to digitally cleaning that cover.
One more thing I want to mention before I finish this is a second task I like to occasionally do to relax. I like to typeset. I think I wrote a blog about that once (I’ll have to look it up) but typesetting is just getting large about of type ready to be printed; the words in a book for example. It’s not that I’m typing the book, that already done, but I’m styling the type. Put in some bolds and italics, set up the fonts, remove all the weird junk spaces that appear in type, set the styles for the paragraphs, and whatever else needs to be done to make the words of the books look good.
There is creative stuff involved in typesetting but once that is done then all that has to be applied to the type. That’s the part that’s like putting together a puzzle. People find puzzles relaxing don’t they? At least that’s what I learned from Ross on “Friends.”
I’m back from the comic shop this week and I got eight new comics and a book.
Check them all out here:

Nostalgia is a funny thing. It’s supposed to be a longing for the past when things are remembered as better for you but sometimes it can be weirder than that. First of all over this summer (2022) I found myself being nostalgic for last summer (2021). It’s a little too soon for barely a year old nostalgia. Plus the reason for the nostalgia was painting. I got five large paintings done over the summer of 2021 and that was the first time I painted that much in years. During the summer of 2022 I got lots of art done but no large paintings. Somehow that made me feel nostalgic for the days when I got paintings done. Weird.
The other strange thing I’m feeling nostalgic for is from a time before I was born. I wasn’t even alive so how can I feel nostalgic for that time? It started when I joined a Facebook group about Andy Warhol. I must have joined it a year ago. I’ve never been a huge fan of Warhol’s work but I enjoyed the group because of the photos of Andy. He seemed to always be having a good time.
Andy Warhol was very much into being a famous artist and it shows in the photos in this group. He goes to all sorts of parties and meets all sorts of famous people. He makes being a famous artist seem like a lot of fun and I appreciate that. I can’t think of any other artist, even ones who’s art I like better than Warhol’s, who looks like they’re having as much fun as Andy.
As time went by and I was paying attention to the Warhol Facebook group one member joined who liked to post photos and stuff about a Warhol “It Girl” from the early 1960s named Edie Sedgwick. She died in 1971 at the age of 28. This member really liked Sedgwick and posted a lot of stuff so that made me aware of a book called “Edie: American Girl” by Jean Stein and George Plimpton. I took the book out on Hoopla, the library app, and gave it a read.
The book was done in a format that was unusual. It was a series of interviews with people about the life and times of Edie. There were a few paragraphs from one person and then another and another. As time periods would change people would come and go. It was an interesting format full of personal stories. The first half of the book was about the Sedgwicks and their family background and the second half was about Edie’s adult life.
Edie’s adult life in the early 1960s had a lot to do with Andy Warhol and it was wild. I had never read about this particular period of time in the art world before. What I knew about Pop Art I learned in my art history classes in the 1980s and it never was my favorite time period. Now it might be.
The early 1960s in the New York City art scene with Andy Warhol was all about parties, staying up late, being seen, making weird movies, taking drugs (lots of speed to stay up all night and get stuff done), sex, plus some rock and roll. Not a lifestyle I’ve ever lead but the people in the book sure seemed to be having fun. Except maybe the ones who died young. There were a lot of those.
After the Edie Sedgwick book I found one written by Andy Warhol himself. It is called “Popism” and if memory serves it was written in about 1980 and it was about his time in the 1960s. I found the writing style to be a little detached and there was a lot of name dropping in it but I liked the book nonetheless. It was a fun look back in time from a person who was there and he was not so far removed from the time he was writing about.
As I now think about the writing and my describing it as “Detached” that may be because I had more nostalgia for the time period than Warhol did. That’s a strange idea to contemplate.
The next thing to trigger my sense of nostalgia was a comic book. I’m in a Facebook group called “The Silver Age of Comic Books” and the Silver Age encompasses the 1960s. Someone posted a Marvel comic book from 1967. It was “Millie the Model Annual #7” drawn by Stan Goldberg.
What made this comic stand out to me was that it was referencing the Pop Art of the time. Millie was in a poster shop which had psychedelic posters of popular actors, musicians, and artists. There is also a cool visual pun going on with Millie blending into the art. She is Pop Art herself! The person who posted this cover on Facebook also posted where the references came from. That was very cool too.
Besides making me nostalgic for the Pop Art days of the 1960s the Millie the Model cover was also a very good comic book cover. It is well designed, well drawn, and well colored. As a huge fan of comic book covers this is a good example of the art form. I knew I wanted to get a copy of the comic for myself and also so I could scan it in, blow it up, and make a large print of the cover. I like to do such things on occasion.
I got onto eBay, looked around for a copy, and eventually spent $26 on a decent one. Since I was going to scan it I wanted a copy that wouldn’t bee too much work to clean up. The prices on the issue varied from $10 up to $200. The expensive ones were in no way worth it to me so I settled on the $26 one. A week later it came in the mail.
The copy I got looks good and I spent a few hours cleaning up the scan I made of it before I printed it out. I’m still not done with it because I had to pause to get more printer paper but it’s 90% there. It makes me wish I was there too. Ahhh… Nostalgia!
Those are the two weird nostalgia urges I’ve been feeling lately. I’m feeling wistful for just a year ago when I got a bunch of paintings done plus I’m feeling like it sure would be fun to visit a time before I was born. I’ve got no interest in speed but it sure would be cool to be a young famous NYC artist in 1963.