I’m back from the comic shop this week and I got four new comics.
Check them all out here:
Comment
I’m back from the comic shop this week and I got four new comics.
Check them all out here:

Over the years I’ve done all my own bicycle repairs. It’s not hard. All you need are tools and simple mechanical skills. Not everybody has mechanical skills but you don’t need very sophisticated ones for fixing or maintaining a bike. I’ve fixed and changed most bike parts: brakes, derailleurs, cables, gears, cranks, tires, tubes, and seats. The one thing I had never done before now is to change a wheel spoke.
Mechanically changing a wheel spoke isn’t hard. It’s just a stiff piece of wire that gets put through an eye at the center of the wheel and then connects to the rim by what they call a threaded nipple. You can go on YouTube and see lots of videos of people showing you how to do it. That’s not the problem I ran into with changing a spoke. The problem I ran into was that I have no new spokes sitting around the place. Who does?
What the spokes on a bike do is keep the tire rim true. There should be equal tension on all the spokes and then the wheel will be straight. Without that equal tension the wheel will wobble a little bit left and right. The more spokes that are out of tension or broken the bigger the wobble. It’s not easy truing a bike wheel. It takes experience. I’ve seen it done and have attempted it but my efforts didn’t make the wheel any straighter. Figuring out which spoke to tighten is a mystery to me.
So how does a person even break a spoke on a bike wheel? That’s easy. You don’t even have to do anything. They’ll just break of their own accord eventually. This time I was just pulling away from the curb when I heard that distinctive “Boing” sound of a thin piece of metal under tension breaking. I had leaned forward to pedal and put my weight over the front wheel when the spoke couldn’t take it anymore. Boing. Crap.
I’ve tried to replace spokes before. As I wrote I have no new spokes but what I do have is old wheels. I figured they have lots of good spokes still on them so if I take one of those off the old wheel I can put it on my current one. That was the plan but it didn’t work out very well. Y’see I ride my bike all through the winter and all through the weather. That means my bike gets full of road sand, salt, and water. That’s not good for a lot of bike parts and that includes the spokes. Not that the spokes get rotted or anything but they do get stuck in place. The threaded nipples get fused in place by grime.
One of the tools you need for a bike is a spoke wrench. It’s a little circular tool with small wrench sizes all around the circumference. You find the right size, fit it around the part of the nipple that sticks through the rim, and twist to tighten or loosen the spoke. The problem is that if the threads are frozen in place what happens if that if the spoke twists it can break. That’s what happened to me a few years ago. I must have broken three spokes trying to get them out. Eventually I gave up and bought a new rim. I think I had a few spokes missing from that old rim anyway so it was good that I replaced it. I was never going to get that rim anywhere near true with that many spokes to be replaced.
So I made up my mind to try it again this time. I pulled out another old wheel to see if I could get a spoke off. I decided to have a go at it from the top end of the spoke where there is a slot for a screw driver. Even holding the nipple in place with the wrench as I tried turning the screw driver achieved nothing. All I did was strip a few screws and nipple bolts. But at least I didn’t break the spokes this time. After half an hour of frustration I decided to give up. But first one last thing.
It was WD40 penetrating lubricant to my rescue. Before I left the wheel alone I sprayed some WD40 onto the spokes and into the little well in the rim where the nipple sat. Sometimes WD40 can loosen stuck things up and this time it did. I went back to the wheel the next day and lo and behold I could loosed the nipple off the spoke and pull it out of the whole wheel. Success!
I knew I’d have no trouble getting the broke one out of my good wheel because the end was broken off. The threaded nipple doesn’t clamp the spoke to the wheel in any way. It just creates tension on the spoke. The tension on the top and bottom of the spoke hold it in place. When the spoke breaks on the bottom the tension is released and it’s just a matter of pulling the broken spoke up through the rim. Nipple, spoke, and all. I was going to reuse the spoke nipple from the broken spoke since the replacement spoke nipple was a different color but then I thought again. The spoke nipple was frozen on to the spoke with plenty of road grime. No need to waste time and WD40 trying to get it off if I already had a good one. So now one of my spoke nipples is shiny instead of black but I don’t care.
Even with the replacement spoke my bike wheel is still not back to true. I tightened up the new spoke and that made it a little truer but it’s going to take even more adjustments to get it back to true. Adjustments I’ll probably never make because I don’t have the skills. But I’m happy It won’t fall any farther away from true now that it has its full complement of spokes. That “Boing” sound is really annoying to hear.
I’m back from the comic shop this week and I got six new comics.
Check them all out here:
“Sunrise Poem” Unfinished
Scanning and organizing photos and negatives is tedious business. It really is. I don’t know how many people have ever done much of it but I have. About a decade ago I scanned in all of my own negatives from about fifteen years worth of taking snapshots as I went through life. I don’t remember the final number but I think I ended up scanning in about five thousand photos. That took a really long time. Around two full work weeks worth of time. And then I had to organized them. That was a large task all in itself.
I’ve never seen any photo organizing software that I’ve liked. It’s improved over time and is certainly better than when I was first organizing my scans but I still don’t like any of it. If you are going to spend a lot of hours organizing photos in a single software program then you’d better hope that program never becomes obsolete. If it does you’re back at square one. That’s not something I want to face. Ever. So I prefer to organize my photos at the level of the OS. Folders and file names are all I need.
That’s what I did all those years ago. It was tedious but easy enough. Since I took snapshots mostly at whatever event my friends or family was having it was easy enough to organize them by event. That’s the simple part. The hard part was that I wanted to be able to easily find individual people. So I looked at each photo and named the file with the date the photo was taken and the names of whoever was in the photo. Talk about a tall task. Especially for group photos. It took a long time to type all those names but I appreciate that I did it. Now I can find photos of people easily with just a basic OS search. No special photo software needed.
A few years after I got all those done my mother asked me if I wanted all her old negatives of family photos. She took a lot of photos of us growing up so there are a lot of them. I’m glad she mostly kept the negatives too since a lot of family snapshot takers throw them away. The only problem was that all through the 1960s, 1970s, and through most of the 1980s she shot with a Kodak Brownie. Those things have big negatives. I had a 35mm slide and negative scanner but for my mother’s old photos I’d need a medium format film scanner. Those Brownie negatives use 120mm film. It was good for me that by the time I was looking for one, around 2009 or so, scanners had gotten better and cheaper. I found a flatbed one that could do the job. Just three or four years before that I couldn’t have found anything medium format without spending a lot of money.
Cut to now, six or seven years later, and I still have only a small percentage of my mother’s negatives scanner in. The job is just too big to get done in a short time. I end up scanning in negatives as I have need to. Being that it takes about fifteen minutes to scan in one negative you can see how it takes forever. Usually I scan things in around Christmas time so I can make presents of old photos for my family. That’s what I’m up to right now. Except before that I had to scan in some even older prints.
Besides the massive binder of negatives I borrowed five small photo albums from my mother. They cover 1964-1974 and have about eighty photos each. Plus two of the albums had negatives in them. I scanned those two albums negatives and prints a few years ago but not the prints in the other three. Since some of the prints in those three were the oldest and had no negatives I decided to scan them in before they faded away. Scanning in prints is easier than scanning in negatives but prints scans aren’t nearly the quality that negative scans are. There is just more information in a negative.
Scanning the prints was the easy part. Organizing them was the tedious part. After they were scanned I named each file with the date it was taken and the name of who was in the photo. My mother had usually written that info down on the back of the picture so I had to check the back of each photo and make sure I had the correct file. Since I was scanning them in batches of four I typed the info four files in a row rather than waiting for all the scans to finish. That way I couldn’t mess up more than four files at any one time if I accidentally skipped something.
After spending the better part of two days doing that I had it finished. That’s when I decided to scan in some negatives. Scanning the prints made me forget what a pain the negatives are. First off you can’t touch them. Oil from your fingers can get on the negatives so use a white glove. Then use an anti-static brush to try and get and dust particles off them. There is always dust. After that you have to set them in this special holder, which takes a moment, and set the holder into the scanner. That’s the physical part that takes a few minutes. After that is the scanner itself.
What settings to put in the scanner is a beast all by itself. Do I want to scanner software to restore color fade, remove grain, sharpen the image, auto tone it, or remove dust and scratches? To do that take the scanner longer but it could save time latter. It can also lead to a bad scan too. Too much fiddling can leave you with a dull scan. I usually do minimal adjusting at this stage but I do some. Finding the balance is tricky.
My biggest tedious time waste was on one negative. I couldn’t get a good scan of it. I could get the scan to look great in the preview window but when the final scan was done (twelve minutes later) it looked terrible. Just this one scan. I messed with it for half an our before giving up. I tell you too much scanning will drive you crazy.
I’m back from the comic shop this week and I got nine new comics.
Check them all out here:
I was working on a new photo today. One of my digital photo collages. It’s one where I work with someone else’s image and mix it in with some of my street photos. I’ve written recently about how I was looking on eBay for some old negatives for sale to use for such a purpose but this one isn’t from one of those recent finds. It’s a negative that I bought over two years ago but haven’t done anything with until now. It’s amazing how long a germ of an idea can sit around never growing until one day it blossoms. I can’t even tell you what changed except now when I went to work on it things worked out.
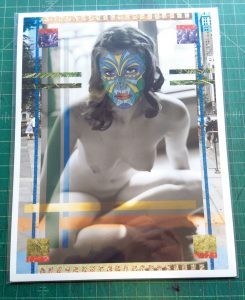
A lot of my street photo collages have a main central image with lots of other images peppered around and even some inside that large central image. Not every photo is like that as sometimes I work with multiple images all of equal or varying importance. I think my problem with this negative was that I didn’t see an opportunity to make the image my own. Using it as a large central image I didn’t see any way to integrate It with my street photo images. The main challenge was that it was a nude. I don’t do nudes of my own so how was it going to fit in? Plus it was such a good photo that it really didn’t need me. So it sat in my files.
My solution was odd. The model in the photo (Rachel Wilson according to the paperwork it came with) has a good face so what did I decide to do? Mask it. About ten years ago I made a few photos with masked people in them. I took one of my street photos and drew masks on the people. I liked the way they came out but it turns out that’s a lot of work if there are three or four people in the photo. Since this was a photo with only one person in it I decided to give the mask thing a go once again.
Though I’ve drawn many masked and marked faces I find it remarkably hard to draw one over the face in a photograph. I’m sure it’s something many artists can do digitally but I can’t seem to do it that way. Though the face will only be a few inches tall in the finished photo I knew I had to draw the mask bigger than that. I printed out a blue line photo of the face about eight inches tall on a piece of Bristol board. That way I could draw right over the photograph.

I’ve found that a pencil drawing works best for a mask photo. Ink is a little too precise Though I do have to bear down and make a dark line with the pencil, the slight fuzziness of the pencil line works well when put over a photo. It took me a few hours to get the pencil drawing done. It seems like it should take a shorter time but it doesn’t. It’s best to make the mask slightly large than the face. That’s key. I also drew her eyes, nose, and mouth in simple basic lines. After that it was all about getting a design I liked. That took a while.
After finishing the drawing it was time to scan it in and color it. That’s simple enough but the color scheme took a bit. I had a lot of shapes drawn on that face. The harder part was getting the line quality right. First I had to clean up some of the stray graphite from around the drawing. That’s tedious but easy. Figuring out exactly how much to darken the line was trickier. The raw scan of the pencil line was a little too light. That’s the way pencil is. It’s shades of grey and not black like ink. I ended up using a couple of different Photoshop techniques to make the lines darker but that meant even more clean up because that also darkens previously unnoticed stray pencil lines. I think I worked longer on the line quality than on the color.
With the coloring done it was time to marry the mask with the photo. That’s as easy as cutting and pasting in Photoshop but then it took some time to figure out how to blend it in. Just plopping the mask over the face didn’t look good so I had to use a couple of different blending modes on duplicates of the mask at different opacities. Once again not something that’s hard but it takes concentration.
After the mask was in place the rest was easy. Or at least it was familiar. I look through my photos to see what would fit where on the photo and cut and paste various images onto the main image. It’s mostly working with space with helpings of color and texture thrown in there. It’s complex but I’m used to it. The key is to get one thing at a time done. Don’t rush it. Find the order in the chaos. This is usually the most enjoyable part as I have a variety of techniques I use at this stage. I mainly wanted the keep the image of the model as the focus of the piece so I worked around it. I like the way it came out.
One way I worked differently on this one than normal is size. I’ve made a lot of my photos at 10×15 inches. I like that size. I print them out on 11×17 in paper. The problem is that I want to try to sell some of these online and that’s a little too big to easily mail. So I wanted to work at an 8.5×11 inch size that many people online prefer. Only those two sizes are not in proportion. If I reduce an 10×15 inch photo down the closest I’m getting is 10×7.5. That’s a little to visually narrow to me. So I don’t like to reduce this 10x15s down. What I did instead with this one was to work on it with the idea in mind that I could trim the top and bottom off without losing much and being able to print it nicely on an 8.5×11 inch piece of paper. Turns out this idea works well with picture that has a large central image. I like it at both proportions.
I have some more of other people’s negatives in my pile. Most of them I’m not sure what to do with but I see some more masks in the future.
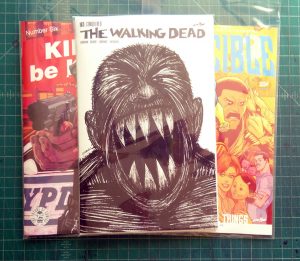
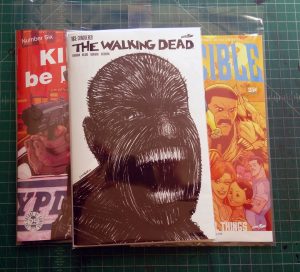
I’m back from the comic shop this week and I got six new comics.
Check them all out here:

One of the things that’s popped up in recent years in the word of comic book collecting is blank covers. They’re published that way on purpose so that a comic book collector can go to a comic con and get his or her favorite artist to do a sketch on the blank cover. It’s a cool idea. A drawing right on a comic. A lot of comic book collectors have embraced the concept. Some artists even buy the blanks themselves, draw on them, and then sell them to collectors.
I’ve even bought some blanks myself, drawn on them, and tried to sell them on eBay. Not much luck there but that’s the life of being a nobody. One of the problems I’ve had drawing on the blank covers is the expense. With comics generally costing four dollars a piece these days that makes for an expensive single piece of paper. It wouldn’t matter if I was making up that cost in sales but I’m not. So I had to find a cheaper way to do things.
When I was a kid I was a do-it-yourself tinkerer. I liked to try and fix things. So when I got my hands on some battered old comics I did my best to repair them. That sort of restoration is frowned upon now in the world of collectors but that really only applies to high dollar books. No one would care one bit if I tried to fix some random comic that had a street value of fifty cents. Fixing comics in my youth is how I learned to reattach a cover or centerfold of a comic that had come loose from its staples.
The first thing you have to do when fixing a cover is to unbend and remove the staples. You’re going to need some needle nose pliers for this. After the staples are removed I recommend straightening them. This makes it easier to put them back in the holes they came from. Then cut a tiny bit of tape with an X-Acto knife, these days I use acid free framer’s tape, and place the tape on the inside of the spine of the comic (or the centerfold) where the staples holes that have been torn through are. Poke new holes in the tape where the staple holes are. After that put the cover (or centerfold) back on the book and thread the staples, one wire at a time, back through the holes they came out of. Finally bend the staples back down to secure them. It’s an obvious method but I was happy to have figure it out back when I was eleven.
That brings us up to now and my desire for some cheap comics to draw on the cover of. I had thought about pulling some old comics out of the dollar bin at my local comic store or even from my own collection. I have worthless comics I could easily get rid of. But somehow that didn’t appeal to me. It seemed weirdly random and didn’t interest me. I sat on the idea for a while and did nothing with it. Then they released a 25¢ issue of “The Walking Dead.”
The the 25th Anniversary of the founding of Image Comics. To promote that fact they are publishing some of their comics at a cost of only a quarter. The first one of them was issue 163 of “The Walking Dead” which is a comic that is on my pull list. When reading the issue I came to the letter’s page where they wrote that they printed up a whole lot of issue 163. 750,000 of them. I believe the normal circulation of “The Walking Dead” is around 120,000 so that is a big multiple of normal. I figure they could spare a few copies to not be in mint condition. Somehow it made me feel better knowing I was going to deface a comic that had zero chance of ever being valuable.
The week after the issues came out I was at my local comic shop again and I decided to pick up ten copies of WD 163. At $2.50 it was a fraction of the $30.00 it would have cost me to get issue 162 (“The Walking Dead” is one of the cheaper comics with a cover price of $3). I told my LCS owner what I was up to and he gave me the comics on the house. Turns out he had a lot of extra ones. As with so many comics these days there were incentive covers that came with ordering extra WD 163s. If a comic shop ordered a hundred copies they got one with a special cover that they could sell for $50. At 200 copies an extra cover that they might be able to sell for even more. That’s how my LCS owner ended up with about 500 extra copies.
With those extra copies at home I had to make a template for the cover. If I was going to wrap the comic with my own drawing paper I had to be able to but it to the exact size I needed first. This is remarkably tricky. You’d think it would be as easy as measuring the size of the comic but it take a little more than that. After three or four tries I finally had the right size and it was time to get to work.
At first I wasn’t sure if I was going attach the drawing paper first and then draw on it or draw on the sheet of Bristol and then attach it. Since I already had a test one done and attached I decided that one could wait and I’d try drawing on the unattached paper. I thought that way would be simpler in the long run if I could easily attach it. Turns out I could.
I completed my drawing, cut it to size, folded it in half (with guidelines printed out on the paper to make it foolproof), removed the staples from the comic, marked where the staple holes needed to be made, made the holes in the Bristol with an X-Acto knife, and finally put the staples back in place. That whole process took me about fifteen minutes. Not bad but I’ve since got it down to ten.
So far I’ve made four WD 163 sketch covers. I’m playing around with various approaches to them and none have sold yet but I’m still trudging on for a little while. Life is all about the trudging on.
I’m back from the comic shop this week and I got seven new comics.
Check them all out here:
Time changes our habits. That’s what life is. One of my, and a lot of other people’s, habits is looking for things. Whatever things you happen to be interested in. Of course the biggest change in looking for things is the internet. That changed all of our habits. Search engines of all kinds have made it easier to find stuff no matter what that stuff is. No leg work involved.
The first thing I was recently looking for was new music. Like most people I don’t listen to as much music as I used to. When you’re young music finds you but as you get older you have to go find music. That’s a lot of effort so most people don’t bother. It’s easier to listen to stuff you already know you like in the time you have to listen. I only bother sometimes. When I was young I used to find new music by listening to the radio. I had two or three stations in my rotation and there was always new stuff to be heard. I don’t listen to the radio much anymore. Who does?
The other way I found new music was to browse at record stores. This really depended on hearing things on the radio and then going to look for that thing or something related to it. None of the record stores I went to had listening stations so it was all about recognizing names and styles from the info on the album. That and checking the section of the stores that housed the genres of music that I liked. It was hit or miss and it sucked to buy an album that I would end up not liking.
As you might suspect these days my looking for music is all online. Maybe once a year, as I was doing this week, I listen to samples at iTunes of lots of songs to try and find some new ones that I like. For the last two years I’ve managed to get about 25 new songs per year. That’s it. And that takes a lot of time to do. Not unpleasant time but time.
The second thing I was searching for this week was conté crayon. I have been doing a bunch of my “Monsters on Comics” drawings and that takes white conté crayon to do. (Monster Blog) I’ve never used much of the stuff but had a couple of sticks of it stuck in a drawer since who knows when. I used up those sticks and went to my local art store to look for more. I found some but when I got it home and tried to use it I found it unusable. The crayon was so hard it wouldn’t draw on the paper. It was like rubbing a stick on paper. It was supposed to be the exact same softness as my old conté crayon but it wasn’t. So I went online to search for another brand that might be softer. Half an hour later I was nothing but frustrated. Turns out that nobody else must be using conté crayon because all the art supply sites only had the same brand my local store had. At least the search didn’t take as long as the old days when I’d drive from store to store or travel down to NYC to find something.
The third thing I search for is comics. I don’t do this as much as I once did because almost all the comics I buy these days are new ones. That’s always how it’s been with me but back in my younger days I would sometimes look through the back issue boxes of comic shops for interesting comics to buy. Now it’s once or twice a year that some old comic catches my interest and I look up how much it is on eBay or on one of the online comic book stores. Usually I end up getting a bunch of cheap dollar comics that fill in some holes in my collection that I’ve never felt the urgent need to fill. This and that. Not even stuff that I’ve always coveted but stuff that I find interesting in that moment of searching. I’ve been looking at filling holes in my “Strangers in Paradise” and “Bone” collections this week but there is no rush. The issues I need are cheap and neither series is in high demand. I’ll get them some day.
One other thing I’ve been searching for lately has no antecedent in the pre-internet world for me. That’s photographic negatives. I like using photographs as the basis for some of my art and normally I take my own photos but on occasion I like to use the images that other people make as a starting point. It started in 1999 when I bought some negatives of dancers in Paris from 1964 (Paris Photo Blog). It took me 15 years to ever do anything with them but I thought they were pretty cool the moment I saw them and they gave me the idea that I could work with old negatives.
I prefer old negatives to old photos because they give you more detail and also because they’re probably orphaned images. People sell copies of photos because that’s their business but if a person is selling negatives it usually means they have no use for the image anymore. Or maybe never had one because negatives are often sold by dealers who bought them at an estate sale or some such. I bought one set from a photographer who was selling his own negatives and image rights but the other stuff I’ve bought from antique (or junk) dealers.
This week I bought a new strip of three negatives of an artists’s model. I was looking at negatives on eBay and I ran into a whole bunch of negatives of an artist’s model from the 1940s to the 1950s. They were from an illustrator named James Schuker (who I’ve never heard of). The seller had purchased the contents of Schukner’s studios back in the early 1980s before Schukner had died and was now selling the negatives of the photos taken as reference. There were a ton of them. Most of them had bid on them but I picked one out that I liked and bid $15 and won it. Much like the Paris negatives I find them a fascinating bit of history. Images lost to time that hardly anybody even knew existed. Maybe I’ll be able to do something with them.
So that’s what and how I’ve been looking for things this week. Mostly sitting in a chair. Times change.