I was working on a new photo today. One of my digital photo collages. It’s one where I work with someone else’s image and mix it in with some of my street photos. I’ve written recently about how I was looking on eBay for some old negatives for sale to use for such a purpose but this one isn’t from one of those recent finds. It’s a negative that I bought over two years ago but haven’t done anything with until now. It’s amazing how long a germ of an idea can sit around never growing until one day it blossoms. I can’t even tell you what changed except now when I went to work on it things worked out.
A lot of my street photo collages have a main central image with lots of other images peppered around and even some inside that large central image. Not every photo is like that as sometimes I work with multiple images all of equal or varying importance. I think my problem with this negative was that I didn’t see an opportunity to make the image my own. Using it as a large central image I didn’t see any way to integrate It with my street photo images. The main challenge was that it was a nude. I don’t do nudes of my own so how was it going to fit in? Plus it was such a good photo that it really didn’t need me. So it sat in my files.
My solution was odd. The model in the photo (Rachel Wilson according to the paperwork it came with) has a good face so what did I decide to do? Mask it. About ten years ago I made a few photos with masked people in them. I took one of my street photos and drew masks on the people. I liked the way they came out but it turns out that’s a lot of work if there are three or four people in the photo. Since this was a photo with only one person in it I decided to give the mask thing a go once again.
Though I’ve drawn many masked and marked faces I find it remarkably hard to draw one over the face in a photograph. I’m sure it’s something many artists can do digitally but I can’t seem to do it that way. Though the face will only be a few inches tall in the finished photo I knew I had to draw the mask bigger than that. I printed out a blue line photo of the face about eight inches tall on a piece of Bristol board. That way I could draw right over the photograph.
I’ve found that a pencil drawing works best for a mask photo. Ink is a little too precise Though I do have to bear down and make a dark line with the pencil, the slight fuzziness of the pencil line works well when put over a photo. It took me a few hours to get the pencil drawing done. It seems like it should take a shorter time but it doesn’t. It’s best to make the mask slightly large than the face. That’s key. I also drew her eyes, nose, and mouth in simple basic lines. After that it was all about getting a design I liked. That took a while.
After finishing the drawing it was time to scan it in and color it. That’s simple enough but the color scheme took a bit. I had a lot of shapes drawn on that face. The harder part was getting the line quality right. First I had to clean up some of the stray graphite from around the drawing. That’s tedious but easy. Figuring out exactly how much to darken the line was trickier. The raw scan of the pencil line was a little too light. That’s the way pencil is. It’s shades of grey and not black like ink. I ended up using a couple of different Photoshop techniques to make the lines darker but that meant even more clean up because that also darkens previously unnoticed stray pencil lines. I think I worked longer on the line quality than on the color.
With the coloring done it was time to marry the mask with the photo. That’s as easy as cutting and pasting in Photoshop but then it took some time to figure out how to blend it in. Just plopping the mask over the face didn’t look good so I had to use a couple of different blending modes on duplicates of the mask at different opacities. Once again not something that’s hard but it takes concentration.
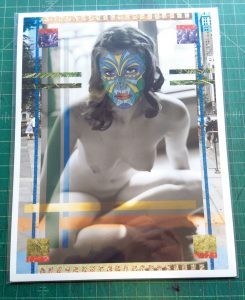
After the mask was in place the rest was easy. Or at least it was familiar. I look through my photos to see what would fit where on the photo and cut and paste various images onto the main image. It’s mostly working with space with helpings of color and texture thrown in there. It’s complex but I’m used to it. The key is to get one thing at a time done. Don’t rush it. Find the order in the chaos. This is usually the most enjoyable part as I have a variety of techniques I use at this stage. I mainly wanted the keep the image of the model as the focus of the piece so I worked around it. I like the way it came out.
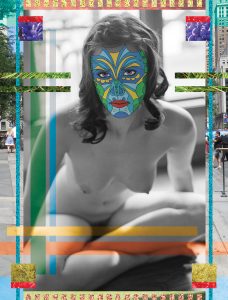
One way I worked differently on this one than normal is size. I’ve made a lot of my photos at 10×15 inches. I like that size. I print them out on 11×17 in paper. The problem is that I want to try to sell some of these online and that’s a little too big to easily mail. So I wanted to work at an 8.5×11 inch size that many people online prefer. Only those two sizes are not in proportion. If I reduce an 10×15 inch photo down the closest I’m getting is 10×7.5. That’s a little to visually narrow to me. So I don’t like to reduce this 10x15s down. What I did instead with this one was to work on it with the idea in mind that I could trim the top and bottom off without losing much and being able to print it nicely on an 8.5×11 inch piece of paper. Turns out this idea works well with picture that has a large central image. I like it at both proportions.
I have some more of other people’s negatives in my pile. Most of them I’m not sure what to do with but I see some more masks in the future.
Discussion ¬