I’m back from the comic shop this week and I got seven new comics.
Check them all out here:
Comment
I’m back from the comic shop this week and I got seven new comics.
Check them all out here:
So as you may have noticed from my Saturday “Comics I Bought This Week” posts I started making some videos and posting them to my YouTube channel. They fall into two categories so far. The “Comic Book Haul” category and the “Me Drawing” category. I’ve been wanting to get started working in video for years but haven’t because I had no idea where I wanted to start. It was the “Comic Book Haul” videos that finally got me going.
I discovered “Comic Book Haul” videos on YouTube earlier this year. All they are is videos of people showing you what comic books that they bought lately. You get a little bit of info with each comic shown. Either why it is a key issue to get if the book is an older one or what the comic is about and why you like it if it’s a newer comic. There are also generally two styles of shooting these videos. One where you sees the person and he or she holds up the comic or one where the camera in on a tripod and pointed at the comic and not the person.
I decided to go with the one where the camera is pointed at the comics. I like to see the comic book covers in these videos and that way gives me the best look at them so I figured that was my best way to show them off. My videos are also about current comics. I don’t buy back issues very much. I’ve been buying new comics since the 1970s so if I want something I probably bought it off the stands when it originally came out. Or else I get it in a hard cover collection.
It’s pretty easy to make a “Comic Book Haul” video. I decided to shot it with my iPad and edit it in iMovie to make things easy for myself. I did buy an iPad tripod adaptor so that I can mount my iPad on my tripod and avoid hand holding the thing. I don’t do my videos in one long take as some do but it ends up being about the same thing. I stop and start the iPad after each comic in case I get interrupted or have no idea what to say. With the first few videos I really was having a hard time with what to say. I’m usually a good talker and don’t have a fear of public speaking but it’s weird to talk to no one but a camera. That takes some getting used to. I talk for about a minute each comic and end up with ten or so minutes of video. I open iMovie on the iPad, stick the videos together (it’s easy), and upload the final video to YouTube right from the iPad. It’s amazing how simple it is.
The next type of vide that I’ve been making is videos of me drawing. Once again it’s something that I’ve wanted to do for a while but couldn’t figure out how to. Most of my drawings take hours and hours to make and that’s really boring to watch. Plus it’s not easy to shoot. It’s tough to place the camera someplace where it can get a nice shot but is out of the way and doesn’t interfere with the drawing. Just shooting the “Comic Book Haul” videos got me started thinking about it though and coming up with something I could actually do.
A lot of my drawing starts with a Surrealist automatic drawing method. That’s where you clear your mind of any preconceived notion of what you want to draw and just start drawing. It takes some practice. I figured it was this part of my drawing that I could make a video of. After a little thought and trial and error I ended up using one of my small table top tripods to set my small pocket camera on. It ended up being right under my chin but I still could draw a bit with it there. I pulled out a five by seven inch piece of paper and framed it in the camera’s LCD. Then I turned the camera on, grabbed a marker, and started drawing.
The first drawing I made I tried to keep under six minutes. It was the first number that came to my head. It ended up being tough to do and came in at over seven minutes. After that I decided to make a ten minute time limit and that seems to be a better time. I think they all clocked in at under ten minutes. I found it a little tough to draw under such time pressure but I got used to it. They key is to get started and keep going. That might be the key to a lot of things in life.
The next thing I tried to to was tell a story as I was drawing. Since I was making a spontaneous drawing I thought I’d tell a spontaneous story too. Seemed like a fun idea. Boy was it a weird thing to try and pull off. First of all the story had nothing to do with what I was drawing. They were two separate things. I had to balance the part of my brain that was making up a drawing with the part of my brain that was making up a story. Or maybe I had to juggle them. Either way it was like nothing I had ever done before. It was fun but took a lot of concentration.
This whole video making thing has even made me pull out Garage Band. I wanted to make a video of me drawing a large drawing to music and I also wanted to make the music. I’m not a musician but I’m good with patterns so I can put loops together in Garage Band into a decent soundtrack. It’s not great music and, like everything, takes longer than you think it will but in the end I thought it was a song I could use. I’m happy with that.
I’ve only skimmed the surface so far with this video stuff but it’s cool to actually get something started. Stay tuned.
I’m back from the comic shop this week and I got seven new comics.
Check them all out here:
The Finished Painting
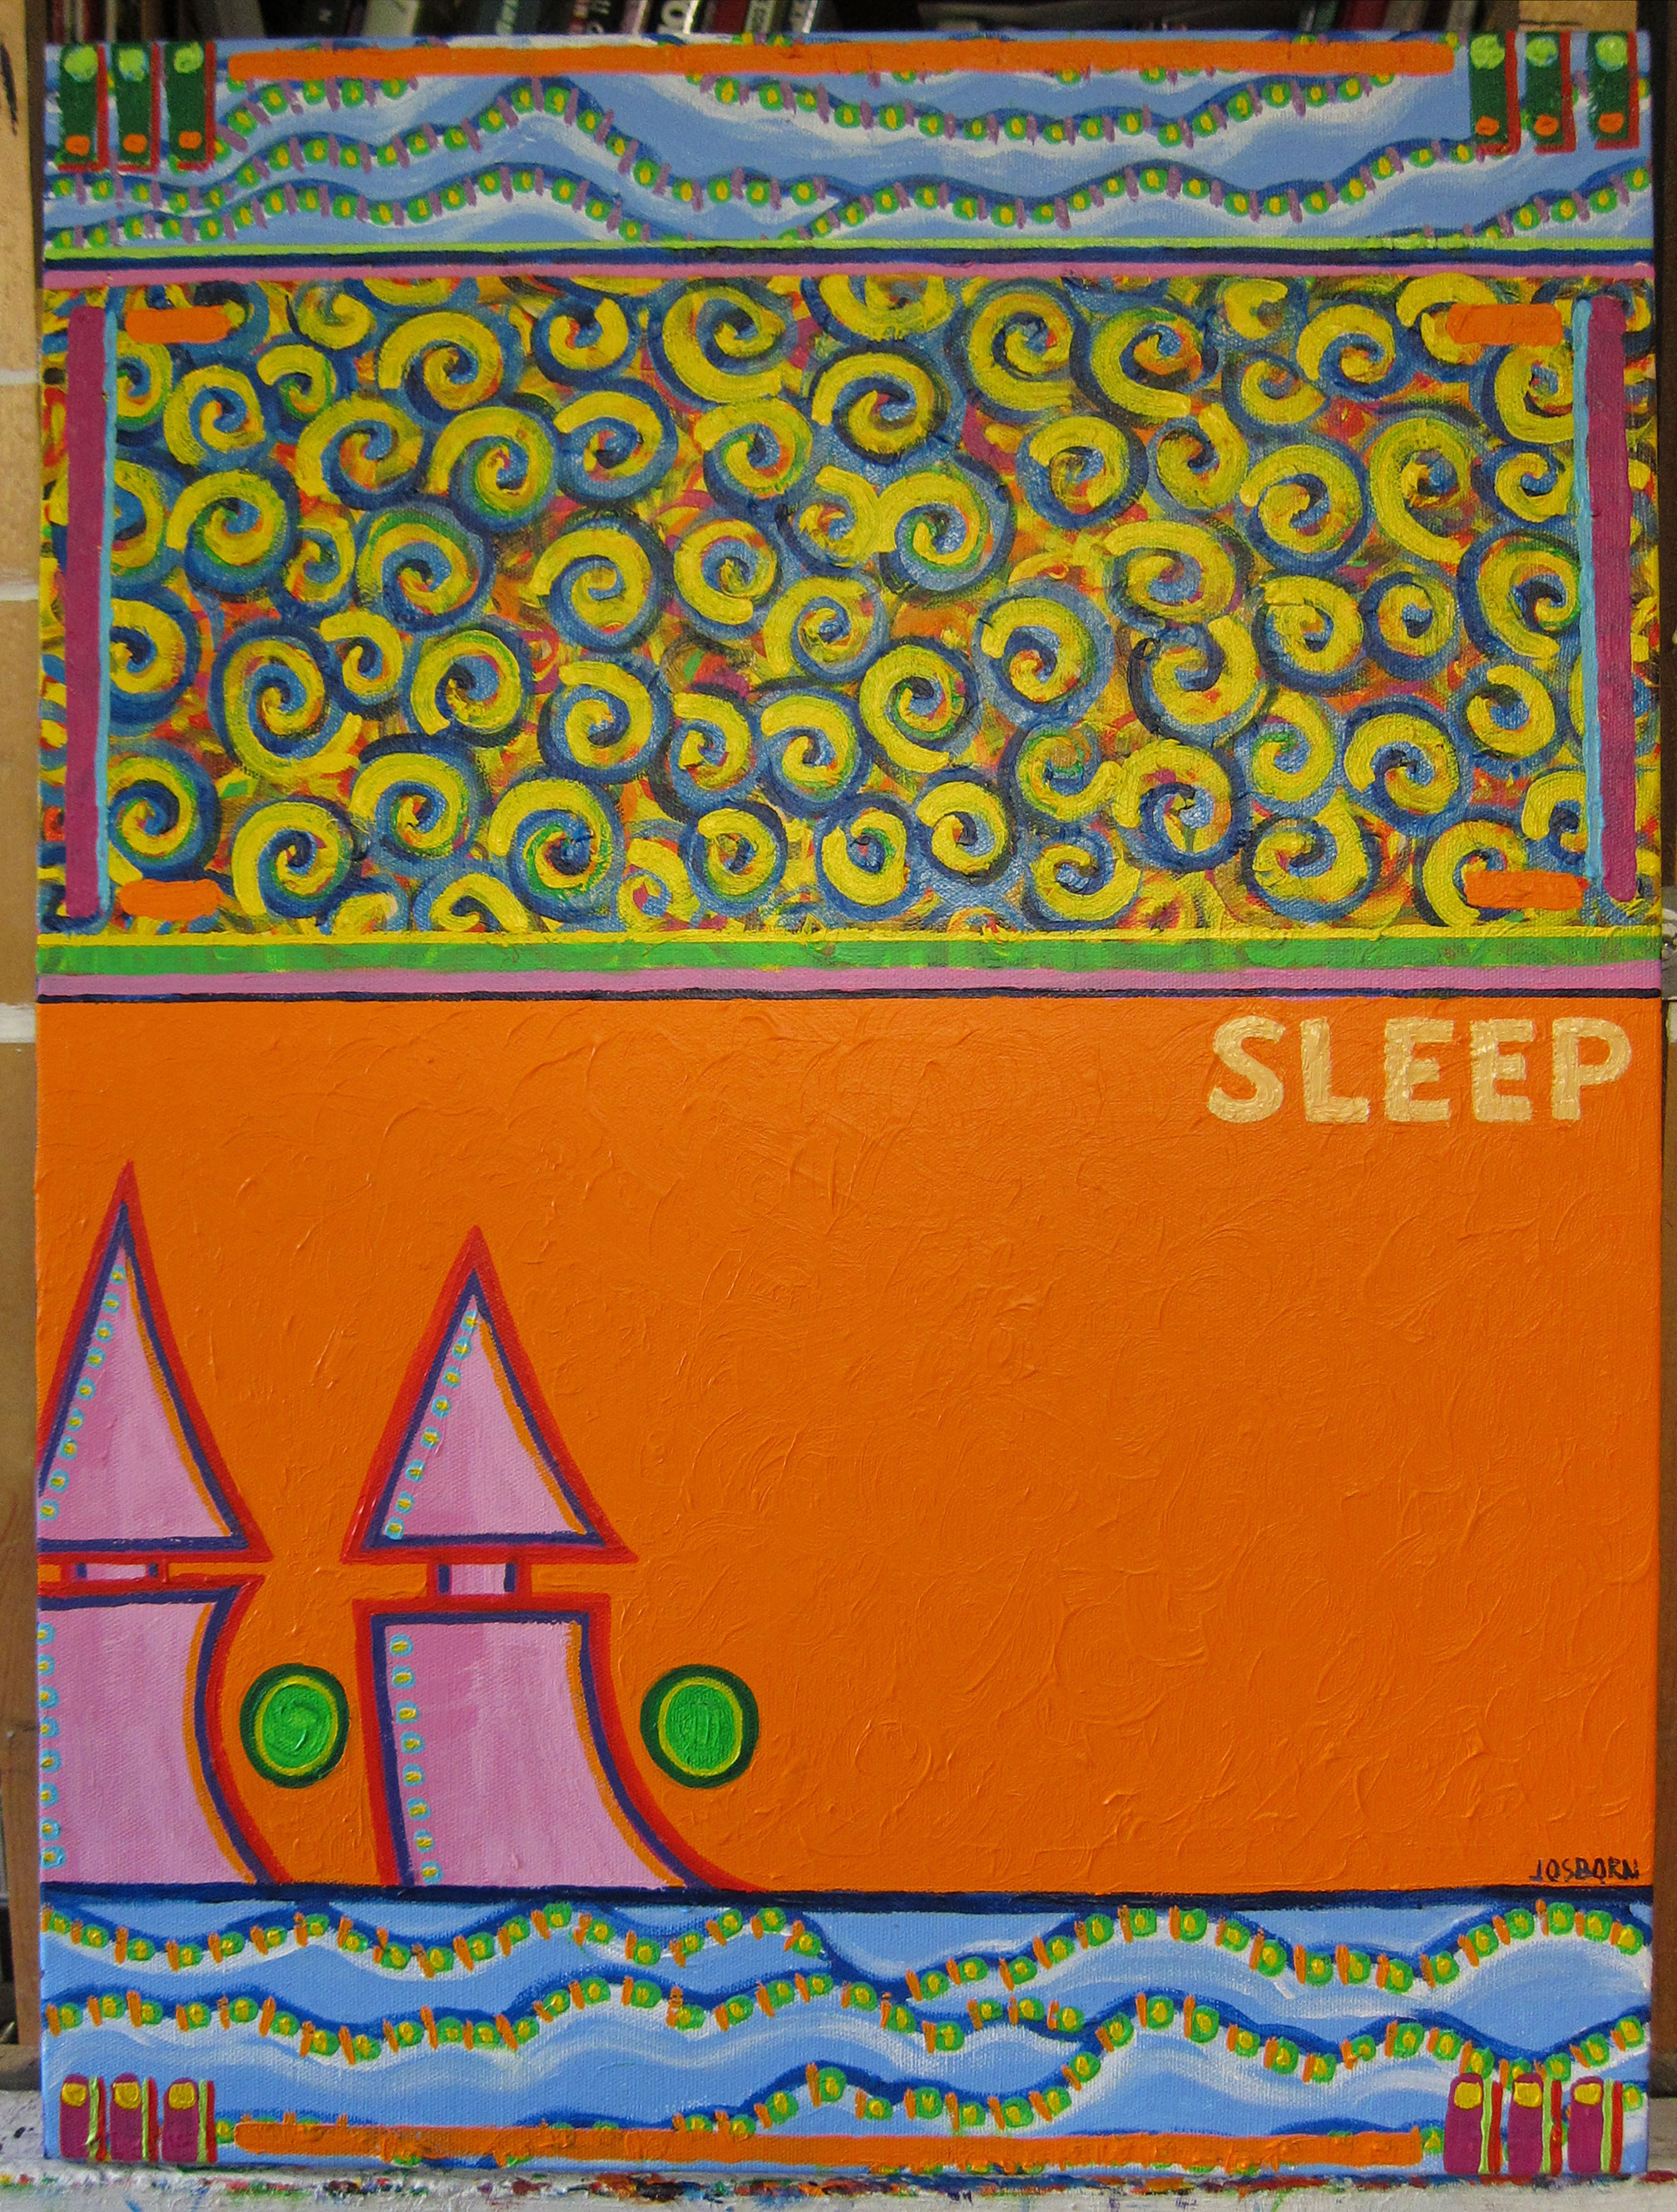
So the painting, “Stainless Sky”, that I wrote about last week when I was in the middle of making it has been finished. It took a while to complete but I got it done. The “Mid Process” piece that I wrote last week was written after a day of painting and it took two more days of painting to finish this one. A lot of those last two days was taken up by looking at the painting and wondering what to do next with it. What did I want? I wasn’t sure what I wanted most of the time I was working on it but by the end I figured it out. I was happy about that.
The first thing I notice on the finish piece is the swirls. They’ve changed quite a bit. On last week’s photo you can see three colors in the swirls: red, brown, and green. I added more layers of color before I was finished with those swirls. There were the toughest part to finish. I use swirls all the time but this go around I couldn’t figure out what I wanted from them. There are probably about six or seven colors in there counting the three original ones as I kept going darker and lighter with the color trying to suss it all out. It wasn’t until I put on the yellow paint and made the negative space on the inside of the swirl into a positive shape that I found my direction. Now the yellow shape is balanced well with the dark blue part of the swirl. I was missing that balance for a long time.
The purple and blue lines on either side of the painting in the swirl area serve to keep the eye contained on the painting. I find that on the “Half way through” painting my eyes tend to fly off the painting on either side of the swirls. Those lines work like a frame and make a painting within a painting.
I calmed the white and blue could areas of the painting down. In the half way through one the white is strong on the top and the blue strong on the bottom. Too strong I thought. Once again I wasn’t sure what I wanted to do with those areas so I started using little brush strokes of paint to tie in colors from the rest of the painting and get the blue and white to sit back and behave. It took a while. I have three different colors and brushstrokes sitting on top of the dark blue lines to knock them back. First it was the little green brush strokes, then later the yellow dots on top of the green, and finally even later still the orange lines in between. I like the way they snake along and tame the blue.
The orange has a couple of more layers than half way through. Plus it has some circular brush strokes in it now. I wanted the orange color to be built up a little more than when it started out. I wanted it to have some presence as paint. Sometimes if paint is put down too thin it doesn’t have enough oomph. I wanted some orange oomph so I put on two more coats of orange and put it down with heavy circular brush strokes. It doesn’t quite have the same impact as some of my oil painting textures but it did the job.
Getting the shapes and outlines right on those two towers took some time. They started out as just a couple of light to dark pinks on the inside with a darker outline but I knew that wouldn’t stand. The first thing I did was work the pink inside shape. I wanted to make that a positive space and not a negative space as defined by the outline. It was sitting behind the outline and I wanted it too sit on top of it. At lest that’s where I started. I then went in with a dark blue inner outline and a red outer outline and totally got rid of the original magenta outline. The transparent red plays nicely with the heavy orange and the dark blue helps define the shape. Then I put an orange line on top of one side of the blue line so it doesn’t define things too much. It took a while for me to get that balance the way I liked it.
The green ovals were a little easier. They almost finished themselves as I didn’t do much too then except keep them monochrome and sort of the same as the towers. My only big decision with them was if I should make them perfect circles or not. In my original drawings they were perfect circles so my instinct was to keep them that way but I decided against it. I’m not sure about it though. That’s the one part of the painting I look at and go, “Hmmmm…”.
The long orange brush strokes on the top and bottom keep the eye contained and unify the color. The brush strokes of color on the top and bottom of the painting and the swirl box almost painted themselves. They were put on at the end of the painting process and by them I had things figured out. They were like putting in the last few pieces of the puzzle. I had fewer choices by that time so they were easier to make.
The final thing I put on the painting was the word “Sleep”. It just came to me in a flash. That happens sometimes. I was looking at the painting for the millionth time trying to figure out what was next and decided it needed a word right in the space the word now occupies. And almost as fast I decided the word had to be “Sleep”. I wasn’t tired. I didn’t need a nap. It just came to me. I have no explanation for it but I like it. It took a bit of time to paint too. It looks simple enough but I laid that orange paint down thick and now had to paint some type over it. I couldn’t pencil in the type either. It was all paint on paint. I did figure out to use some masking tape to make straight guidelines for the top and bottom though. Then it was all putting the letter down and fixing mistake after mistake. But I got ‘er done.
I’m back from the comic shop this week and I got six new comics.
Check them all out here:
Halfway Done With This Painting
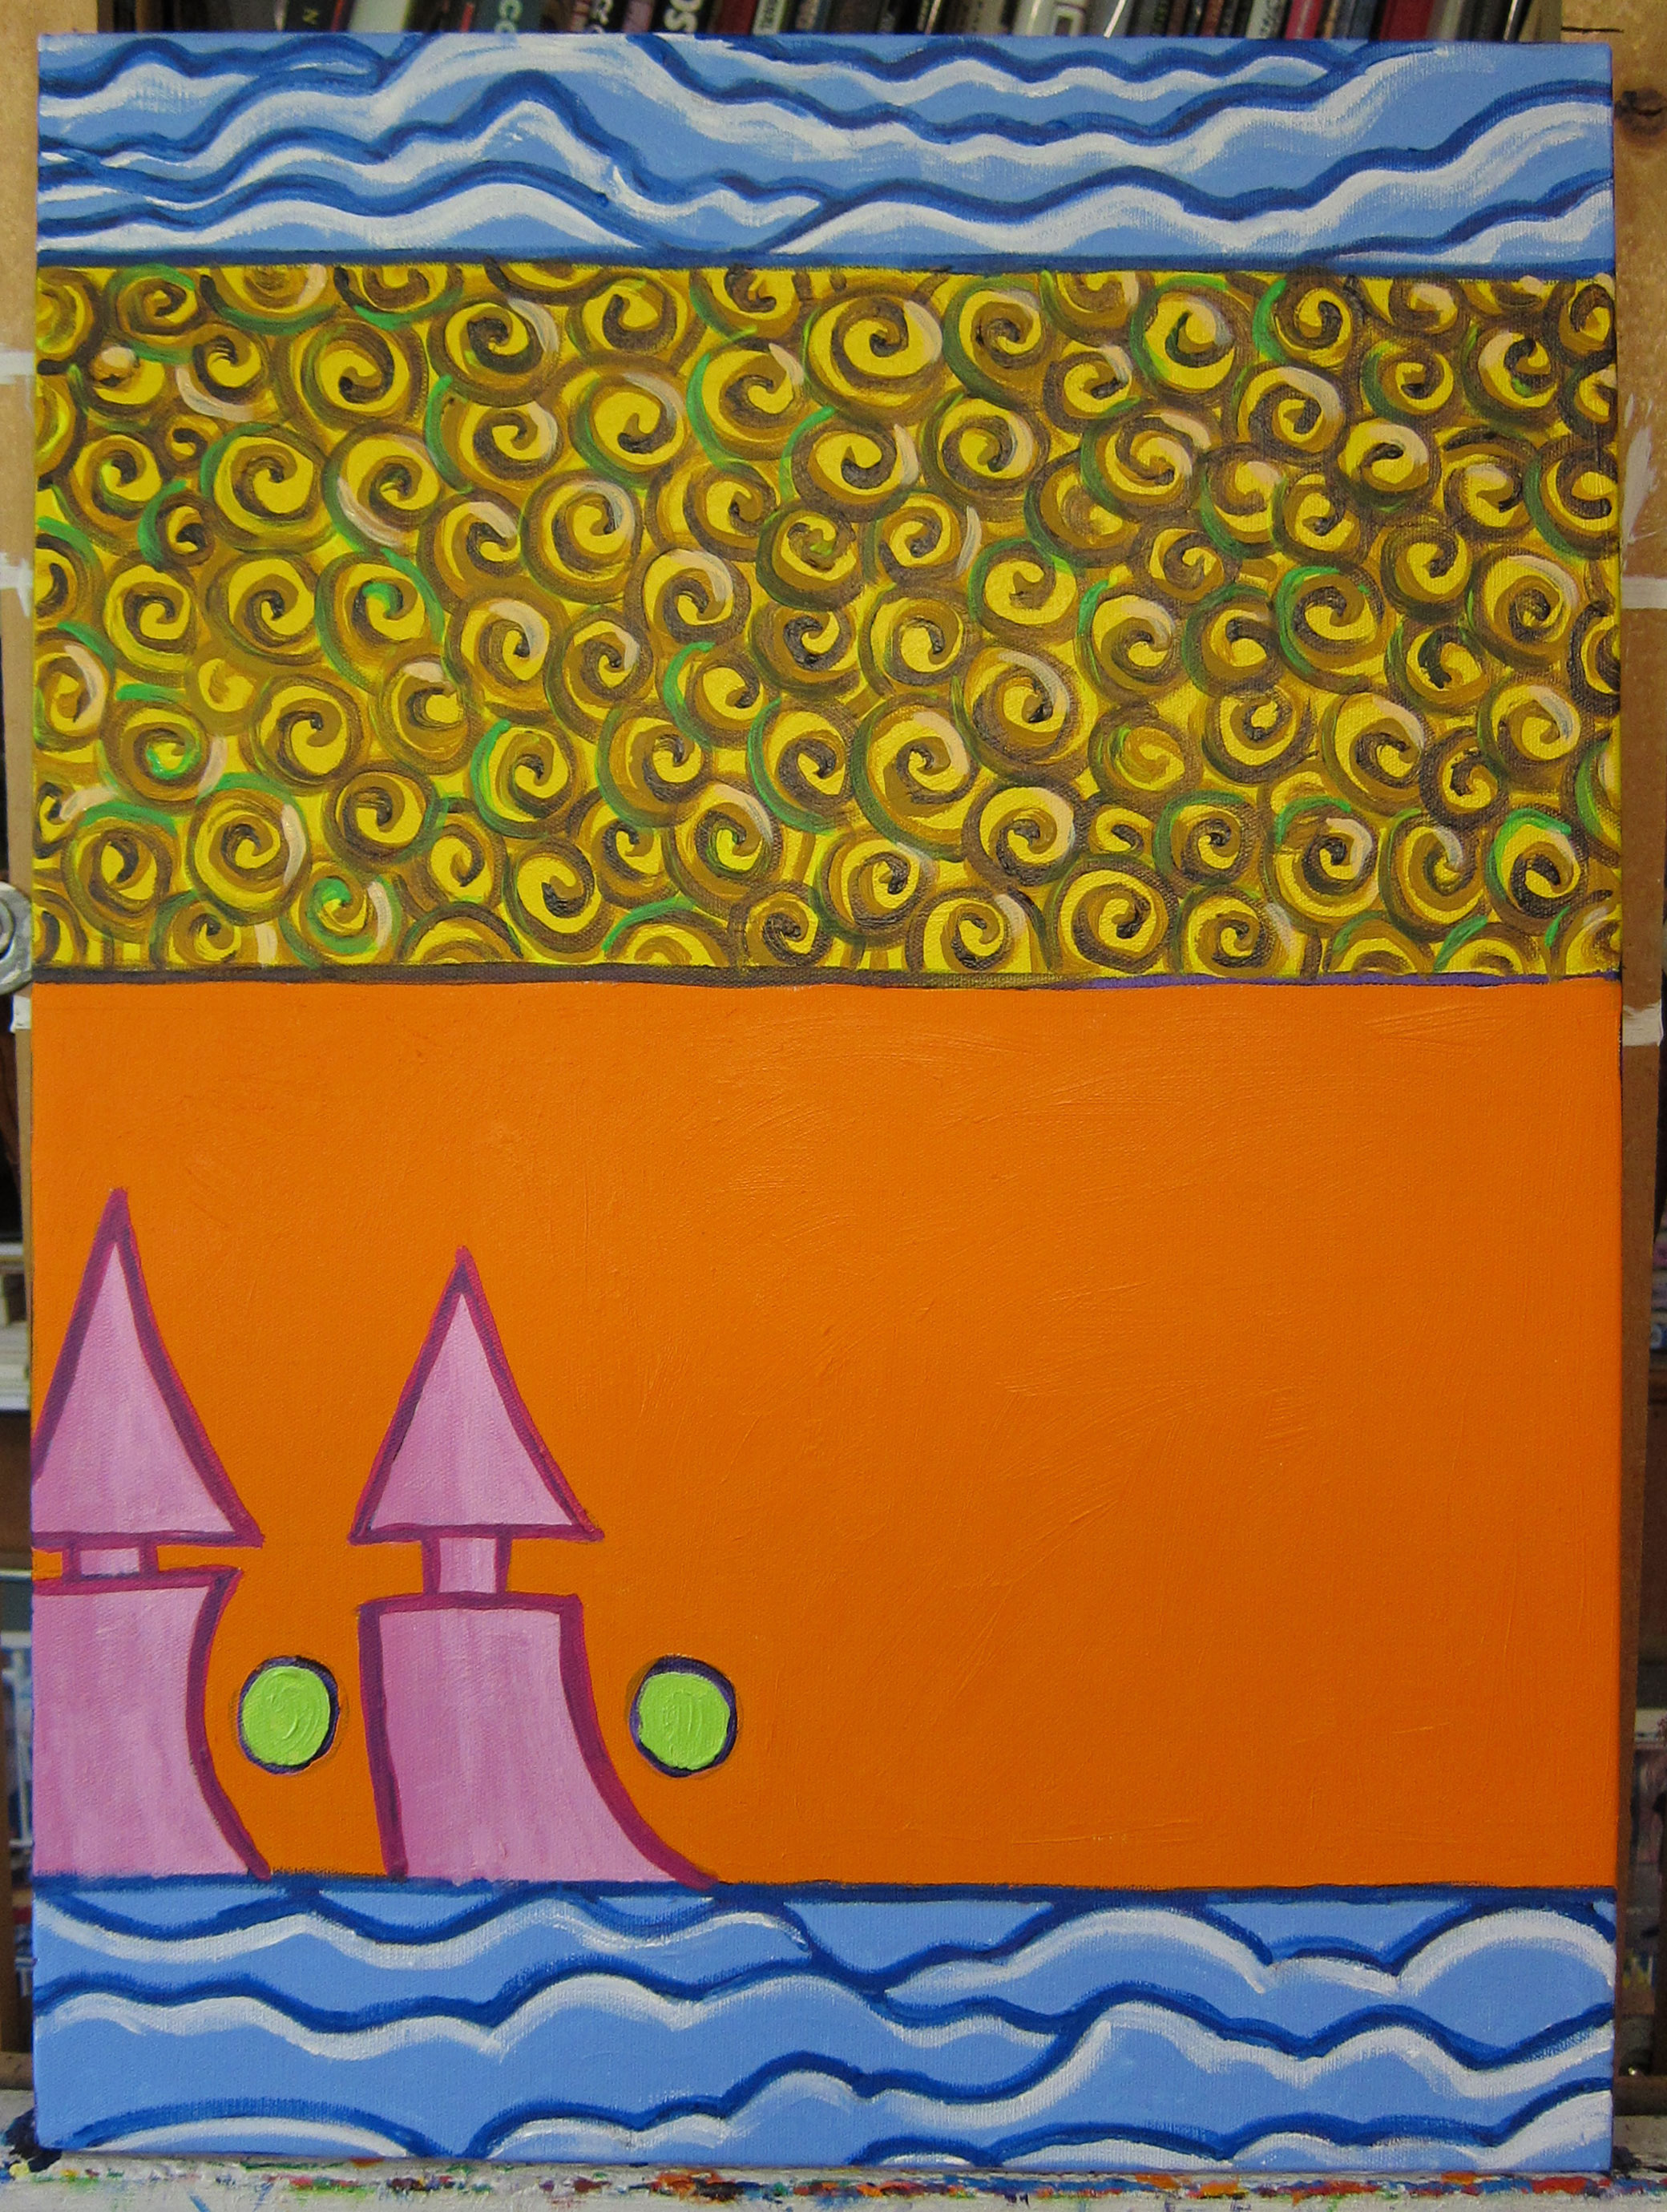
I’m working on a painting today. An eighteen by twenty-four inch acrylic on canvas painting named “Stainless Sky”. I thought I’d stop working on it for a little while and write something about it because I don’t think I’ve written about one of my pieces mid-process. I’m not exactly sure what to write. It’s odd.
I’m having trouble writing about the painting because I’m having trouble making the painting. I’m not sure what I’m doing with it just yet. It’s an unusual one for me. It’s not what I’d call an abstract painting but there are no recognizable objects in it. I’d call it an unsubjected painting. There are shapes, swirls, and maybe some clouds in there but no real people and places. There are not even my usual unreal people and places. Weird.
Normally I plan my painting out first. It’s how I do things. I’m a methodical artist. Method is important to me. But this time I dove right in. Sure I had a sketch made but it was a simple sketch stripped of all the usual details of people and places that I put into such things. I liked the sketch but I wasn’t exactly sure what it was. I also usually work out the basic color scheme before I start painting. Often the color ends up changing by the end of the painting but with this one I’ve been picking the colors as I go along. That means a lot more stopping and looking. Things go slower.
I decided to make this painting that way because I haven’t made a painting in a while. I wanted to dive in and get going. For most of this year so far I’ve been working on small drawings. I’ve been working in ink, marker, and watercolor but not in acrylic. I have made some big drawings on paper but that’s not the same as a big painting. I bought two canvases this size a couple of months ago and they’ve been sitting there ever since. I finally said, “Let’s go” and started painting on one even if it wasn’t by my usual method. Sometimes it’s more important to get started rather than waiting for the perfect start. Even so it took me half a week to actually start painting. Since the drawing was so simple it took me only a short while to transfer it to the canvas but then it sat there for days. Pencil on canvas doing nothing. It took me a further half a week to finally lay some paint down. These things aren’t always easy.
It’s also not easy because I haven’t picked up my acrylics in three months and don’t know which colors I have and don’t have. Sure I have a general idea but paint runs out and I forget. Plus I buy tubes of paint but then mix them in little plastic cups that seal. The paint stays wet in the little cups but it dries out eventually. At this point I don’t know what I’m going to get when I open up one of the little cups. Today it’s mostly been paint that’s not quite dried out and not quite wet. I’ve added water to some cups and cleaned others out entirely. That adds a little more time to the process.
I started the painting by drawing over my pencil line with a purple painted line. I often start my acrylic paintings this way but today I didn’t even want a purple line. I knew I was going to get rid of it but since I didn’t know what my colors were yet I put it down anyway. At this point I just obliterated the last of the purple line by painting a magenta line over it. Well, there is still some trace of the purple but you have to be looking for it.
The three main colors on this painting are blue, orange, and yellow. Or at least they are as I write this. I put the blue on the top and bottom first. I wanted to evoke the sky and so far have evoked both the sky and the sea. Though the original blue was a light blue it was too dark. I dropped some white on top of that to make some cotton candy type clouds. Then I made the clouds purple line into a dark blue line. I’m still not sure how I want them to look but that’s true of the whole painting.
Next I dropped the orange in. With the two pink and magenta tower shapes in front the orange takes on the location of a sky by with blue and white clouds up above and below it the space gets confused. If the orange was the sky it should sit back in space but so far it move forward. I like this kind of color defining space but haven’t come to a conclusion of how things should be just yet. I’m not sure what the orange is.
The yellow between the orange in the blue is filled with swirls but they don’t look finished. There is something missing as of now. I decided on swirls for that are early on and I was going to go with a lighter yellow to make the swirls but decided that there wan’t enough contrast and went with the two shades of brown instead. I think I’m going to have to work some more color into those swirls. Maybe I can use that lighter shade of yellow now. We’ll have to see.
I just noticed the last trace of my purple line is around those two small green circles. I haven’t gotten back to those green circles yet. The last thing I did was work on those pink tower shapes. They starred out a little too dark so I wart in with a lighter shade of pink. It looks better but they still need some thinking about.
That’s what’s different about this painting than my usual ones. Everything still needs some thinking about. Usually I do most of my thinking in the preliminary stages and by this stage I’m reacting to stuff but not thinking about what is it I want to do. Putting a lot of the work on the back end can make it harder to finish but it sure helped me get things started. And that is what I was looking for.
I’m back from the comic shop this week and I got nine new comics.
Check them all out here:
So now I’m one for three when it comes to changing flat tires on my bicycle when I’m out on the road. For years I didn’t even bother with the idea. If I got a flat I just walked my bike home. I’m usually within a few miles of home when I cycle since my route is circular and it takes no more than thirty minutes to walk home from most points. So I never bothered with a tire changing kit. Last year after one too many flats I changed my mind and bought a small under-the-seat bag for my bike, an extra tube, a portable air pump, and a 30-in-1 bike tool. Earlier this year when I got a flat I changed out the tube lickety-split. The next two times I was not so lucky.
Oddly enough both flats came on my front tire. Since my body weight is over the rear tire that’s where I usually get a flat. Maybe one out of ten flats happen on the front tire. For the first one I think I hit a small pothole and the tire popped. The roads are a mess from the long and snowy winter and there are potholes in lots of places but I usually avoid them. This one I didn’t even see but I felt it as I went over it. The tire made a popping noise and immediately deflated. I hopped off my bike, gabbed my tools, and took the tire tread off of the rim. Then the trouble started.
The tire valve has a little hand tightened thumb-nut on it. When you put the valve stem through the rim you tighten the nut on it with your thumb and finger and the valve pulls off of the rim a little and locks into place so an air pump can fit over the valve. Except this time I couldn’t unscrew the nut with my thumb. I think a winter of water, ice, salt, and road grime locked it into place. A simple pair of pliers would have rectified the situation but guess what tool my 30-in-1 bike tool doesn’t have on it? That’s right. Pliers. It has all sorts and sizes of wrenches but this thumb-nut was round. I eventually got frustrated and tried cutting the valve off the tube but that was useless. The valve was still locked into place on the rim. Plus the tube couldn’t even be patched then. That was a dumb move.
So I ended up walking my bike home. It was especially annoying since I now had the tube and tread off of the rim. I supposed I could have tried putting the tread on by itself to walk the bike but that didn’t seem like it would work well. And since I didn’t want to risk ruining my rim by rolling the bare metal along the ground I had to hold the bike up on its back wheel and keep the front wheel off the ground as I walked. I made it about a hundred yards before I noticed having the bike upright like that made my water bottle fall out. I had to back track to find it. Yeah, that was a frustrating morning. Plus as I was looking for my bottle I noticed a large dead frog in the road. I don’t think I’ve ever seen a dead frog in the road before. Weird.
That was on Sunday and the second flat came on the following Saturday. Not a pot hole flat this time though. I was nearing the end of my ride and I noticed a funny noise coming from my front tire. I thought the brakes were rubbing or something. A couple of hundred yards later the noise got louder and more persistent and I realized my front tire was leaking. I pulled over. Sometimes with a slow leak you can fill the tire up with some air and ride again for a bit. Since I was near the end of my ride I decided to try that. It didn’t work. My slow leak turned into a fast leak and the tired got flat as soon as I stopped pumping air. Oh well, I decided to change the tube.
This time the tube change went easily. No problems. I even filled the tire with air and had no problem. Then I tried to remove the pump from the tire valve. These tires have what is called a Schrader valve. It’s a couple of inches long and on the end is a tiny valve that you unscrew to get the air in it. There is a little metal stem inside the larger valve body that holds the tiny valve in place. The tiny valve should not come off that metal stem when you unscrew it to fill with air. This time it did. I’m guessing that I filled the tire to about 60 PSI (with my larger pump that tire gets 90 PSI) and as I was trying to remove the hand pump I met some resistance. I don’t know why. The pump usually comes off smoothly. I gave it a little yank, the pump came off, and the tiny valve flew off the valve stem and was lost forever. As a matter of fact the little metal stem flew away too. All I was left with was the plastic stem with nothing to stop the air from coming out of it. I walked home.
That second flat was a puncture flat. I must have hit a piece of glass or some such. Usually a couple of flats in a row mean my tire tread is wearing thin. I checked out the tread and it didn’t seem too bad but then I wondered what I was really comparing it to. I determined that I was really comparing it to other thinner treads that I felt when trying to decide the same thing in the past. I ordered a new tread. I put that one on my bike today and I’ve got to say that it has a lot more tread than my old one. The old one really was thin.
I’m back from the comic shop this week and I got eleven new comics.
Check them all out here:
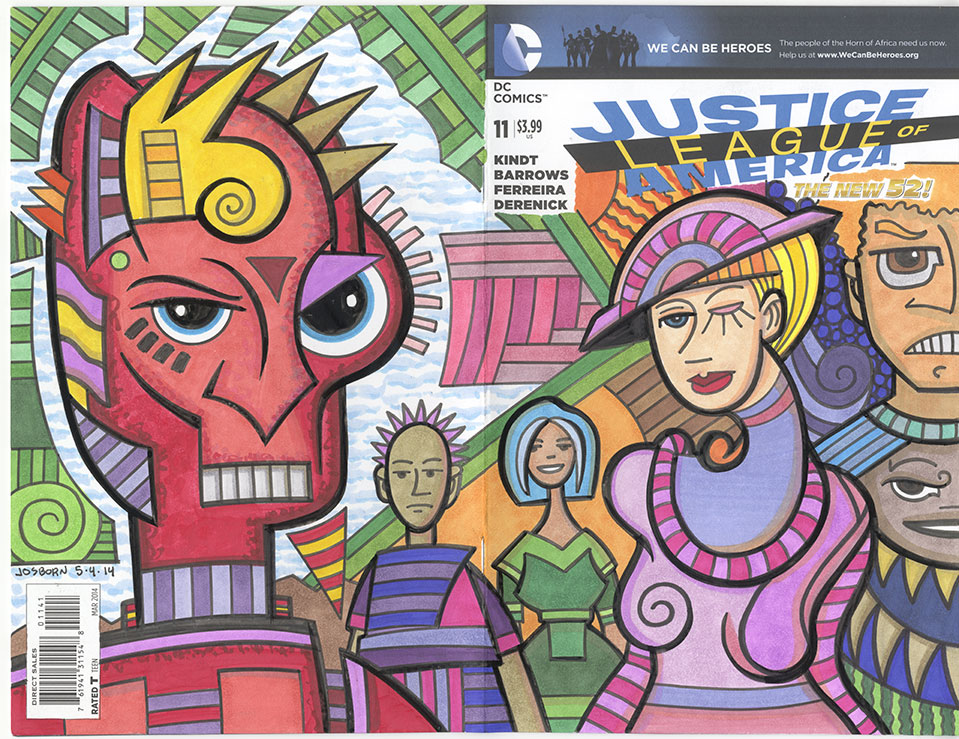
I made a new sketch comic cover this week for the first time in months. I’ve been buying blank sketch covers all that time but not drawing on them because I got bored with the whole concept. The concept being making a drawing on the cover of the comic that has something to do with the comic. That’s generally how sketch covers are done. I found that restricting and since nobody cares about my sketch comic covers anyway why was I bothering trying to please anyone with the expected? So I decided to make one of my own drawings on the cover. One that had nothing to do with the comic inside. It became a totally different process and took a whole lot longer than any of my previous ones.
First off I had to decide what I wanted to draw. I pulled out a bunch of drawings from my stockpile of drawings, looked through them, but couldn’t find anything I liked. Then I looked over at a couple of drawings that I made for my YouTube channel and they seemed perfect for what I wanted to do. I scanned in the two 5×7 marker drawings plus the blank comic book cover and put them all together into one file so I’d have a template to draw on. Since there were logos and such on the cover I could have any drawing those areas. This was the stage to figure that out. After I got the two drawing in place on the template I turned then into blue lines and printed them out on a 9×12 inch piece of bristol paper. This is the pencil drawing stage.
This part is straight forward. Using the blue lines as an underdrawing guide I redraw the whole thing in pencil. This is where I have to make everything work. I have to turn the two drawings into one drawing and make sure every part of the drawing is thought about and works. The 5×7 inch sketches that I was working from were spontaneous ink drawings and as such were far from finished drawings. They’re made to just get ideas on paper and not work about getting everything perfect. Now was he stage for getting everything perfect. Or at least pretty good.
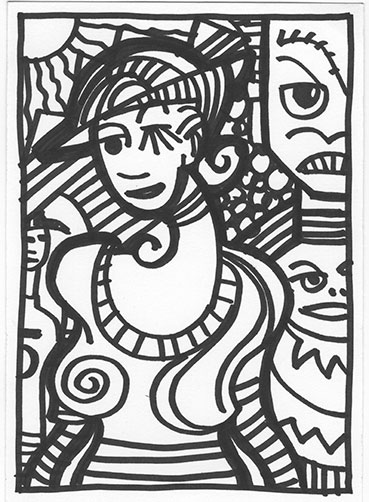
After I finished the pencil drawing I scanned it in and blew it up a little bit in Photoshop to get it to the correct size. Here is where things get a little bit different from my usual process. Normally I would turn the pencil drawing into blue lines, print out the blue lines on bristol paper, and then ink and color the blue line pencils. Since I was working on a comic book sketch cover that is actually attached to a comic book I couldn’t print in blue lines. A comic book won’t go through my ink jet printer. So I had to transfer the drawing a different way. I chose graphite paper.
I find graphite paper useful but annoying. It’s paper with graphite attached to one side of it so as you imaging it can get messy. I put the paper graphite side down on the blank cover and taped my correct sized printout of the pencil drawing on top of the graphite paper. Then I get a hard-leaded pencil, a 2H, and trace the drawing. The pressure of the pencil point transfers the graphite on the graphite paper onto the blank comic nook cover. Unfortunately the pressure of my hand on the paper can also transfer some graphite on the sketch cover. Tracing the entire drawing plus keeping things clean usually takes more effort than I want it to. But it’s still a lot less effort than redrawing the whole thing. I also drew on both the front and the back cover. So that’s twice as much drawing as the other ones I made where I just drew on the front cover.
The next stage was inking. But first I have to mention that since I was working on both the front and back covers of the comic I taped it down to a larger 14×17 inch piece of paper. That way the comic would not get too battered moving around my desk as I drew on it. That worked out well as the corners of the paper got dinged up but not the corners of the comic book. I used my sign pen filled with India ink and some French curves to ink most of the cover. Then I went in with a brush and ink for the parts that weren’t geometric. I ended up with a nice black and white ink drawing that I scanned in just to save before I added color.
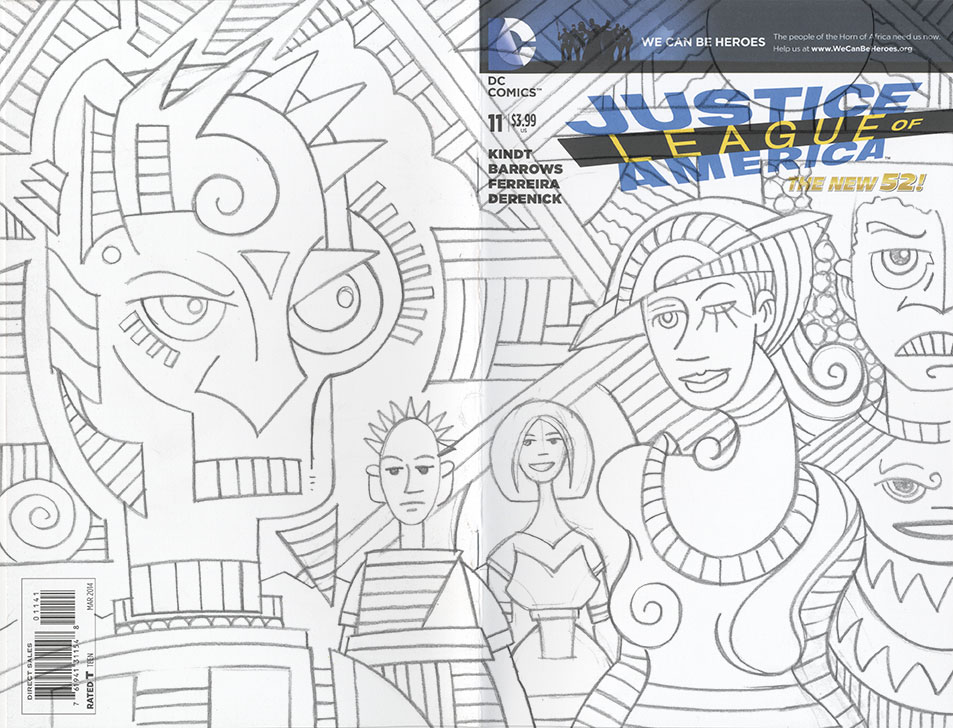
The color on this piece is all Copic marker but I have to use a different technique than I usually do. When I user marker on bristol paper it really absorbs into the paper. I can keep adding layers of marker stroker on the paper and build up pigment. This sketch cover paper is much less pours and the ink sits on top of it rather than sinking in so much. I can’t load the paper with as much pigment. I have to avoid my normal layering method and wait a moment or two longer than I usually would for the marker to dry. After the color I hit it with some more black ink since the color lifted some of that off.

As you can see my drawing has nothing to do with the JLA. I used the woman and her crazy hat for the cover and the big headed freaky looking guy for the back. Maybe they can be super heroes of some kind. They do all look weird and are dressed in costumes. The guy all the way on the right might even be a giant. That’s it, they’re some kind of alternate world Justice League.
No matter who they are I like the way this cover came out. It was sort of serendipitous that I was able to make a couple of drawing that were only drawn so that I could make a video of drawing into a finished piece. I’m happier with it than my other sketch cover too. I’m just better are drawing my own things rather than someone else’s things.