I’m back from the comic shop this week and I got six new comics.
Check them all out here:
I’m back from the comic shop this week and I got six new comics.
Check them all out here:
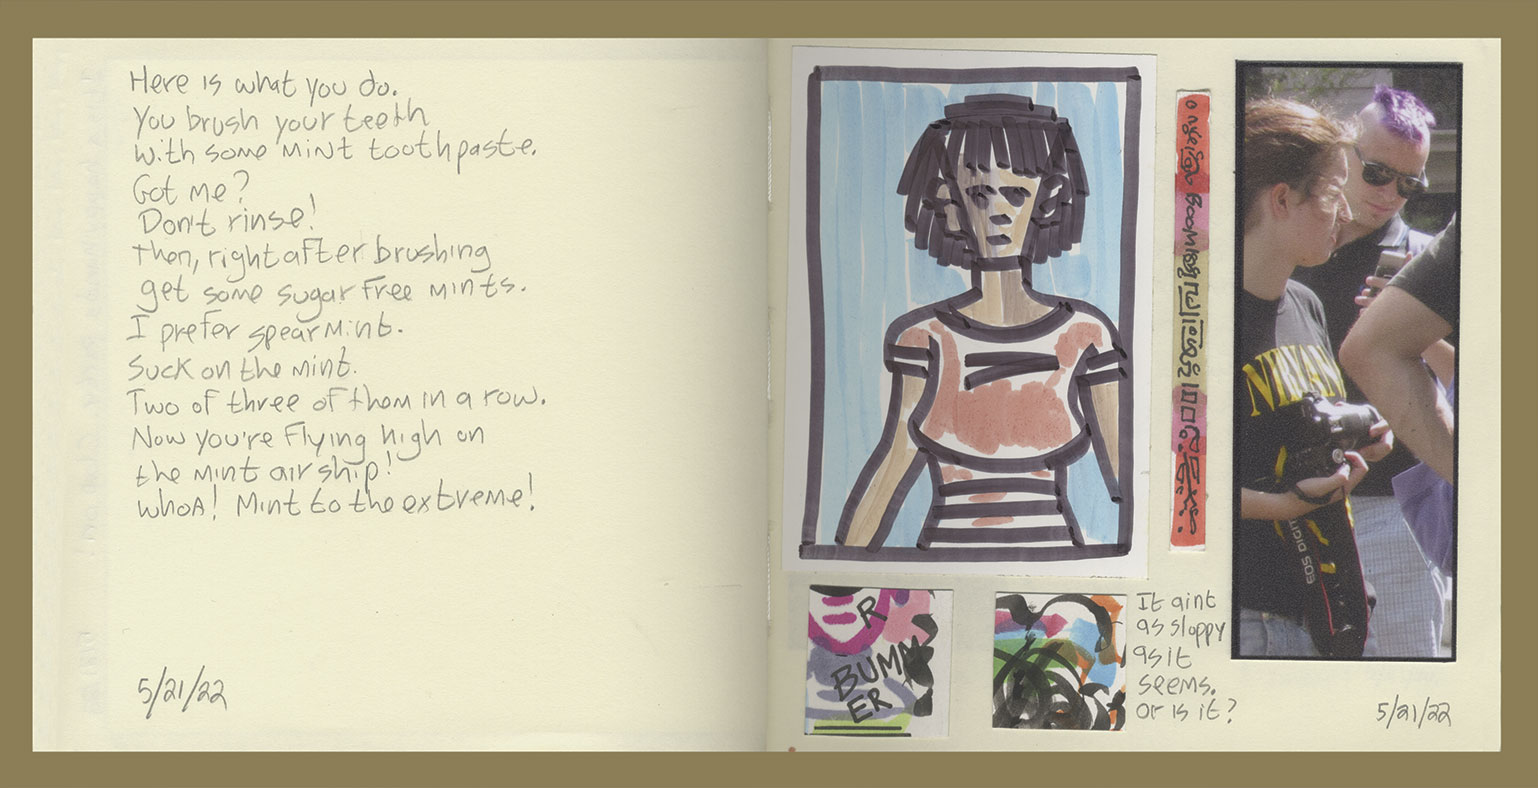
I started a new project this week (it’s the middle of May, 2022). Or maybe it’s a new genre for me. I’m not sure exactly what it is but I guess it’s the closest to scrapbooking that I’ve ever done. As an old school paste-up guy (that was what book publishing involved before the digital age) I have the skills and tools to cut stuff out and paste it down with precision and neatness. I like to use those skills.
The project started when I was looking online at sketchbooks and I saw a square 5×5 inch one. I don’t know why but it caught my eye. Then as I was thinking about square sketchbooks it struck me that Instagram made the square photo popular. Maybe I could do something with that.
I like to collect photos and images from social media and the web in general. I usually look at Instagram and Twitter on my iPad. As I browse those social media sites if I see a picture that I like I either download it or take a screen shot. As I’m an organized person I then put the picture in a folder with the person’s name or social media handle on it. I’ve been doing this for years. I usually don’t do anything with the photos but they sit there and I sometimes look at them.
So the thought I had was that I could print out a square photo and paste it into the square sketch book. That idea was enough to get me to buy the book. When the book arrived it gave me more ideas. Just pasting down Instagram photos didn’t seem interesting enough but I knew that was a starting point. Over the next day I thought about what else I wanted the book to be.
By the way I named the book “Small Things.”

Being an artist who has spent three decades making art I’ve got a lot of stuff lying around the studio. Among that stuff is a lot of little drawings on little pieces of paper. Nothing finished. They’re all mostly working drawings. Working drawings are done in order to make a bigger finished piece. I have a baseball card box filled with little drawings that I kept because I liked them but on their own aren’t much to look at. Who cares about an inch tall sketch of a random face?
I’ve also kept some small pieces of paper that I used for testing pens or markers. Usually they have some color in them but otherwise have black and white lines that aren’t really drawings but often look cool. I kept them because they are little works of abstract art.
I took these three things: square photos, baseball card size thumbnail drawings, and those little abstract works and started pasting them down in the sketchbook. I would arrange two or three things on the right hand page and leave the left hand side blank. After getting a few pages done I decided to write stuff on the left hand side. I would write stuff on the right hand side too but the left hand side had more room for wring.
After working on a few pages of art, photos, and writing I decided I needed more variety in sizes. I needed some photos to fit under a 2.5 inch square of art. So I printed out some photos (from Instagram) that were 1×4 inches. After doing that I immediately noticed that I needed some vertical versions of photos that size. So I printed some 4×1 inch photos.
As I made more pages it seemed I needed a bigger variety of stuff to paste down. That’s when I remembered my tracing paper drawings. Sometimes as I’m drawing I need to use tracing paper. Often it’s when I’m drawing something symmetrical. I draw the right side, put a sheet to tracing paper over it, trace the right side in dark graphite, flip the paper and transfer the drawing to the left side.
There is really nothing to do with these tracing paper drawings after I’m done with them. Often I reuse the tracing paper and there are a lot of pieces of different drawings on it. So I decided to pick out some of the pieces to glue down into the book.
A quick word about how I paste things down. I don’t use paste. I use repositional mounting adhesive. That’s sticky stuff on a roll of plastic paper. I put my art or photo on the sticky side of the paper, burnish it down (apply pressure), peel the plastic backing, and at this point the sticky stuff has transferred to the back of the photo or art and it can be stuck into the book.
I mention that because the next thing I though I needed were stamps. At least something about stamp sized. I remembered that I had some inkjet sticker paper so I decided to use it. I made a bunch of one inch squares in Photoshop and put a bunch of my street photos into them and printed them out. I then had a bunch of tiny photos to stick down.

The last photo idea I had was to use my “Objects” photo folder from my iPad. These are random things I’ve taken photos of over the years. Usually just a small something that I wanted to post somewhere. Some dice, purple flowers in my lawn, a toy, and lots of other stuff. Photos that served a purpose for a moment but were then useless. I kept them anyway. In a folder. I like to keep things because I never know if I can reuse them but I am always looking to reuses them. I printed these ones at half the size of the Instagram ones. About 2.5×5 inches.
For about a week I was moving at a pretty good clip on this project. I think I made 50 pages. I also decided to make a digital book out of it too. I scanned in all the pages and set them up in a book in InDesign. That took some time but was still doable. I like the way it’s going.
I’ve lost a little energy for this project at the end of this week. Maybe because I had a lot of energy for it at the beginning. I have gotten a lot of pages done, and that’s a good thing, but I think I need even more types of things to paste down. Even with all the stuff I’ve come up with I want even more variety. We’ll what I can come up with. Time will tell.
I’m back from the comic shop this week and I got four new comics.
Check them all out here:
I’m pretty good at backing up my digital files. I even pay five dollars a month with a service that backs things up off site. That’s really an “In case of emergency” thing since most of my files are really big and to recover a whole hard drive worth of stuff would take a while. They’d have to ship me a new hard drive with the stuff on it as downloading it would take forever.
I’ve also used the “Time Machine” app on my Mac over the years. They problem really is money. I have six hard drives connected to my computer and if I really wanted to back each of them up that means I’d need six additional hard drives. Thats a lot of space, money, and hard drives! (They’re all backed up off site though.)
From 2008-2021 my main computer was a MacPro Tower. My main hard drive on that one, by the end, was an 8TB hard drive that housed all my artwork. I’ve got stuff going back 25 years on that drive. The problem was that 8 TB hard drives are expensive so when I bought that 8TB one I couldn’t afford to buy a backup one too. So I no longer had a Time Machine backup for my main drive. I still had the offsite one though so I was okay.
Last year I finally got a new computer. A MacMini. I had to buy docks to attach all my old hard drives to it but I also bought a 2TB hard drive to use as a backup for my new main system (the built in hard drive of the new MacMini was only 1TB). Of course my old 8TB hard drive was hooked up and I was still going to be working on it and it was still not backed up on site. After buying a whole new computer I sure couldn’t afford a new 8TB drive.
Everything was running fine with the new computer with one exception. Occasionally as I was going to save a document (on my 8TB hard drive) I would get a message that said I didn’t have permission to save it. I could do a “Save As” and rename the file and everything would be fine. Sometimes Macs have weird permission quirks and there was an easy workaround so I didn’t sweat it too much. That went on for eight months.
Last Friday I woke to a disturbing message from my computer. It told me it could no longer save things to my 8TB hard drive and I had to copy everything off of it and reformat it. That will sure cause some anxiety! Especially since I had nowhere to copy the 4TB+ worth of data I had on the drive. I had no choice but to buy a new 8TB hard drive then. I got on Amazon and found that they could get one to me that night. So I ordered it and waited.
I got the hard drive that night at about 8PM and then I had to decide what to do with it. The old 8TB hard drive still had my old system on it in case I wanted to slide it back in my old computer and start that thing up again. In the eight months I had the new computer I never had to do that but I could. If I wanted to do that again I’d have to clone my old drive rather than just copy info off it. I looked up how to clone a drive and gave it try. As I suspected it took about ten seconds to tell me it couldn’t clone the drive. After all the drive needed to be reformatted as it wasn’t working right.
I decided that I didn’t need the old system anymore and I would just have to copy the info to the new drive. I grabbed my “Work” folder and a few others and set them to copying overnight. I knew that with copying such large chunks of info things could go wrong but what else could I do at that time of night? I tried to put it out of my mind and get some sleep.
The next morning I woke up to find that the copying had failed because of permissions. I didn’t have the permission to copy something. The problem is there was nothing to tell me what was the thing that I didn’t have permission copy. So I’d have to copy everything chunk by chunk. I’d grab one folder that had anywhere from 10-200TBs in it and see if it would copy. This took all day. From 7AM until 7PM.
It turned out that what stopped everything from copying the night before was one font. One font out of 4TBs worth of files held up the whole process. It was even a duplicate copy of a font. It cost me about five hours to find that out. Luckily it wasn’t a real five hours as the vast majority of time the machine was doing its own thing copying files as I was doing other things but I had to keep checking it. It didn’t make getting anything done that day any easier.
After I got everything copied I reformatted the old 8TB hard drive and all was well with it. I decided to set it up with Time Machine to back up the new 8TB hard drive. It turns out that is a little confusing to do. It’s easy with a main hard drive and an external hard drive for back up but with two external hard drives I was a little lost. I think I did it correctly but I’m not 100% sure. It’s been backing up for about 12 hours now so I think it’s doing its job. We’ll see.
So I dropped $170 on that 8TB hard drive but now I had another worry. My photo hard drive. That 3TB hard drive has all my photos and other family photos going back nearly 100 years; thousands upon thousands of photos. I didn’t want a panic moment with that drive. I went back online and dropped another $100 on a portable 3TB hard drive.
For my photos I don’t need an active Time Machine back up. I like a hard drive I can just copy to and then turn off. A hard drive that is off can’t break. At least I think not. I’m copy everything from my photos drive onto the new backup drive and then just add the new photos in every now and then. That’s the plan and as I said I’m good at backing stuff up so I know I’ll keep it up. They key was having the money to buy the drives. Luckily I had it this time.
I’m back from the comic shop this week and I got nine new comics.
Check them all out here:
I’ve got an Instagram just like everybody else (or a least like a lot of people). I’ve been posting on there for years and years but not many people follow me. I’ve got 759 followers but only about 20 people push the like button on any given post. Not a very big reach but I still like to post there. 20 people is actually more interaction than I get on any other social media platform. It’s not easy being a nobody:).
I wrote a few months ago about the dice color compositions that I post on Instagram (Dice Color Compositions) so I figured this week I’ll write about the videos that I often post there. I call them my tape peeling videos.
I have no idea when I first taped the edges of a drawing. I wasn’t the first one to do it and I won’t be the last. An artist tapes the edges of a drawing to keep them clean. That way you don’t have to worry about stopping your hand, and therefor the paint or ink, at the edge of the drawing. You put tape around the outside edge of the drawing or painting, make the art, then peel the tape off and any over-paint goes away with it. It keeps a piece neat. Not every artist cares about clean edges but plenty do.
Sometimes taping the edges is essential. If I’m making an ink drawing and I want a group of lines to run off the side of the page it is much easier to draw right over the edge than it is to stop the brush right at the edge. I don’t want the energy of the line to stop at the edge. I want it to go over the edge. That’s easier to accomplish with tape in place.
I can remember back in the 1990s I first taped the occasional edge using drafting tape. That tape is like masking tape except it has less glue. Low tack tape it’s called. That way you can pull the tape up without the tape being so strong that it pulls up the top layer of the paper with it. We all know what that’s like. Tape can be a beast.
I haven’t used drafting tape in a long time. Sometime in the late 1990s-early 2000s they came out with something called “Artist’s Tape.” Where drafting tape was the same color yellow/off white as masking tape artist’s tape is stark white. It also has less glue to it so as not to tear the paper but it’s still not as low tack as the stuff I use to mask my edges now. I use artist’s tape all the time when I need to tape a piece of paper to my desk but for masking edges I prefer removable tape.
Removable tape is just like the Scotch tape we’ve seen and used all our lives except it’s really low tack. It’s meant to be easily removed. I first used it regularly in the 1990s when making my photo collages. Before the digital age I used to cut up physical photos and arrange them into a big photo. After I cut some photos, and then before I put them in place permanently, I’d use removable tape to keep them in place. When I finished the photo composition I’d pick the photos up, pull off the removable tape, and them paste them down with mounting adhesive. It was essential that the tape came off easily and left no residue behind. Real tape would wreck the photos.
These days one of the sizes that I work at all the time is 6×9 inches. I buy 9×12 inch Bristol paper and cut it in half giving me two pieces at 6×9 inches. I do a lot of drawings at that size. It’s often my “First step” size on the way to bigger 11×17 drawings. At the 6×9 inch size I also make a lot of ink drawings. I look through one of my Inkbooks (sketchbooks) for thumbnail drawings that catch my eye, blow them up to 6×9 inches, and print them out in blue line. That way I can use ink right over the blue line. After I’m done I scan the ink drawings in bitmap mode and the blue lines drop right out.
It’s been a few years I’m not exactly sure when but at some point I decided to start taping the edges of these ink drawings. I don’t tape the edges of all my drawings, or even all my 6×9 inch drawings, but for these ink ones I decided to. It was just easier to draw them with ink when I didn’t have to think about the edges. After the drawing was finished I’d pull the tape off and have nice clean edges.
Once again I’m not sure when it happened but, one day, I decided to make a video of me pulling the tape off a drawing. It’s a satisfying feeling. I’ve done the work, the drawing is finished, and now I can do this one more easy step to clean up the edges of the drawing and make it look neat. What was once messy becomes clean in an instant. Order from chaos. You don’t get that a lot in life.
It only takes about 45-55 seconds to peel the tape. It’s under a minute so it fits on an Instagram reel with ease. I have a cardboard box that I made, for reasons long forgotten, that sits under a window and is just the right size to fit my iPad on to film a video. So the drawing goes on my drawing table, the box also on the table, and the iPad on top of the box. Then I film. It’s really easy.
It turns out other people find the tape peeling satisfying too. I have no idea how Instagram chooses to show or not show something to people but sometimes my tape peeling reels can get 100 likes and sometimes only 20. Either way it’s usually more likes than my dice color compositions on my regular feed. So I’ll continue to make them. Easy and satisfying is a good combination.
I’m back from the comic shop this week and I got seven new comics.
Check them all out here:
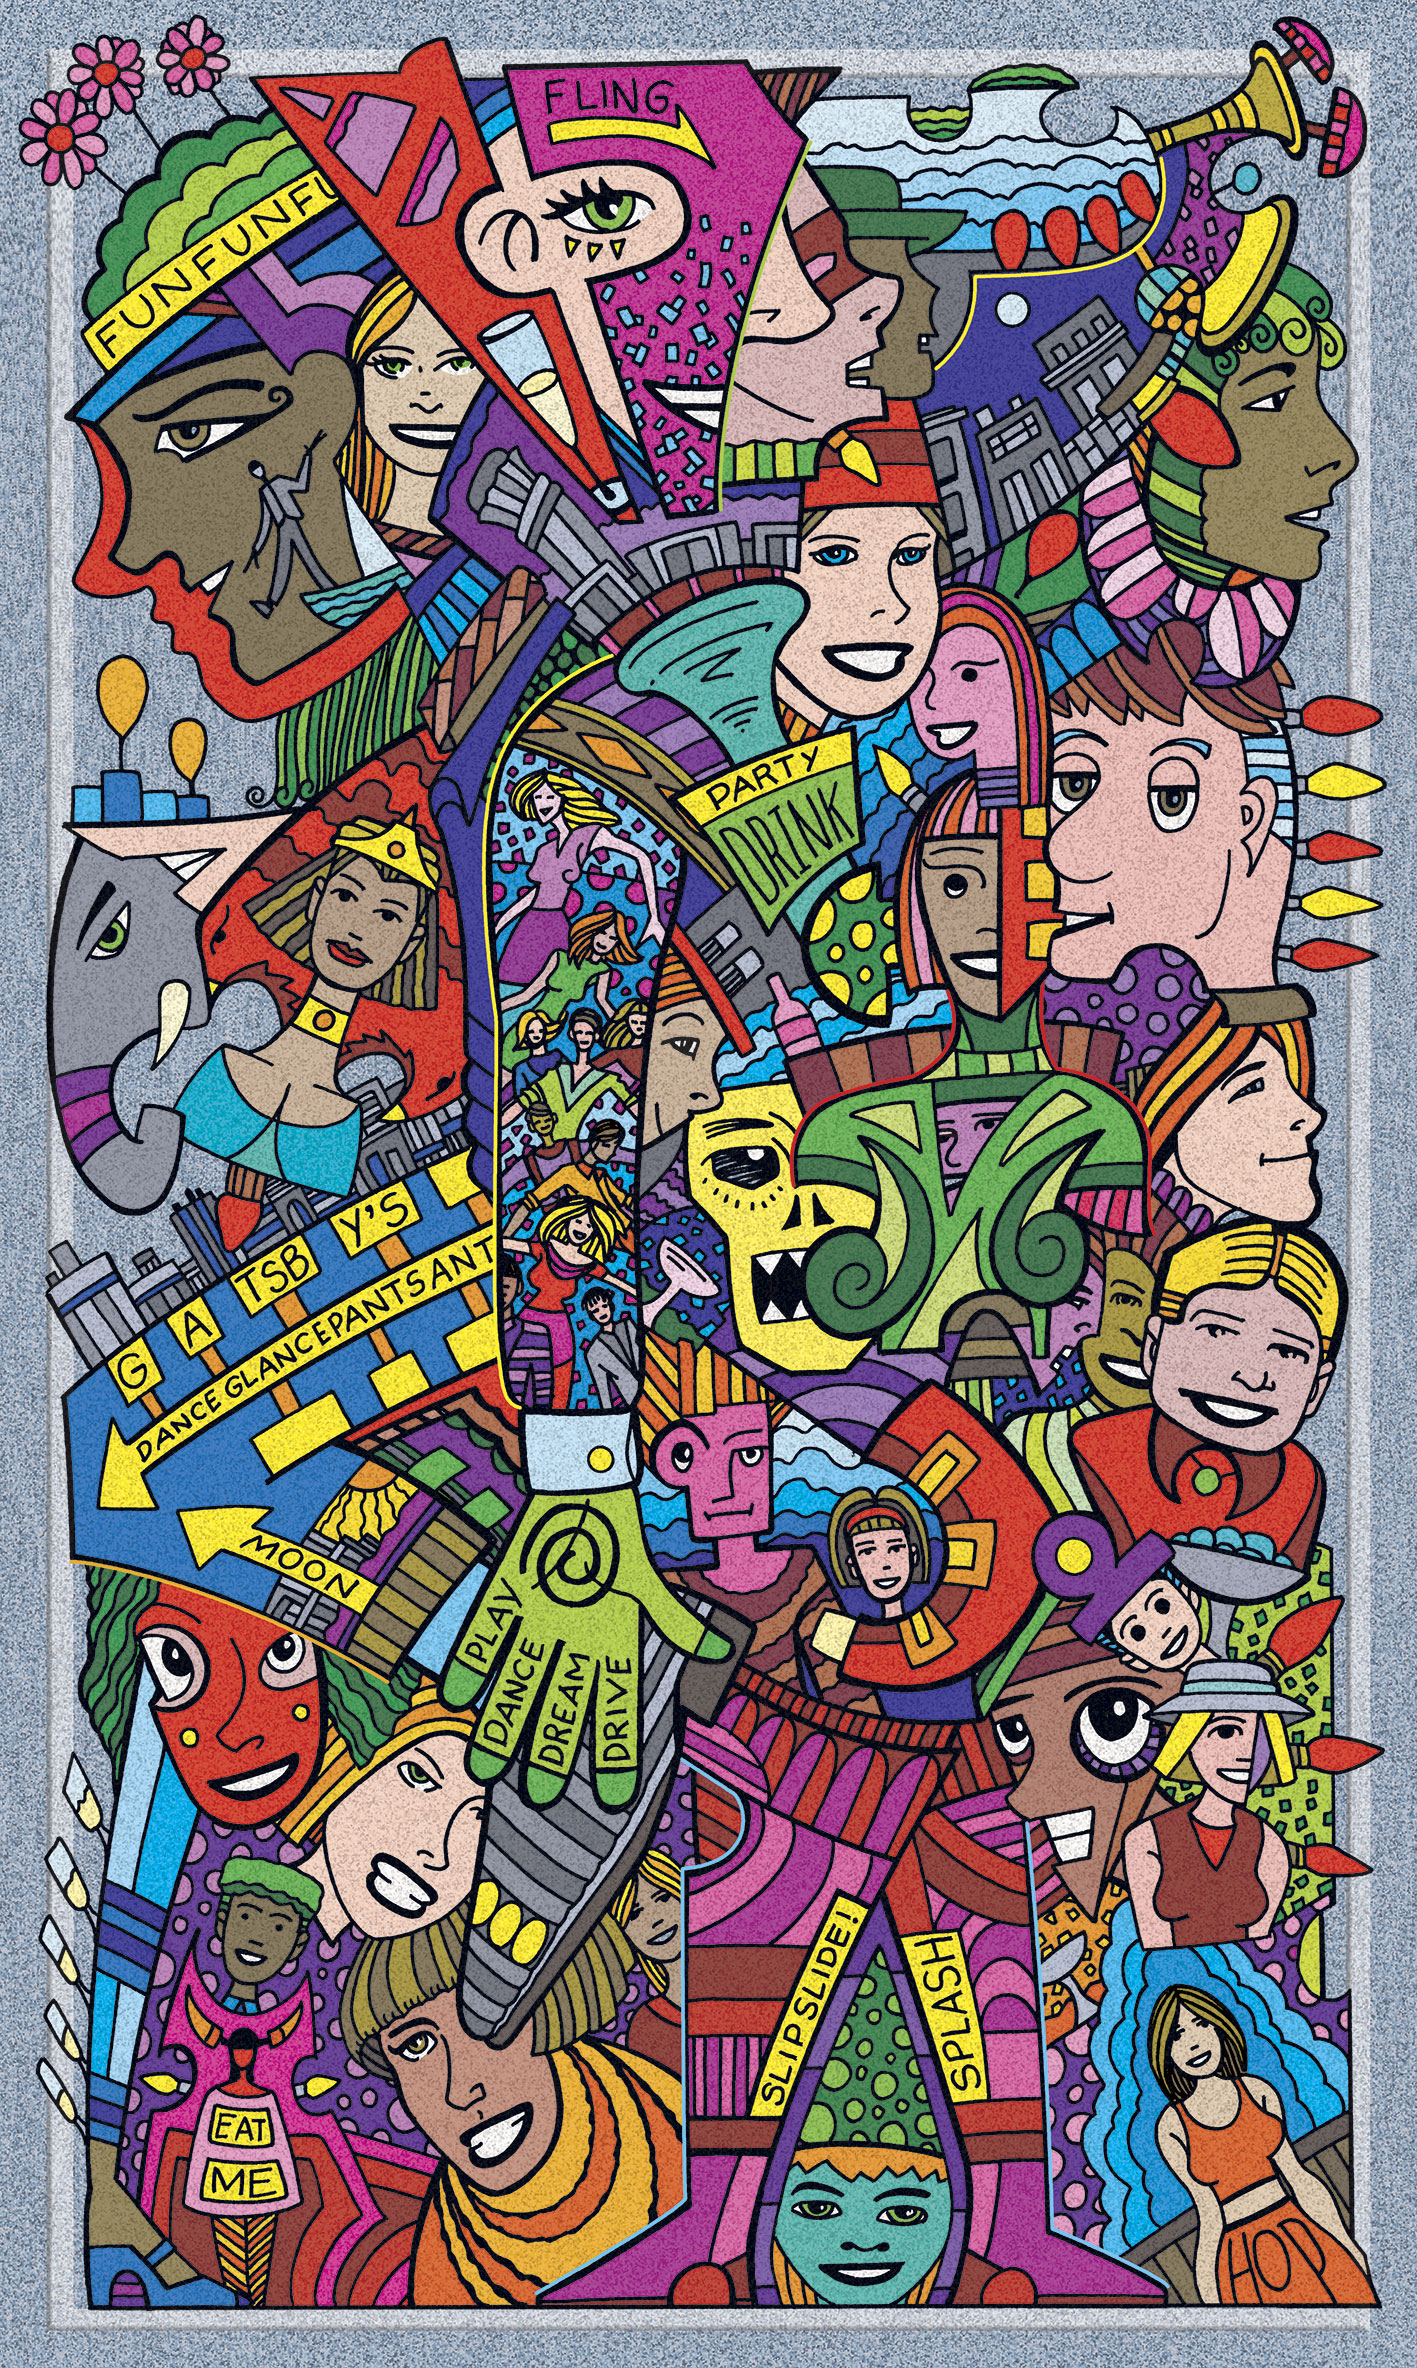
It was back on February 13, 2022 that I finished inking a drawing for my Great Gatsby project. I’ve finished other illustrations from the project since then (it’s April 24, 2022 as I write this) but it took me until yesterday to finally getting around to finishing that party scene. Why did it take so long to finish that one? Time. I knew it was going to take me a long time to color the party illustration in Photoshop so I kept putting it off. It was too big a job for me to tackle that early on in the project. I wanted to get some other stuff done first.
It usually takes a while to color one of my pieces in Photoshop. It can take anywhere from four hours to fourteen hours I’d guess. Sometimes I stretch that time out over a few days. I’ll even work on something for a few hours, be almost done with it, but then let it sit to be finished the next day. That gives me time to think about the color and figure out what I want to do with it. Sometimes the figuring out takes more time that the execution. With the party piece I knew the execution was what would take a lot of time.
The Gatsby party illustration is one of my “Dozens of interlocking people and objects” drawings. That’s when I take a blank page, start in the top left corner, and fill the page will little drawings of people and things. Everything is jammed together without making a literal scene. It’s a visual jumble that I thought would be good for depicting a party. It took me a while to draw and then a while to ink but I thought it came out well. But then the coloring seemed daunting.
Conceptually the color wasn’t daunting, I knew I didn’t need any king of special approach or technique, but the execution would take a lot of time. Organizing that many colors in a jam packed space is not easy to do. The colors have to make things clear and easy to see. That takes a lot of work. Trying to keep the chaos away takes time.
There is a video meme going around with a guy singing “You’ve gotta show up if you wanna get it done” and that certainly applied in this case. I couldn’t get it done for over two months because it was too much. I didn’t want to show up. At least for coloring this piece. I got plenty of other stuff done that probably took as long as the party art but still I had trouble facing it. Until yesterday.
It was on Friday night that I said to myself that I was going to get up on Saturday and start coloring on the party scene. It was time. Often I like to decide in advance what art project that I’m going to work on any given day. That gives me a sense of structure and helps me get things done.
Saturday morning I woke up and got started at 8AM. My approach was to just start adding color to the art. That’s usually how I have to approach a piece that is this visually complex. I have to pick and area and start adding color there. It almost doesn’t matter what color either because it’s probably going to change. With Photoshop, and digital coloring in general, change is easy. That’s why I try not to sweat my early decisions and get started.
I don’t remember where I started but I picked a section and dropped in the color. After coloring about 1/50th of it I decided to color all the faces. That’s the only decision I remember making since there were so many color decisions to be made. As I was working I even changed the background color about half a dozen times as I went along.
After starting it was a ll a matter of keeping going. I’d color part of the bottom right corner, get stuck, and them move to the top left. I probably got stuck a dozen times and moved to another part. I had to not let getting stuck bother me. That’s the key to coloring something like this. It’s always going to be a big job that trips me up. That’s why it took me so long to get to it.
Besides the basic color I added a small bit of technique to it. I knew I wanted some texture in it so I added some to the background color. Then I turned the background color into colors. I liked what the texture added so then I put a small bit of texture over the whole drawing and printed it out. Seeing the piece printed helps me to see problems and fix them.
I ended up making about six printouts and fixing a bunch of stuff. The biggest thing was to replace one of the faces. In the printout that face looked too goofy. It didn’t fit in with the rest of the piece and it was one of the biggest faces. It kept drawing my attention and not in a good way. So I drew a new face and patched it into the drawing in Photoshop. Digital makes changes easy.
The second biggest thing I did was to delete some of the texture that was over the drawing. I liked the texture in a lot of the faces but not in all the areas of flat color. The texture was dulling the color too much. I couldn’t decide if I should keep the texture or not but then I finally decided on the Gordian Knot solution of deleting selected areas of the color. That took some time but it was the right decision. I like the way it worked out.
In the end it took me from 8AM until 7PM to get the piece done. I took my bike ride from 9-10AM, broke for lunch and dinner, and tried to pace myself well in general but it was still a long day. No wonder it took me so long to get there.
I’m back from the comic shop this week and I got fourteen new comics.
Check them all out here:
I haven’t watched an episode of “Friends” in a while. Not since I wrote my last walkthrough seven weeks ago. That means I’m up to Season 6 Episode 4: “The One Where Joey Loses His Insurance.” What a bleak title. It first aired on October 14, 1999. Let me check my calendar and see what I was doing that day.
It looks like that day I was working in Manhattan at Marvel. I also spent $67 at Kam Photo. That means I got a lot of photos processed and printed. It sure was a lot more expensive before the digital age. Looks like all those photos were from a friend’s wedding the previous weekend. I was also home sick the day before. I never got sick very often so that’s unusual. I was also out sick two days the week before. I wonder what I caught?
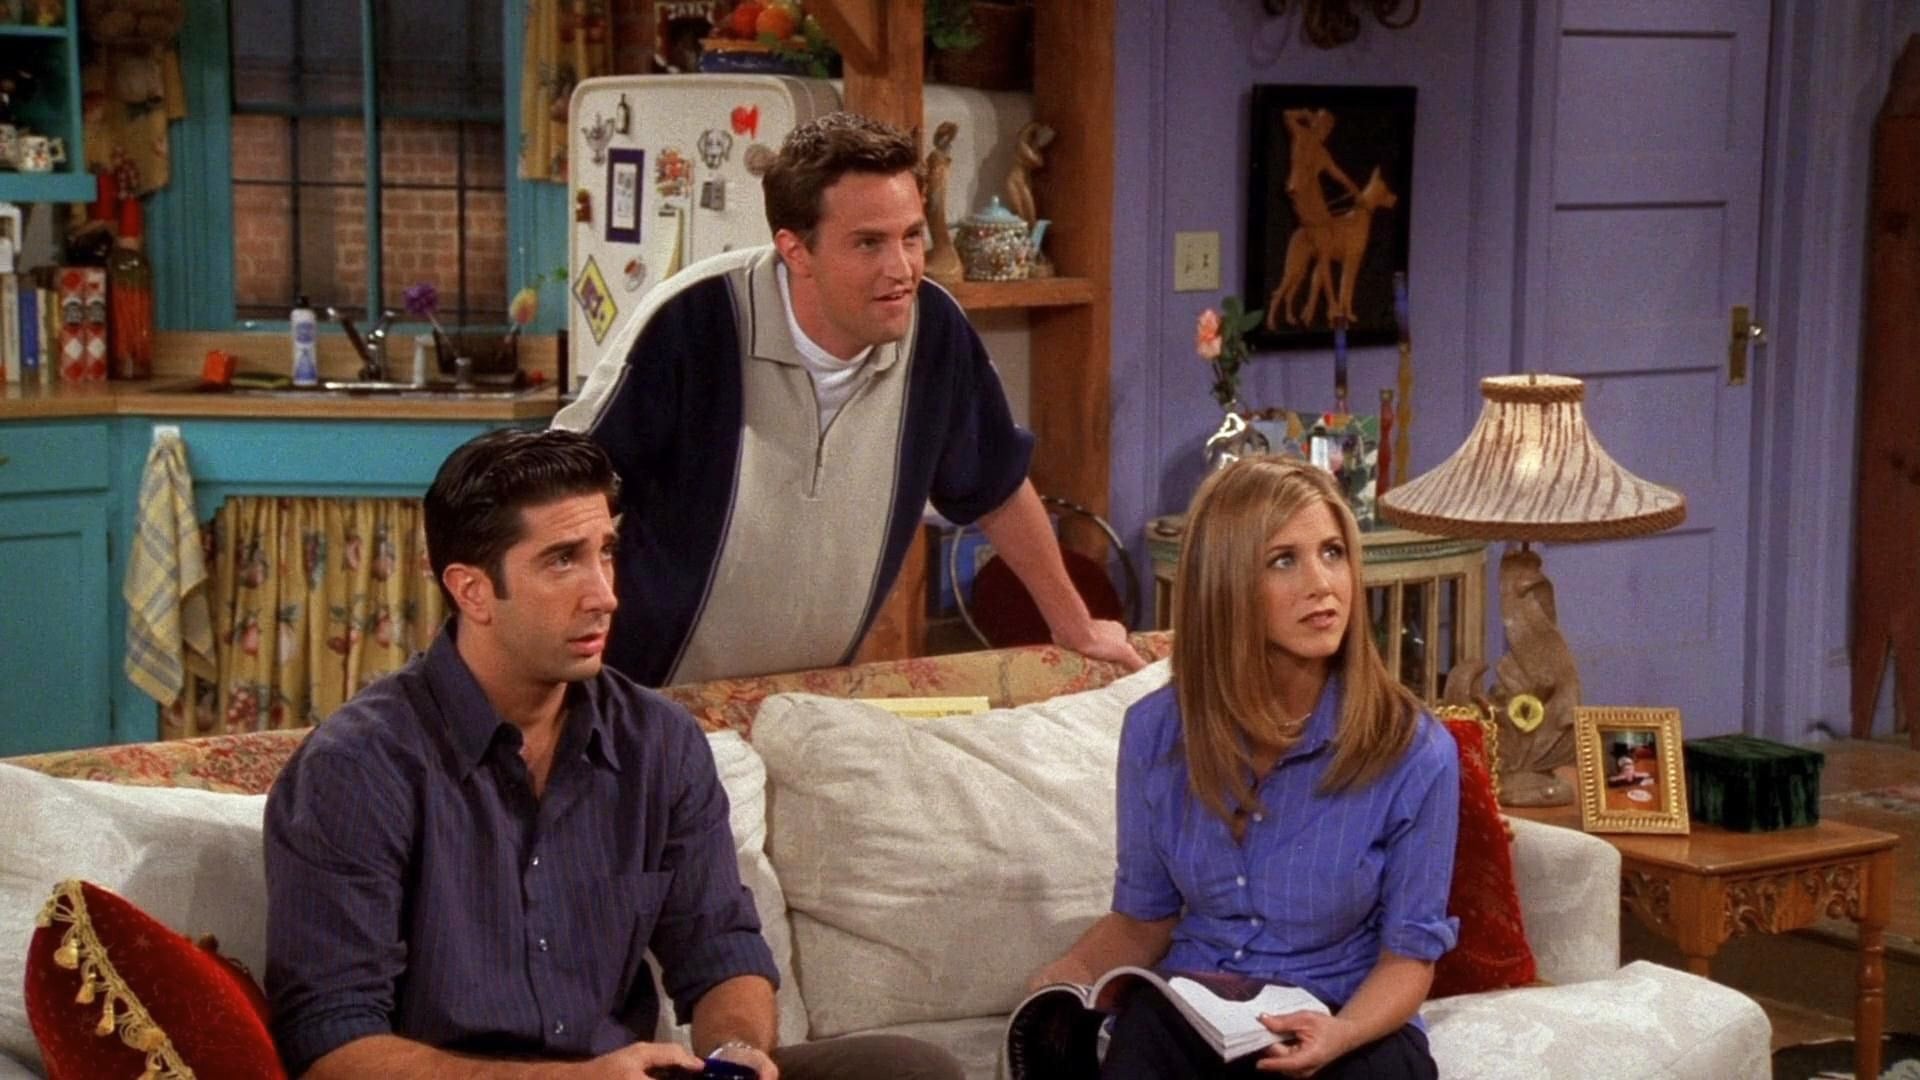
Let’s start the show. We open with Rachel moving out of the apartment with Monica (Chandler is moving in). Rachel is moving in with Ross as just friends but Ross is still in love with her. Phoebe confronts Ross about it but Ross gets all goofy and accuses Phoebe of being in love with Rachel. Crazy Ross is the funniest Ross. Rachel tries to move out some candlesticks but Monica hides them away. I think this becomes a running joke this episode. The old “Who owns what stuff” routine.
This is the episode where Ross first gets a job teaching at NYU. I think this is his job for the rest of the series. Phoebe drops the bomb the Rachel and Ross are still married. Then she gives a “Just kidding” to Rachel. Funny moment because they really are still married. Ross never took care of it. Now here comes the theme song.
The next scene is a Central Perk one. Phoebe tells the gang that her psychic says she is going to die this week. Phoebe believes it but in a funny way. Ross stops by to try his first lecture out on the gang. They all are bored by his boring delivery. A solid scene with some funny stuff.
The next scene takes place in Joey’s apartment where he gets the news that his benefits from the Screen Actors Guild have lapsed. Twentythree years later and we still need universal health care in this country. Joey is upset that he can no longer get hit by a bus or catch on fire.
That was a quick scene and now we’re back with Rachel and Phoebe as Phoebe is waiting for death. Phoebe takes a nap and Rachel discovers the candle sticks. She takes them back and keeps the gag going. Here comes Ross to tell the girls how well his lecture went. He tells it in a funny way. I’m good with that.
Hey! It’s Joey’s agent Estelle’s office. Here comes Joey to try and get work and his benefits back. Estelle thinks Joey left him and is coming crawling back. The joke has always been that she’s an incompetent agent. Here they double down on it.
That was another quick scene and now we get to see Rachel and Monica show up to one of Ross’s lectures. Turns out it went well because he uses a fake English accent. He spots the girls. That was a one minute scene.
Meanwhile back at Joey’s apartment Chandler finds him in pain on the floor. Turns out he was exercising and got a hernia. “Damn you fifteens!” Sad and funny scene.
Back to class where Ross tries to explain himself to Rachel and Monica. Monica and Rachel start doing accents too.
Coffee shop and Joey is in pain but won’t go to the hospital. Duh, he has no insurance. This hits too close to home for me. Phoebe sees the bright side. Joey might die and join her in death! Totally dark humor. That’s rare for “Friends.”
Back to Monica and Rachel fighting over the candle sticks. They split them. Here comes Ross. What is he going to do if they find out he’s a fake? Wow, that was another fast scene. Sometimes I forget how quick the scenes in this show can go by.
Now Joey is trying to audition with the hernia giving him pain. It doesn’t go well. It comes off creepy and weird since he’s auditioning with a kid. Next audition he can’t pick up a bag of dog food. Third audition. This one is for “Dying Man.” And the short scene is over. Fast editing in this episode.
Here come Monica and Rachel making prank phone calls to Ross in accents. Phoebe walks in and tell the ladies that it’s her psychic who is dead so she’s off the hook. And that scene ends. Another one minute scene.
Now Chandler is helping out Joey on his commercial shoot. He got the “Dying Man” job. It’s a painful shoot. The hernia comes in handy when the kid he is playing against won’t cry so he shows him the hernia. That may have been a two minute scene.
Rachel answers the phone. What does she find out? She finds out that she and Ross are still married. Wow, that was thirty second scene.
Now Ross is in class and is phasing out his English accent. The class notices and he comes clean. The students all think he’s weird. Rachel storms in and yells at Ross that she can’t believe he didn’t get the divorce. In front of the whole class. This is the funniest scene in this whole episode. And credits.
The credit scene is Joey celebrating that he got his insurance back by wearing a football helmet and having Phoebe hit him in the head with a bat. One of the goofiest jokes in the whole series. Monica and Chandler join in too. Super goofy.
Now it’s time to check and see what was cut out of this episode for syndication. Just one joke early on about Chandler and his lack of success with women. Then later in the show they cut a joke about Phoebe and Joey dying. A Ross’s accent joke goes too. And finally the sound effect they added to the final Joey and helmet joke. Not that much was cut from this one and no really good stuff either.
Let’s see what rating I gave this show back in 2013. Right now I’d give it 3 out of five stars. It was solid but not spectacular. Looks like I gave it a three back then too. Sometimes my ratings change but most of the time they stay they same. Until the next episode…