I’m back from the comic shop this week and I got eleven eight comics.
Check them all out here:
Comment
I’m back from the comic shop this week and I got eleven eight comics.
Check them all out here:
A few people over the years have asked my for my chili recipe but I’ve always been too lazy to write it down. Or maybe it’s that it’s not so much a recipe as a process. At least I never think about it as a recipe. I basically make two different kinds of chili: beef and chicken. Take the meat out of the beef recipe and you’ve got a vegetarian chili but I don’t count that as a different kind. It tastes exactly the same as the beef one except without any meat in it. Meat is mostly texture in chili rather than flavor.
I make my chili in a crock pot. You can make it on the stove top but believe me it’s a lot easier in a crock pot. You don’t have to stir it every twenty minutes to keep it from burning. That means you can ignore it. Works out much better for me. I also have a hand chopper that I use for chopping up the vegetables. It makes the task much easier and give me easy control over the size of the chopped veggies. I like to keep them a little chunky and have a little variety in their size. It’s one of those “As Seen on TV – Miracle Choppers” that I bought in the early 1990s and I’ve been using it ever since. The same one. A quick search shows me it’s still available. And pretty cheap. http://www.amazon.com/As-Seen-On-TV-Chopper/dp/B000E226EM
Let’s start with the basic vegetable ingredients. Veggies – Green Peppers, tomatoes, onions, hot peppers, and broccoli. And then the spices – Cumin, oregano, garlic, basil, and thyme. That’s it. Pretty simple. Plus red kidney beans if you want beans instead of meat or if you want beans along with your beef. With chicken I’ve been using, and liking, chick peas instead of kidney beans. I used to use white kidney beans with my chicken chili but I like the chick peas better.
I use a five and a half quart crock pot for making my chili. That’s pretty big. I make a lot of it at once. You can cut the recipe down if you want to but chili also freezes well so you can make a big bitch and freeze half for later. I often chop up my veggies the night before I’m cooking, put them in the crock pot, and then stick the crock pot in the refrigerator. This is because I don’t want to have to do all the chopping in the morning. It doesn’t matter if you do this or not but you have the option.
So here is what I’d chop up and add to the crock pot.
The vegetables:
Three green peppers.
Three medium sized onions (slightly bigger than a baseball).
Four to six hot peppers.
Three cans of diced tomatoes. (Equivalent amount of fresh tomatoes is always better but not always available).
One head of broccoli.
The spices:
Five tablespoons of cumin.
Five tablespoons of oregano.
Five tablespoons of basil.
Five tablespoons of thyme.
Five tablespoons of chopped garlic. Usually I buy the chopped garlic in water in a jar and use that. Or you can chop your own.
These tablespoon amounts are just estimates too. I pour the spices onto the palm of my hand and guess it’s about a tablespoon. They are also intentionally low as I’ll taste the chili later and add more of what I think I need. I’ve also had a hard time finding thyme in the supermarket as of late. I have no idea why. But “Italian Seasoning” is easily found and reading the label reveals that it’s nothing more than a blend of oregano and thyme. So I use that when I don’t have any thyme. I think it has more oregano in it than time though but I often end up using more oregano anyway.
And a word about broccoli. If you’re not a fan of broccoli just add it and don’t worry. Those little tiny broccoli buds help thicken and sweeten the chili and won’t taste anything like broccoli. Chop them up fine and all will be good.
And a word about hot peppers. They’re the wild card. You never know exactly how hot they’ll be. The long hot peppers (rated medium to hot) that I’ve been using lately are fairly consistent but I notice they are growing them longer and longer. When I say one of these peppers I mean one that’s about six to eight inches long. I’ve seen them a foot long and I count that as two peppers. For milder chili stick with four peppers and for hotter go with six. You can also underestimate and add some of your favorite hot sauce latter on. You can always add a little heat but not take it away.
So I’ve got all that in my crock pot and I pull it out of the fridge in the morning. Then I add the meat. I usually use beef cubes for stewing. They didn’t have that at my local store this week so I used beef strips for stir fry. I think I had about a pound and a half of beef in there. Use whatever you want. The meat isn’t about flavor as much as it’s about texture. Keep the meat a bit chunky too. It’ll get smaller as it cooks and shred apart so think about a size that’s a little bigger than a forkful.
Speaking of texture I also add some ground turkey to the chili. Your standard supermarket package. I brown it off in a frying pan and then put it in. It doesn’t have to go in right away so usually I wait until lunch time to add it. I don’t often feel like frying things in the morning. You can use what ever ground meat you prefer but I find turkey the easiest. And once again it’s there for texture rather than flavor. It’ll end up tasting like chili no matter what.
One other reason I usually add the ground meat later is that sometimes there is too much liquid in the pot as the veggies cook and it threatens to overflow if more stuff is put in. I drain some of the liquid off with a ladle until there is enough room. This used to happen more in my five quart crock pot but less in my five and a half quart one.
I turn my crock pot on at about 8 AM. The first two hours on high and then the rest of the time on low. You could cook it on low the whole time or high the whole time and the cooking times would be different but that’s how I do it. And then don’t touch it. There is no point. It’ll take until about 1 PM until all the flavors cook and mix together and then you can taste it. I almost always add about two to three more tablespoons of everything at this point. More cumin gives it a more Mexican food flavor, more oregano gives it a more pizza-like flavor, more thyme gives it a more pine needle type flavor, more basil gives it a more sweet and woodsy flavor. Pick what you want or add them all. I might add some more garlic here too. Even garlic powered if I want a little more subtle bitterness. If it’s not hot enough for you than add some hot sauce. Try it again at 2 PM for one last adjustment if it needs it. It’s done when the beef falls apart under your fork (Usually by 3 or 4PM). If you’re using chicken it’s probably already done.
For my chicken and chick peas chili I take away two cans of tomatoes and add in a large jar of chicken gravy (16 ounces I think) and a large can of chick peas (32 ounces I think). I used to use chicken breast but have switched over to the dark meat. That’s because when eating chicken I prefer the light meat but it turns out I like the dark meat in chili a lot better. It absorbed the chili flavor much better and has a better texture.
I’m also a firm believer that chili tastes even better the second day. After sitting in the fridge overnight the flavors blend together even more and taste even better. So if you’re making chili for some occasion or to bring somewhere it’s okay to make it a day or two ahead of time. Chili keeps for a good long time in the fridge.
And if for some reason you have no time and want to make a quicker version of chili then cook everything in a frying pan first. Sauté all the vegetables, cook all the meat in a pan, throw the meat, veggies and all the spices into a pot, and cook that on the stove for an hour or two. It’s not quite as good as the slow cooking method but it’s still okay. And maybe cut the amount of ingredients in half if you’re doing it this way. Otherwise that’s a lot of stuff to cook in a pan.
One final thing is that when I want beef and red kidney beans in my chili I usually take out an onion and a can of tomatoes. Or maybe not add as much broccoli. For the vegetarian version I just don’t add meat and add beans instead.
The shopping list version.
3 green peppers.
3 medium sized onions
4 to 6 hot peppers.
3 cans of diced tomatoes.
1 head of broccoli.
Jar of cumin.
Jar of oregano.
Jar of basil.
Jar of thyme.
Jar of chopped garlic.
For Beef:
1.5-2 lbs Beef cubes for stewing
1 Package ground turkey
For chicken:
1.5-2 lbs chicken thighs (off bone)
1 can of diced tomatoes (instead of three)
1 large jar of chicken gravy
1 large can (32 ounces) of Chick peas
1 Package ground turkey
For Vegetarian:
4 sixteen ounce cans of red kidney beans. Or whatever other beans you like.
I’m back from the comic shop this week and I got nine new comics.
Check them all out here:
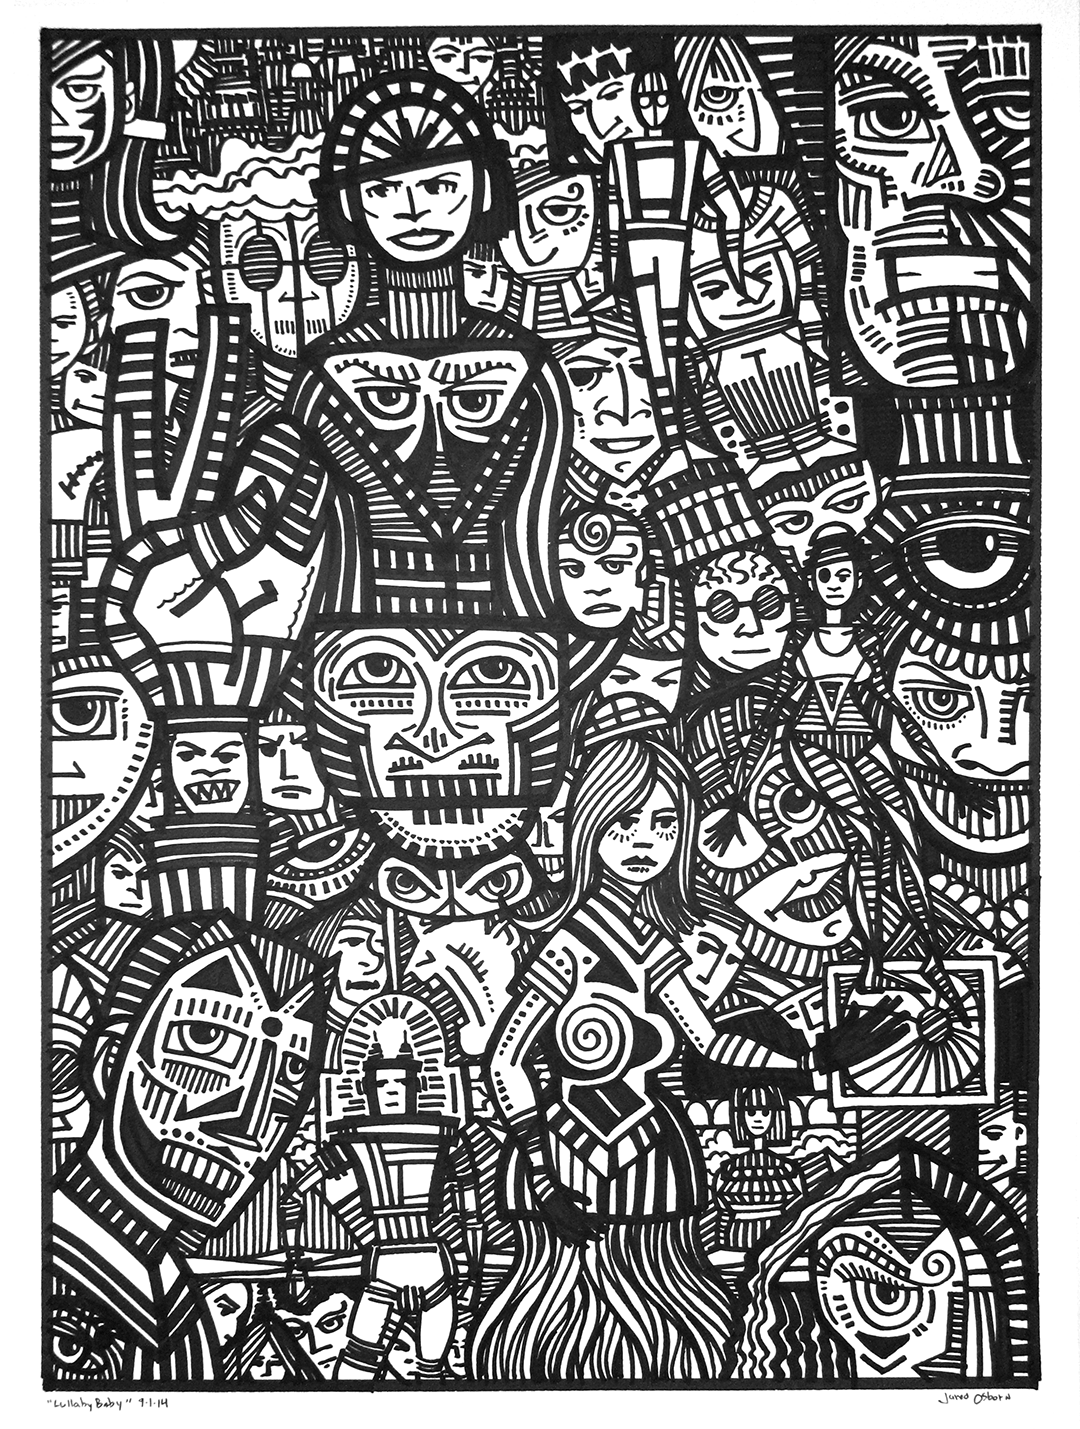
This week I have another one of those “Things always take longer than I think they will” tales. Or maybe it’s that this one just got away from me. Y’see, a little while ago I made a large 20×28 inch drawing in about fifteen minutes. I wanted to make a video of me making a large spontaneous drawing and so I did. I made it in the time limit too. (Scroll to the bottom to see it). It wasn’t my greatest drawing ever but I thought I did a good job with the whole thing. Then I got the idea to do another spontaneous large drawing the same size but in about an hour. The one thing I saw holding me back was the size of the markers I had to work with.
For the fifteen minute drawing I used my Copic extra wide marker plus my regular chisel tip Copic marker. Though the extra wide marker was pretty big I had a bit of trouble drawing with it. That’s because it’s big but narrow. I found that to be a clumsy combination to draw with and when it became too much of a problem I switched over to my chisel tip one but that was a bit small for the job. So I’ve been looking in my art catalogues at some larger markers but I haven’t had the chance to buy any yet. I wanted to get a second hour long spontaneous drawing going so I decided to try and do one with just the chisel tip marker. Sure it was a little small but so what? Full steam ahead. Or at least that’s what I convinced myself of after about two weeks of mulling things over in the back of my mind.
So one morning I decided to do the drawing. I had some time to draw that day but not a lot of ambition so I figured that an hour drawing wouldn’t be too hard to get done. Instead of my Copic chisel tip marker I decided to use my Shin Han chisel tip marker but they’re basically the same. Six hours later I finally finished the drawing. Boy did I underestimate things. The main problem was that I really didn’t understand how using the smaller marker on the larger paper would change my whole approach to the drawing.
When I made the earlier drawing with the extra wide marker I automatically made the image I was drawing in scale with the marker. I had a big marker so I drew a big face. That makes perfect sense. But now I had a smaller marker and so I drew a smaller face. The piece of paper I was drawing on was still big though and I would have to fill it up. I knew I was in trouble when the first figure I drew, the man in the upper middle with the triangle shirt on, took me fifteen minutes to draw and that was about as big as I could draw with the marker I was using. That was a quarter of my allotted time on about a tenth of the drawing. Whoops! So I hunkered down and drew. For most of that previously unambitious day.
In the end I like the way it came out. I’ve made drawings like this where I fill up every bit of negative space before but not this large. And certainly not this large in ink. Usually with something like this I’ll make a small five by eight inch drawing in ink and then blow that drawing up to about ten by fifteen inches and redraw it in pencil and then ink it. Not this time. This time it was strait to ink on a large scale and no fixing anything.
The first thing I notice about this drawing is that I have no idea where to look first. It’s busy. There is no composition as I’m used to doing it. I don’t get to move the viewer’s eye around the piece as I am used to doing. Here it’s chaos with only a slight skin of order. There is no easy way into this drawing. No place for the eye to settle so you just have to start looking and see what you can see. Usually with these writing pieces I explore the order the eye moves in as demanded by the composition be here I have to just start.
I think my favorite part of this whole drawing is the robot guy on the bottom left. Not the big head in the corner but the one with two antenna on the top of his head and his arm bent in an almost dancing pose. He amuses me the most. The background behind him gives him a halo too so he’s almost holy. A holy robot. I like that.
The one eyed face in the bottom left is kind of creepy. I hadn’t noticed him before. He’s staring at us through some sort of structure that looks half like hair and half like some stone castle window. Whatever he’s got going on I don’t trust him.
I posted a photo of this drawing on Facebook and one of my friends said that the face in the upper right corner looked like me. I can understand that. The guy has a big chin and so do I. Plus artists usually can’t help but draw faces that look like their own on occasion. Our own faces are the ones we know best and so tend to copy them. Interestingly that face was also the last part of the drawing that I worked on. I started it early on but didn’t put in those radiating lines until last. It was mostly blank and therefor ended up being the whitest part of the whole drawing. It stood out and not in a good way. So I found a way to tone it down. I like it much better now.
A man with a tea cup face on his bottom half, a woman with tentacles for her bottom half, strange masked people, and over three dozen faces staring out at us. I could go on and on but there is too much stuff. That’s what this drawing is all about. Too much to look at so you have to look hard. Turns out that takes a long while to draw.
I’m back from the comic shop this week and I got twelve new comics plus a new Artist Edition..
Check them all out here:
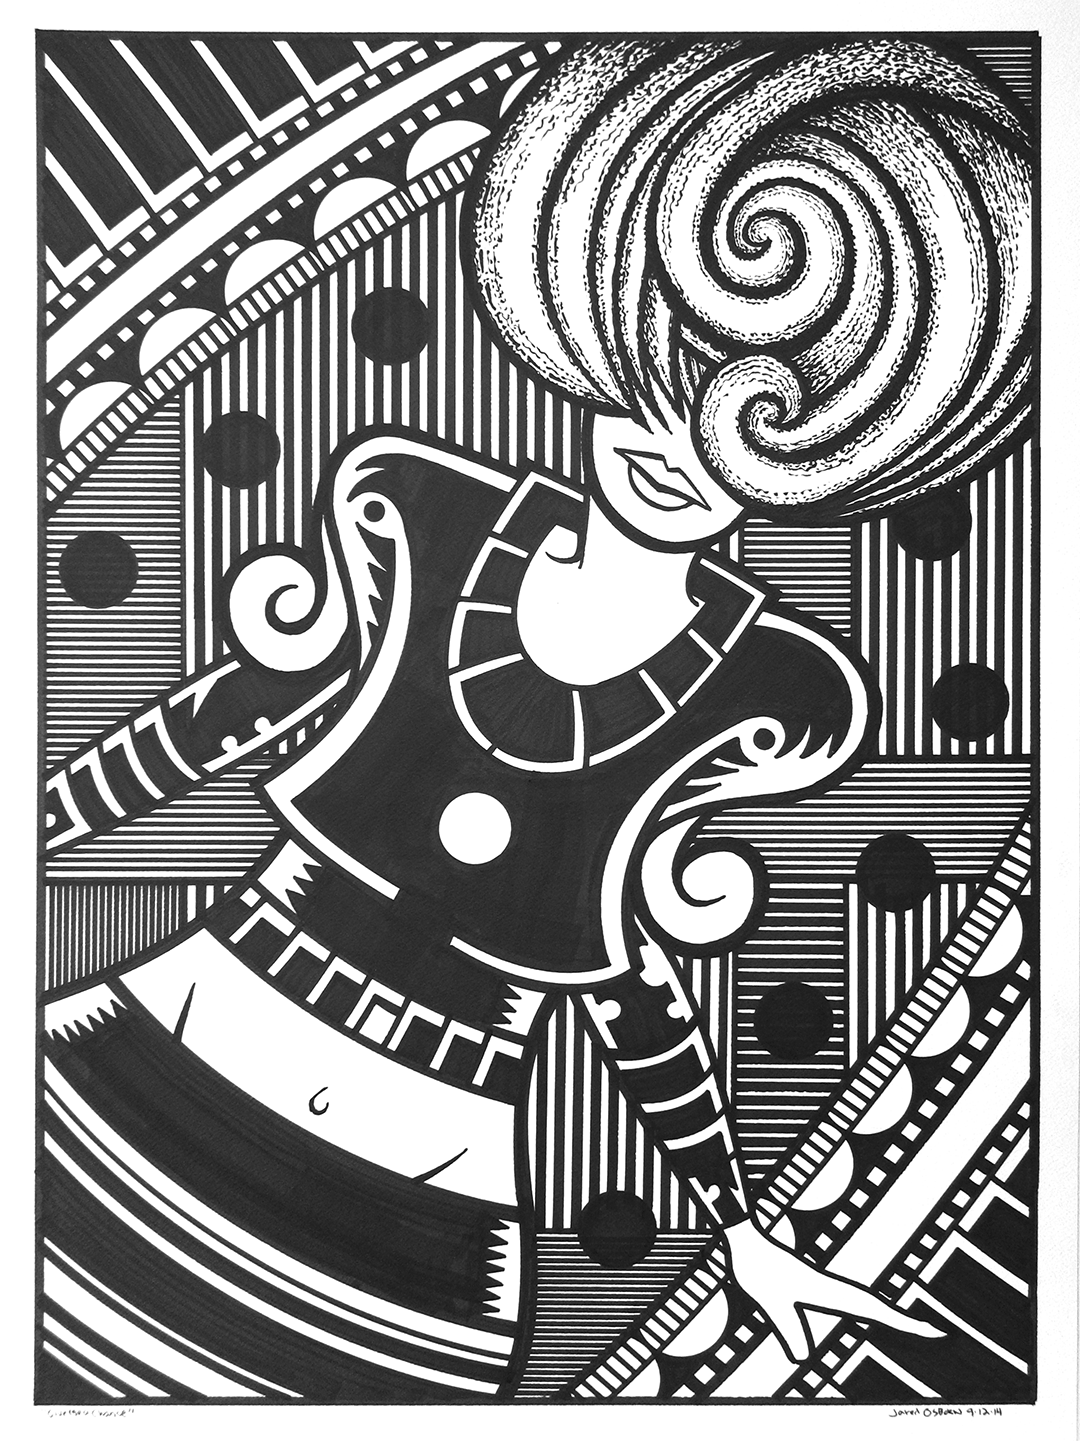
This week I dove into some large drawing. I’ve had such a busy end of the summer that I didn’t get much of a chance to make some of my own art so when I had a little bit of time I decided to make some large black and white marker drawings. As a matter of fact I made three of them but this is the one I drew yesterday and it’s titled “Give Me a Chance”.
I only started making these large drawings a couple of years ago and for a second time, as in my “On the Rough” drawings, the process was dictated by the paper. The very first of these large drawing was done on some very nice 140lb watercolor paper. The paper was nice and creamy and I remember using some marker on it but it was mostly brush and ink. The drawing came out okay but I wasn’t overly enthused by it.
Then I bought some of this much cheaper 22×30 inch 140lb watercolor paper and things changed. Not only was it a dollar or two a sheet rather than six to eight dollars a sheet but it was much harder to draw on let alone get a nice smooth brush line on. It has a fairly rough surface which is often hard to deal with. So I went the way of markers rather than a brush. A whole bunch of different Copic markers.
That very first large drawing I made mostly with a brush also had some straight lines that I made with a Sharpie marker. Since I had made that I got into markers a lot more and knew that just a Sharpie wasn’t going to cut it. I started using my two Copic markers, the sketch marker and the regular one, but even with each marker having two different tips on them it wasn’t quite enough. I ended up buying an extra wide Copic marker plus some Copic calligraphy tips which I used to replace the regular Copic marker tips.
I basically ended up with seven different markers to work with. The regular marker has a chisel tip on one end and a fine tip on the other. The sketch marker has a rubber brush on one end and a small chisel tip on the other end. The calligraphy marker has a small flat end and a large flat end. The extra wide marker is an inch and a half wide. That’s good for filling in large areas of black. I also have some tiny .5 and .7 Copic markers that I almost never use on large drawings but I have used on occasion.
“Give Me a Chance” is a good example of what these large marker drawings have become. They’ve become very much about black and white graphics. When I made that first large drawing it was a lot like my smaller drawings. It was a lot about the line. With this rougher paper I couldn’t make my usual pretty brush line so I had to find something else. What I found was large black shapes and a mechanical line. I couldn’t make a thick to thin brush line but I could use a ruler or a French curve to make a nice mechanical line. So that’s what I did.
In this picture she have a woman who looks like she’s dancing. Or maybe just posing but there seems to be a little more movement than that. When I make these large drawings I start by making a small drawing of the image. Not all of the elements are in the small drawing such as the black shapes and patterns but all the basic line work is there. This particular small drawing was even sitting around for two years before I made a big drawing out of it. First I scan in the small drawing, blow it up in Photoshop, print it out in pieces, tape those pieces together, tape the printout onto my 22×30 inch paper, and then use graphite transfer paper to transfer the drawing onto the larger paper.
This graphite paper transfer method always makes for a lousy drawing once it’s on the big paper. It looks like a mediocre tracing because that’s what it is. If I was going to make a drawing that depended on my usual line work I’d have to redraw the tracing at this point. But since these drawings depend on a more mechanical line I really don’t have to. Since I’m using straight edges and French curves I just have to know where the line is going to go in general and then the straight edge will make it exact. That’s how I did the lines and circles on the upper left and lower right of this one.
None of the black shapes in the woman’s shirt, skirt, or arms were in the original drawings. This is the stuff I like to figure out at full size. Sometimes when I scale up a drawing the details that work at the small size don’t work well at the large one. Plus with the crude tracing method I use to transfer the drawing most of those details will be messed up anyway. It’s best to leave them out until I need them.
The parallel line patterns in the background also weren’t in the original drawing. The shapes that the patterns fill were there but I wasn’t even sure what I was going to do with those shapes. At first I wanted some of the shapes to be solid black but then I knew I couldn’t pull that off with the woman having so much black in her clothes. So I got out my Haff hatching machine and the Copic Calligraphy tipped marker. Those two tools work very well together.
The hair on the woman in unusual for these drawings. It’s not graphic as much as it’s textured. I haven’t done a lot of that with these but it was appropriate here. Those large and smooth swirling lines are hard to do on this rough paper so I decided to go with a rougher textured line. Since it was her hair a texture that stands out and sets it apart seems to work fine. It ended up being one of my favorite parts of this drawing.
So that’s my art work for this week. It’s what I got done. Sometimes it’s important to just get something done.
I’m back from the comic shop this week and I got thirteen new comics.
Check them all out here:
It’s been mostly a quiet summer biking season for me this year. That’s a good thing. It means nothing has gone wrong. Sure I had to replace my rear wheel gear cassette but that went fairly smoothly. The gears and chain don’t seem to quite mesh as flawlessly as they could but my bike is hardly without flaws. It has plenty of them but as long as one doesn’t stand out too much it’s all okay. That’s my philosophy. I haven’t had any flats since I replaced my back tire tread either. Well, maybe there was one but it was a while ago and an aberration. The new tread is holding up well.
It’s been a mild summer around these parts too. I can tell by my water bottles. I carry two water battles on my bike: a big one and a small one. I usually drink from the small one except for really hot days when I drink so much water that I need the second bottle too. Why don’t I just carry, and drink from, the big bottle you ask? Because I find the smaller one easier to handle. Simple as that. Being distracted by trying to handle a large water bottle while biking is a bad thing. This summer it’s been almost all the small bottle. I’d guess that I’ve only had to drink out of the larger bottle on about three days this whole summer. That’s pretty crazy. I’d guess in other summer’s I’ve had to drink out of the larger bottle at least ten days in August alone. Like I said: mild.
Now comes the time of year where I have to make a decision about my bike route too. I have three bike routes: Summer route, Fall route, and snow on the ground Winter route. The summer route has my biggest hill in it. The route is probably an extra two miles and has a pretty big climb in it. At least big by my standards. When it starts to get cold out the climb starts to get too hard. Or at least too hard for me to want to bother with. I can still make it but it’s no fun. It takes a lot of energy in the cold.
In general biking is different in the cold. My legs don’t work the same way they do in the warmth. They’re slower and don’t respond as quickly. Plus when I reach for that little bit of extra kick to make it up the big hill that kick is just not there. It’s there in the warmth but not in the cold. So this time of year my question to myself is always, “When should I stop going up the big hill for the year?”. It’s a bit of a tough question because I always feel a little sting of defeat when I change to my shorter route. I get over it for sure but it’s there at first.
Since I cycle in the morning it can be fairly could out there in late summer. It was 60ºF the other morning and so I had to put on a long sleeve shirt for my ride. We’ve had a bit of a heat wave this week and it’s back up to the 70s in the morning but it’ll drop into the 50s before I know it. And 50s and cloudy can be pretty cold for taking that big hill. Especially if the autumn winds are blowing.
Last year I remember it got cold a little early. I ended up changing over to my Fall route in the first week of September. I was tired of thinking about when to change routes so I just did. Then it warmed up a little and I was disappointed I had already cut the hill out. Once I change the route it’s changed. There is no going back. Or maybe I did go back for a day or two. I really can’t remember but I don’t think I did.
This year I’m aiming to keep going until the 15th of September. I’ll reevaluate then. It doesn’t seem like I’ll have much problem until then since it’s warm out as I write this.
With this being the fourth winter in a row that I’m going to cycle through at least I’m not asking myself when to put my bike away for the year anymore. That used to always be the question to myself in the fall. When was it too cold to ride? That always brought a greater feeling of defeat because it meant that I was inside on the stationary bike until Spring. It used to be miserable cycling in the cold of the late Fall though. Before I figured out how to dress properly for winter riding “Too cold to ride” was a real thing that could sneak up on my on any October or November day. So this “Too cold for the big hill” is much better.
One thing that has been annoying with my bike ride lately has been the “Loose stone paving method”. The town next to mine uses this paving method sometimes on the roads that I bike over. They basically put sticky oil down on the road and then cover the oil with small gravel. The cars driving over the gravel push it down a little bit into the oil but mostly the gravel gets built up in ruts before it eventually gets pushed over to the sides of the road. Meanwhile I have to cycle through gravel. That is not fun. I ended up changing my route which wouldn’t be so bad if my favorite part of the route wasn’t the part that I had to cut out. I couldn’t ride my best down hill right into an up hill combo. It’s been three weeks so far and not all of the gravel is out of the way. I tested it out today and it’s generally okay but there are still a few areas with deep gravel on them. Still that’s better than the terror ride I had over the gravel the first day when I didn’t know how bad it was.
Well, that’s the bike riding report. Keep pedaling and stay out of the deep gravel.
I’m back from the comic shop this week and I got eight new comics.
Check them all out here:
It’s been a quiet week for me art-wise. I did manage to get four “On the Rough” drawings done though. Numbers eighty five through eighty eight. These are the spontaneous brush and ink drawing that I make on really rough watercolor paper that doesn’t seem to be good for anything else. At least I can’t manage to draw anything else on it. But it takes a brush and ink real well if you’re looking for some rough around the edges line work.
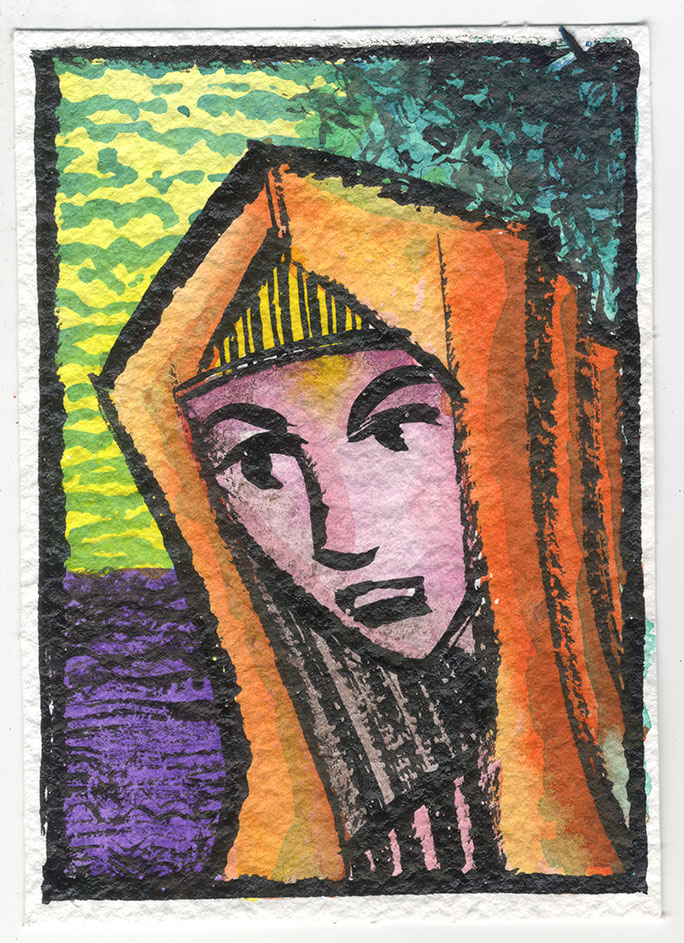
Number Eighty Five – This one looks a little Mary-mother-of-Jesus-ish to me. I guess it could be a man too but the face looks feminine to me. It’s the head piece that make it look biblical but I think Mary usually was painted with a blue head piece and not orange. I could be wrong about that since it’s just a memory. I like the orange head piece. It makes a bold color statement. It dominates most of the picture but is knocked back a little bit in spots with a blue wash to give it some depth. The yellow sky just kinda limply sits there but the violet ground (or is it water?) holds its own and demands a bit of attention. I find the green tree sneaks up on me. At first I don’t notice it but then in draws my eye in. I think the fact that the woman is looking away from us makes this painting a little pensive. She seems to be thinking. I’m not sure if I like her yellow bangs or pink shirt. These are spontaneous paintings so everything is not going to work out every time so I’m okay with the things I don’t like. The orange is nice though.

Number Eighty Six – Here we have a woman looking into the distance as she raises her hand. That hand is problematic. It’s barely a hand. Like I said, this paper is rough and the brush I use on it is in rough shape so it’s often tough to make something as delicate as a inch tall hand. But that’s how it ended up so I made the best of it. It was even more awkward before I turned it into a silhouette. I like the woman’s face. It has a happy quality to it. And who doesn’t like crazy orange hair? I like the rough lines of the hair because they echo the hand a bit and make the hand seem a little more normal. The purple sky makes a nice backdrop for the orange hair as it fades into the darkness that is the ground. The rectangular collar on the dress makes her neck even longer than it is. Long necks almost always work in art. The light green color of her dress almost acts as a neutral. It’s where your eye can rest. The orange, pink, and purple are very active but the green with a wash of red on one side is a calm presence. Overall I’m happy with the way this one came out.
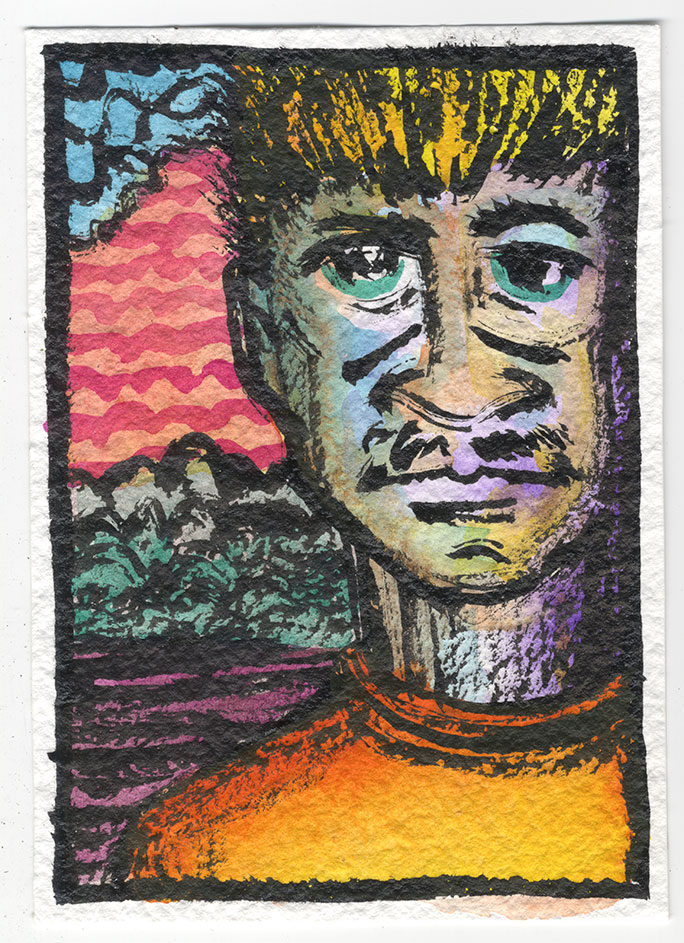
Number Eighty Seven – Here we go with a person who is looking right at us. This is more usual for me. And he is an unusual looking man. First off his skin tone has so many colors in it that it’s threatening to turn into mud. “Muddy” is usually how painters describe the brownish colors that result from too many pigments mixing together. I think I avoided that but just barely. In his face we have blue, violet, yellow, and orange. Not to mention his green eyes. That’s an unusual color combination and I’m not saying that it works but I do think I stopped short of making it not work. There is some damning with faint praise. I like the orange of his shirt best in this one. It glows. The yellow and orange of his hair is tamed by all the black brush strokes but the same colors in his shirt are free to be themselves. The whole background on this one is just there. It doesn’t do much for me. The black lines and shapes don’t say much and neither does the color. It’s not terrible just perfunctory. I’d say this painting is the weakest of the four.
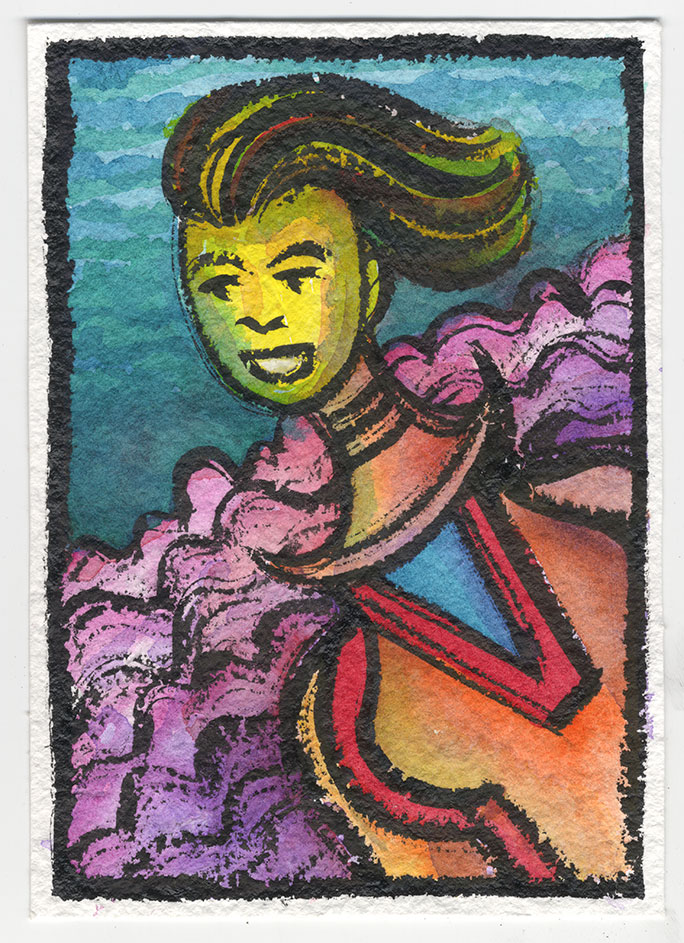
Number Eighty Eight – The final one for today is the most out there image. We get a diagonal composition and what may be a woman flying through the air. Or she could be on the ground. Those pink and purple clouds behind her might be land. I’m not sure. Her hair is also blowing in the wind as if the wind was in her face. That would seem to put her on the ground. I like not knowing. This woman also has a very long neck. So long, in fact, that it seems detached from her body. Her head is off center of her shoulders but that’s okay with me. It may not work anatomically but it works compositionally. I really like the blue/green of the sky next to the yellow of her face. Some of that blue/green is brought into her face as a wash both giving her face a little bit of dimension and harmonizing it with the background. That doesn’t always work but here it does. The brush strokes in her hair are about my favorite brush stokes in all of these four paintings. I think it was the only time I managed to get a smooth and pretty line. The hair looks flowing. It’s tough to do flowing on this paper. The oranges and reds of her top also harmonize well with the light purples and pinks of the fluffy clouds. I don’t think I use that color combination very often. The piece of blue in her collar is a good change of pace bit of cool color amongst all those warm oranges and reds. Overall this might be my favorite of the four.
So there you go. I didn’t get a whole lot of my own artwork done this week but there is a look at a few of the things I did manage to do. I hope you like them.