Digital Version
Usually when I make one of my big collage photos I work with a lot of different photos and organize them into, if not one big image, a series of images designed to work together. It’s all about using the different spaces in the photos to create a new space. A space that can’t be created with just one photo. A piece of land here, some sky there, a few building, and then some people. It all adds up to a different looking space compared to a single photo.
I changed up that formula for my latest photo. Instead of multiple images I decided to work with one big image. That’s something I haven’t really done before with my photography. I do it all the time with my drawing and painting but with photos I’ve always gone in a different direction. As long as I’ve been shooting street photos I’ve always been looking for series of images. Usually with photography you search for the one good shot but I never have. I like candid photography so I shoot from the hip and work with what I get. But occasionally I do get that one good shot. The law of averages says it has to happen every now and then. Especially when I’m out taking 5000 street photos on a single Saturday.
My “One good shot” photos I take get posted to Instagram. I look through a lot of photos on my iPad, pick one out, crop it, and do some digital manipulation with various iPad apps. Sometimes I also print out theses photos onto five by seven inch pieces of paper. I have a box of those 5x7s an pick one out to put on a little easel on my desk. I change the picture for a new one every so often. I mention all that because the current photo on my desk easel is the one I decided to blow up big.

Physical Version on the Easel
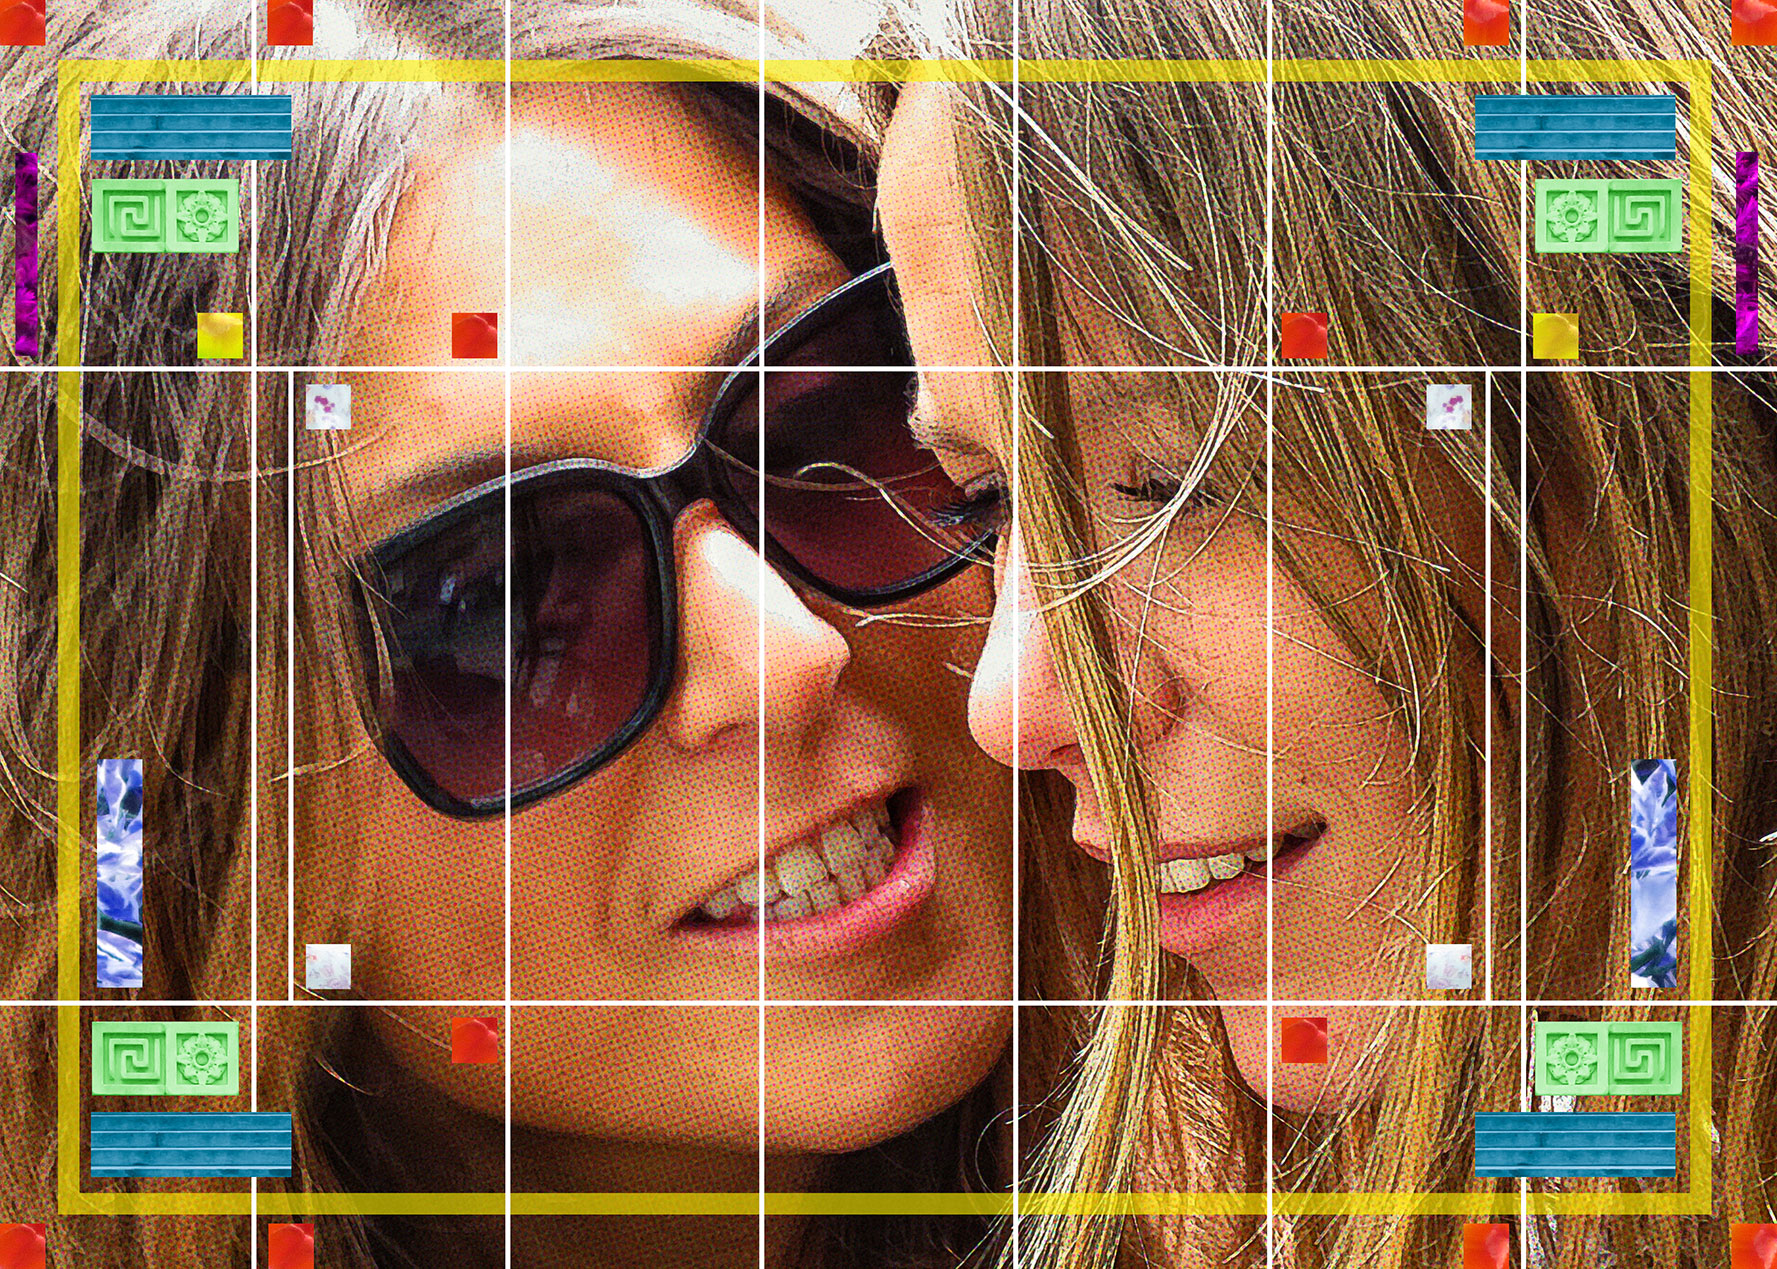
The photo is a close up crop of the faces of two women looking at a phone while sitting in Bryant Park. One woman is staring intensely through sunglasses at the second woman who is looking at the phone. I cropped the phone out of the picture so it looks like she’s staring into the middle distance. I like the emotions on their faces and the feeling of affection between them. It’s a good buddy photo.
I used this photo before as the base for one of my 11×17 inch prints. I paired it with the words “All Your Secrets are my Secrets.” It came out nice but it’s been a few years since I made that print and I wanted to make something bigger with this photo. The 5×7 version of this photo is cropped horizontally but the print was cropped vertically. I was looking to go horizontal with the big version.
I knew I didn’t have enough resolution to print this photo big. Usually I print stuff at 300 DPI but since this was going to be 20×28 inches my 15 megapixel camera would only give me about 150 DPI at that big size. But I’m prepared for such events. I teach a class in digital prepress. That’s printing stuff.
One of the things I teach my students is that if you don’t have enough DPI for printing you have to get creative. Over the years I’ve developed a series of Photoshop filter recipes that use pattern, color, and texture to turn a photo into something closer to a drawing. I still like it to be close to a photo but since it’s not a continuous tone it can be printed bigger. As a matter of fact a lot of the effects work better at lower resolution.
So I took the photo of the two women, sized it 20×28 inches, and then started to find the right filter recipes on it. For the first time in making one of my prints or photos I also used my iPad in the process. One of the good things about modern iPads is that they apps on them work on photos at full resolution. This wasn’t the case in the past. My old iPad would always lower the resolution on photo before working on them. It just wasn’t a powerful enough machine for full 10-15 megapixel resolution.
Certain photo apps on the iPad do one or two things really well and I wanted to use those. I have an app that allows me to transfer things to and from my desktop hard drive so I pulled my full resolution photo over, worked on it with a couple of apps, and copied the photos back to my desktop computer. Since the new photos were the same resolution as the original I could load them into Photoshop as layers and they would snap right into place. That’s pretty cool.
It took me a few hours to get the photo looking like I wanted it to. I ended up using about half a dozen different filter recipes and effects all on different layers and mixes together by setting the layers to different opacities. It’s something I’ve done a lot with my 11×17 inch prints so it was familiar to me. I also added some boxes of color photos but I kept them geometric and fairly abstract. There are the lines of some stairs, concrete decorative building elements, and random foliage turned different colors. I kept it minimal because I knew I’d add a few more elements after I printed out and pasted up the full size image.
The printing process was pretty easy. I kept the rectangular pieces smaller than 8.5×11 inches so I could print them all out on letter size paper. Then I put some sticky 3M paper on the back of the photos and cut them all to size. This all took another few hours. After that it was line them up, peel the backing off to reveal the sticky paper, and put them down in place on a big piece of 22×30 inch drawing paper. Then I had to do the same with the boxes of color. They get pasted down on top of the photo.
As I looked at the big finished piece it would give me ideas for more color blocks. I think to myself, “I need some more green here” and then go make that green happen on the digital file. I’d print out some new color blocks and add them to the physical photo. The very last thing I did was put in those four red color blocks closest to their faces. That finished it for me. I knew I needed nothing else after I had those in.
Well, I wasn’t quite finished. One of the photo rectangles, the one containing the woman’s lips, looked like it had a flaw in it. It was just some stray pixels brought up by the process but I didn’t like it. It was all I could see. So I went back to the digital file to fix it. Three hours later I finally had it fixed. It took so long to do it was crazy. It took nearly as long to get that one small flaw right as to make the original file. Sometimes trouble shooting is the most time consuming part of making something. Though I’m glad I got the trouble fixed. Now I can look at this photo without that flaw being what I see first.