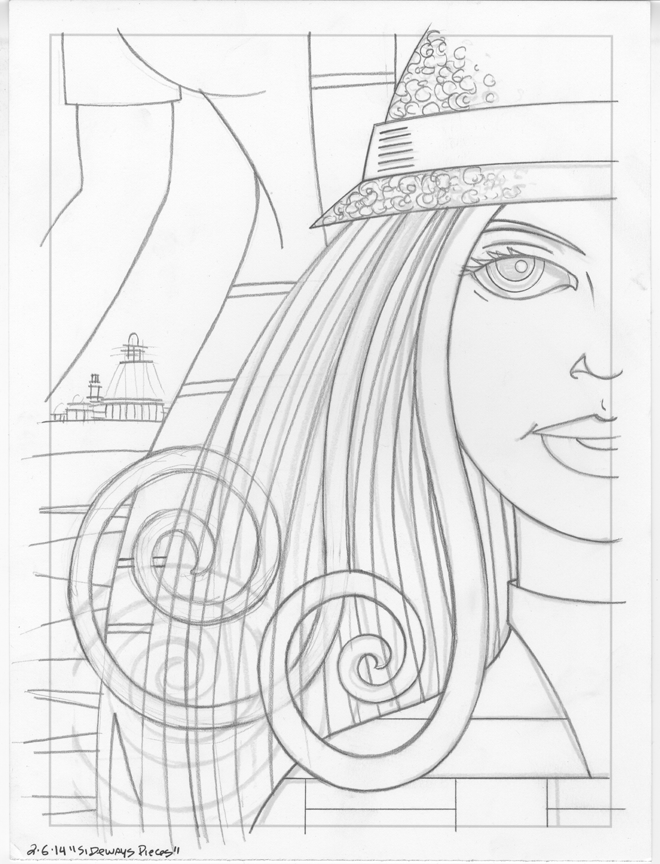
Pencil Drawing 9×12 Inches
This week I finally pulled out my big paper and black markers. By big paper I mean that it’s a full sheet of watercolor paper. That makes it 22×30 inches. With an inch of white border all around the final size of the drawings that I make on it are 20×28 inches. It’s been well over a year since I last made a black marker drawing that size. Back then I made about a half dozen of them and really enjoyed drawing in marker so large but life got in the way and I never got back to making any more. This week I finally decided to pull out the big paper and marker kit.
The paper I use for this is not my usual fancy and expensive watercolor paper. It’s cheap watercolor paper called Blick Studio Fabriano. It’s made by Dick Blick art supplies and Fabriano paper to be a low cost alternative watercolor paper for students and artists. I find it hard to even erase pencil off of this paper so I don’t know how good it would be for real watercolor work but for big black marker drawings it works well. It’s a couple of bucks a sheet rather than ten dollars.
The marker kit is a bunch of different style black Copic markers that I even bought a marker wallet for. I’ve got a regular black marker, a black sketch marker, and extra wide black marker, and one that I fitted with special calligraphy nibs. I use all these plus I have Copic black ink refills so I can constantly refill the markers as they get empty. And using them on large sheets of watercolor paper they get empty pretty quickly. I also have extra nibs to replace the marker tips that get damaged. Since I use French curves and straight edges in these drawings the marker tips can get beat up quite a bit. The felt fabric tip will shred.

Ink on Paper 20×28 Inches. Half way there.
The drawing that I made this week is titled “Sideways Pieces”. It’s named that because in looking through my pile of pencil drawings for something to make into an ink drawing I came across some old attempt at a comic strip named “Sideways”. I don’t even remember what the strip was about but I liked the woman’s face in the panel that was in front of me. It had no background though so I used a second panel of the same woman and digitally added it into the background. I then printed that out in blue line and drew over that to make a 9×12 inch pencil drawing. Then I had something to make a finished marker drawing out of.
If I was making a painting this size I normally would use a grid to transfer the drawing to canvas. But since this paper is hard to erase on (I’d have to draw the grid and erase it) I use graphite transfer paper to move the drawing over. Therefore I need a printout of the drawing the same size as the final drawing. I don’t have a 22×28 inch printer so I printed out the drawing on four 13×19 inch sheets of paper and then taped them together. After that I taped the drawing over the paper and in-between the two I place a sheet of graphite paper. I then take a hard 2H pencil and trace over the top of the drawing. The pressure of the pencil transfers the graphite from the graphite paper to the watercolor paper. This can be a tedious and messy process so I have to be careful. Once the drawing is transferred I remove the printout and graphite paper, clean things up, and redraw. The process of using graphite paper is less than perfect so I have to make sure the drawing looks good on the watercolor paper.
Now come the markers. Being that these drawings are black and white and very graphic looking with almost no shading I find myself using a lot of curves and straight edges with the markers to get things just so. I especially like the 24 inch adjustable ship’s curve that I bought years ago. It’s good for making long flowing curves with. I also use a few French curves for the smaller arcs I have to make. It’s important to keep the curves as clean as possible when using them like this. Since I’m using them with a marker I’m actually drawing on the edge of the curve with the marker ink. Too muck ink on the edge will get on my hands and then on the paper. I want the white parts of the drawing really white so I try to avoid that and wash my edges twice a day or so.
This drawing is all about the face. One of my favorite subjects. Well, the face and those two large spirals of hair. Plus the deep negative space of the background. There is a bit going on here. More than half of the drawing is taken up by the woman and her hair but since half of her face is off-stage then the drawing isn’t totally about her. She’s the star but the woman behind her is a co-star. Though we only get a hint of her so she’s not a big co-star. Her booking might even be beneath the negative space between her arm and body and its op-art effect.
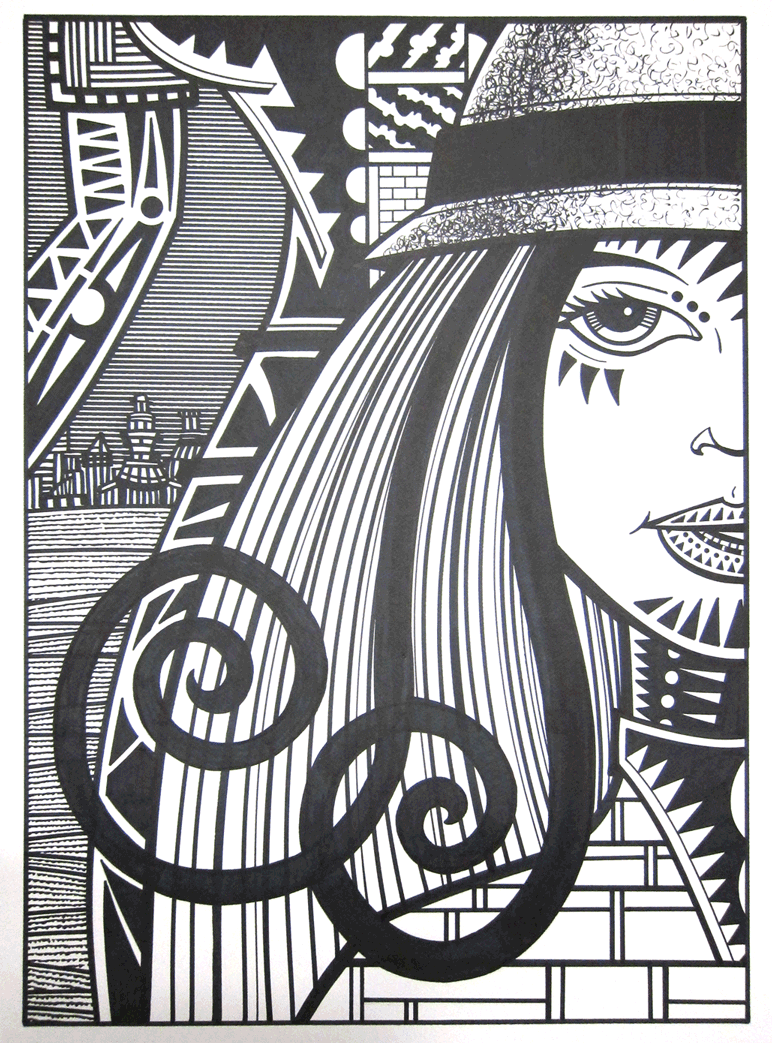
Ink on Paper 20×28 Inches. Finished.
This drawing and this style of drawing are very much about shape and technique. Most of the black shapes such as on the woman’s neck and face are not even in my initial pencil drawing. All those black shapes in the woman’s arm and on her dress are drawn in after I make the original black line drawing. Once I use the markers and curves to make the initial drawing I like to see what I can see. I look for the shapes that suggest themselves. That’s when I draw them in with a light 2H pencil to get them just right before committing to ink.
I also use my Haff hatching machine with these. That’s how I got those straight and parallel lines that make up the sky. The Haff is like a little t-square that’s attached to an arm. When you press down on the little lever/button the arm moves down from one to ten millimeters. Whatever you set it to. Then you move the marker along the straight edge to make a straight line, hit the button, make another line. Easy to use and I like the results.
Yeah, it was good to get back to this type of drawing. They’re so big and hard to scan in that it’s not easy to show them off but oh well. I can’t make 5×7 inch drawings all the time.
Discussion ¬